"8cf381d830761a9b"{"id":"24474","slug":"make-a-multiplayer-game-in-unity","title":"Make a Multiplayer Game in Unity","category":"Unity","engine":"Video language: English","assetVersion":"Video language: English","engineVersion":"File content: video + supporting files + English subtitles","tag":"Unity","accent":"violet","visual":"mech","summary":"This Unity course walks through building a multiplayer game that connects to Photon Unity Network, spawns players over a network, and keeps key stats synchronized. It also covers menus, game modes, multiple levels, and room handling in a single project flow.","platform":"Unity","updatedAt":"2026-04-20","sourceNotes":[],"fileContents":[],"compatibility":["Unity","Video language: English","File content: video + supporting files + English subtitles"],"featuredImage":{"alt":"Make a Multiplayer Game in Unity","src":"https://3dcghub.com/wp-content/uploads/2026/04/7d16db9eaddb_5539734_b95e.webp"},"hasDownloadLink":true,"galleryImages":[],"accessPanel":{"kind":"video-resource","title":"Access this video resource","eyebrow":"Free video resource","message":"Sign in or create an account to continue to the protected video package through the managed storage service.","fileName":"Make a Multiplayer Game in Unity.rar","safetyNote":"All resources are 100% manually reviewed to eliminate all risks.","actionLabel":"Download Free","resourceType":"Video package","sourceShortcode":"cryptomus_video"},"contentHtml":"\u003cp\u003eMake a Multiplayer Game in Unity follows a clear build path through a networked project. The work starts with a character setup, moves into server connection and Photon Unity Network, then adds menus, gameplay, multiple levels, and room handling. It is framed as professional game design and listed for all levels, so the material stays broad enough to show a complete multiplayer workflow without narrowing itself to one isolated feature.\u003c/p\u003e \u003ch2\u003eFrom character setup to the first connection\u003c/h2\u003e \u003cp\u003eThe early part of the curriculum focuses on introduction, setting up a character, and connecting to a server. That sequence gives the project a usable base before multiplayer behavior is layered on top. In a real Unity production workflow, that is the point where a project stops being only a local scene and starts taking shape as something networked.\u003c/p\u003e \u003cp\u003eStarting there makes the course relevant for developers who need to move from a basic playable character into an online structure. The order is practical: establish the character, establish the connection, and then continue into the systems that make the game behave correctly for more than one player.\u003c/p\u003e \u003ch2\u003ePhoton Unity Network and the multiplayer layer\u003c/h2\u003e \u003cp\u003eConnecting to Photon Unity Network is one of the main technical steps. Alongside that, the course covers networking scripting, spawning players over a network, and displaying key stats across the network. Those topics define the core of a multiplayer game build, because they handle how players appear, how state is sent, and how shared information stays visible to everyone in the session.\u003c/p\u003e \u003cp\u003eThis is the part that matters most for a prototype needing actual multiplayer behavior rather than a local stand-in. A project at this stage needs the networking layer to do more than connect; it needs to coordinate player entry, state display, and the basic scripting that keeps the game responsive across the network. The course keeps all of those parts in the same build path, which makes it easier to see how they support one another inside Unity.\u003c/p\u003e \u003ch2\u003eMenus, user interface, gameplay, and game modes\u003c/h2\u003e \u003cp\u003eAfter the networking foundation, the curriculum moves into menus and user interface, then gameplay, then game modes. That order reflects how many Unity projects are assembled in practice: first the project needs a way for players to move through the experience, then it needs the actual play loop, and then it needs structure around that loop.\u003c/p\u003e \u003cp\u003eThe presence of multiple levels adds another layer to that structure. A single test scene can show that networking works, but multiple levels make the project feel closer to a playable build with progression or scene changes. For developers planning a small multiplayer game, that makes the course useful beyond a quick technical demo because it connects the front-end screens with the gameplay layer and the level flow.\u003c/p\u003e \u003ch2\u003eRoom management and keeping sessions tidy\u003c/h2\u003e \u003cp\u003eLeaving rooms and removing data are also part of the learning path. Those details can be easy to overlook when the focus is only on joining a session or spawning players, but they matter when a multiplayer project has to handle exits cleanly. A room-based setup needs to know what happens when players leave and how session data is cleared out afterward.\u003c/p\u003e \u003cp\u003eIncluding that step gives the project a more complete multiplayer loop. Instead of stopping at the moment of connection, the course reaches the point where sessions can end and the network state can be reset. That is useful for anyone thinking about repeated testing, play sessions, or a multiplayer prototype that has to be started and closed more than once.\u003c/p\u003e \u003ch2\u003eHow the course fits a Unity production workflow\u003c/h2\u003e \u003cp\u003eThe curriculum runs through introduction, setting up a character, connecting to a server, menus and user interface, gameplay, game modes, and a bonus section. That sequence places the work in a familiar Unity development rhythm: start with setup, move into connection, build the player-facing screens, then lock in the core mechanics and the way the game is played. The course also runs for 10 hours 26 minutes, which gives the material enough room to cover several connected systems rather than only one narrow feature.\u003c/p\u003e \u003cp\u003eIt is aimed at anyone wanting to make their own Unity multiplayer games, so the practical value sits in showing how the pieces fit together inside one project. For a developer planning a networked game in Unity, the strongest takeaway is the order of work: character, server, Photon Unity Network, player spawning, synchronized stats, rooms, menus, gameplay, levels, and cleanup. That is a usable blueprint for a first multiplayer build.\u003c/p\u003e\n\n\u003ch2\u003eRelated Resources Worth Checking\u003c/h2\u003e\n\u003cul\u003e\n\u003cli\u003e\u003ca href=\"https://3dcghub.com/stylized-grass-shader-for-unity-2021-2023/\" title=\"Stylized Grass Shader (for Unity 2021-2023)\"\u003eStylized Grass Shader (for Unity 2021-2023)\u003c/a\u003e\u003c/li\u003e\n\u003cli\u003e\u003ca href=\"https://3dcghub.com/make-a-horror-survival-game-in-unity/\" title=\"Make a horror survival game in Unity\"\u003eMake a horror survival game in Unity\u003c/a\u003e\u003c/li\u003e\n\u003cli\u003e\u003ca href=\"https://3dcghub.com/unity-shader-programming-beginners-to-advanced-techniques/\" title=\"Unity Shader Programming: Beginners to Advanced Techniques\"\u003eUnity Shader Programming: Beginners to Advanced Techniques\u003c/a\u003e\u003c/li\u003e\n\u003cli\u003e\u003ca href=\"https://3dcghub.com/mastering-editor-scripting-in-unity/\" title=\"Mastering Editor Scripting in Unity\"\u003eMastering Editor Scripting in Unity\u003c/a\u003e\u003c/li\u003e\n\u003cli\u003e\u003ca href=\"https://3dcghub.com/altos-volumetric-clouds-skybox-and-weather-for-unity-urp/\" title=\"Altos – Volumetric Clouds, Skybox, and Weather for Unity URP\"\u003eAltos – Volumetric Clouds, Skybox, and Weather for Unity URP\u003c/a\u003e\u003c/li\u003e\n\u003c/ul\u003e","contentTextLength":4895,"navigation":{"current":1746,"total":2470,"previous":{"id":"24458","slug":"vfx-graph-level-up-effects-vol-1","title":"VFX Graph - Level Up Effects - Vol. 1","category":"VFX","platform":"Unity","updatedAt":"2026-04-20"},"next":{"id":"24477","slug":"learn-to-create-advance-metroidvania-game-with-unity-c","title":"Learn to create advance Metroidvania game with Unity \u0026 C#","category":"Unity","platform":"Unity","updatedAt":"2026-04-20"}},"relatedResources":[{"id":"24514","slug":"create-2d-multiplayer-game-with-photon-in-unity","title":"Create 2D Multiplayer Game with photon in unity","category":"Unity","engine":"Video language: English","assetVersion":"Video language: English","engineVersion":"File content: video + supporting files + English subtitles","tag":"Unity","accent":"violet","visual":"mech","summary":"This Unity workflow follows the build of a 2D multiplayer game with Photon from the first menu screens through player setup, UI, enemies, and progression systems. It also includes mobile joystick support, game sound, and a range character type.","platform":"Unity","updatedAt":"2026-04-20","sourceNotes":[],"fileContents":[],"compatibility":["Unity","Video language: English","File content: video + supporting files + English subtitles"],"featuredImage":{"alt":"Create 2D Multiplayer Game with photon in unity","src":"https://3dcghub.com/wp-content/uploads/2026/04/d0bd75435e19_4751476_9c73.webp"},"hasDownloadLink":true},{"id":"24285","slug":"make-a-horror-survival-game-in-unity","title":"Make a horror survival game in Unity","category":"Unity","engine":"Video language: English","assetVersion":"Video language: English","engineVersion":"File content: video + supporting files + English subtitles","tag":"Unity","accent":"cyan","visual":"city","summary":"This Unity course follows a complete horror survival project from setup through combat, menus, and export. It moves through player control, inventory handling, zombie encounters, save systems, and a final boss scene in a clear production order.","platform":"Unity","updatedAt":"2026-04-19","sourceNotes":[],"fileContents":[],"compatibility":["Unity","Video language: English","File content: video + supporting files + English subtitles"],"featuredImage":{"alt":"Make a horror survival game in Unity","src":"https://3dcghub.com/wp-content/uploads/2026/04/9d184af1a92b_2390368_3d6f_4.webp"},"hasDownloadLink":true},{"id":"24551","slug":"egg-snatchers-fun-local-multiplayer-game-in-unity-netcode","title":"Egg Snatchers - Fun Local Multiplayer Game in Unity Netcode","category":"Unity","engine":"Video language: English","assetVersion":"Video language: English","engineVersion":"File content: video + supporting files + English subtitles","tag":"Unity","accent":"teal","visual":"luts","summary":"Egg Snatchers focuses on a local multiplayer game flow where players connect on the same network, move through shared scenes, and interact with systems like eggs, fills, powerups, and combat. It also folds in object-oriented principles, clean code, and Unit...","platform":"Unity","updatedAt":"2026-04-20","sourceNotes":[],"fileContents":[],"compatibility":["Unity","Video language: English","File content: video + supporting files + English subtitles"],"featuredImage":{"alt":"Egg Snatchers - Fun Local Multiplayer Game in Unity Netcode","src":"https://3dcghub.com/wp-content/uploads/2026/04/4ef93fa18069_6112557_404e_5.webp"},"hasDownloadLink":true}]}
Unity
Make a Multiplayer Game in Unity
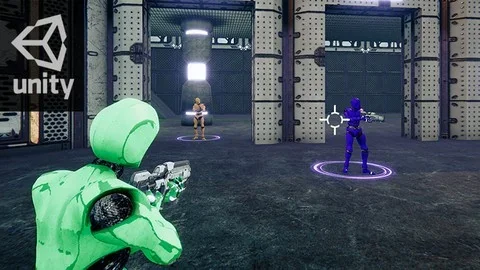
This Unity course walks through building a multiplayer game that connects to Photon Unity Network, spawns players over a network, and keeps key stats synchronized. It also covers menus, game modes, multiple levels, and room handling in a single project flow.
Platform: UnityVideo language: EnglishFile content: video + supporting files + English subtitlesUpdated 2026-04-20
Unity
Resource overview
Make a Multiplayer Game in Unity follows a clear build path through a networked project. The work starts with a character setup, moves into server connection and Photon Unity Network, then adds menus, gameplay, multiple levels, and room handling. It is framed as professional game design and listed for all levels, so the material stays broad enough to show a complete multiplayer workflow without narrowing itself to one isolated feature.
From character setup to the first connection
The early part of the curriculum focuses on introduction, setting up a character, and connecting to a server. That sequence gives the project a usable base before multiplayer behavior is layered on top. In a real Unity production workflow, that is the point where a project stops being only a local scene and starts taking shape as something networked.
Starting there makes the course relevant for developers who need to move from a basic playable character into an online structure. The order is practical: establish the character, establish the connection, and then continue into the systems that make the game behave correctly for more than one player.
Photon Unity Network and the multiplayer layer
Connecting to Photon Unity Network is one of the main technical steps. Alongside that, the course covers networking scripting, spawning players over a network, and displaying key stats across the network. Those topics define the core of a multiplayer game build, because they handle how players appear, how state is sent, and how shared information stays visible to everyone in the session.
This is the part that matters most for a prototype needing actual multiplayer behavior rather than a local stand-in. A project at this stage needs the networking layer to do more than connect; it needs to coordinate player entry, state display, and the basic scripting that keeps the game responsive across the network. The course keeps all of those parts in the same build path, which makes it easier to see how they support one another inside Unity.
Menus, user interface, gameplay, and game modes
After the networking foundation, the curriculum moves into menus and user interface, then gameplay, then game modes. That order reflects how many Unity projects are assembled in practice: first the project needs a way for players to move through the experience, then it needs the actual play loop, and then it needs structure around that loop.
The presence of multiple levels adds another layer to that structure. A single test scene can show that networking works, but multiple levels make the project feel closer to a playable build with progression or scene changes. For developers planning a small multiplayer game, that makes the course useful beyond a quick technical demo because it connects the front-end screens with the gameplay layer and the level flow.
Room management and keeping sessions tidy
Leaving rooms and removing data are also part of the learning path. Those details can be easy to overlook when the focus is only on joining a session or spawning players, but they matter when a multiplayer project has to handle exits cleanly. A room-based setup needs to know what happens when players leave and how session data is cleared out afterward.
Including that step gives the project a more complete multiplayer loop. Instead of stopping at the moment of connection, the course reaches the point where sessions can end and the network state can be reset. That is useful for anyone thinking about repeated testing, play sessions, or a multiplayer prototype that has to be started and closed more than once.
How the course fits a Unity production workflow
The curriculum runs through introduction, setting up a character, connecting to a server, menus and user interface, gameplay, game modes, and a bonus section. That sequence places the work in a familiar Unity development rhythm: start with setup, move into connection, build the player-facing screens, then lock in the core mechanics and the way the game is played. The course also runs for 10 hours 26 minutes, which gives the material enough room to cover several connected systems rather than only one narrow feature.
It is aimed at anyone wanting to make their own Unity multiplayer games, so the practical value sits in showing how the pieces fit together inside one project. For a developer planning a networked game in Unity, the strongest takeaway is the order of work: character, server, Photon Unity Network, player spawning, synchronized stats, rooms, menus, gameplay, levels, and cleanup. That is a usable blueprint for a first multiplayer build.
 Unity
Unity Unity
Unity Unity
Unity Unity
Unity