"268893c7adc68efc"{"id":"24285","slug":"make-a-horror-survival-game-in-unity","title":"Make a horror survival game in Unity","category":"Unity","engine":"Video language: English","assetVersion":"Video language: English","engineVersion":"File content: video + supporting files + English subtitles","tag":"Unity","accent":"cyan","visual":"city","summary":"This Unity course follows a complete horror survival project from setup through combat, menus, and export. It moves through player control, inventory handling, zombie encounters, save systems, and a final boss scene in a clear production order.","platform":"Unity","updatedAt":"2026-04-19","sourceNotes":[],"fileContents":[],"compatibility":["Unity","Video language: English","File content: video + supporting files + English subtitles"],"featuredImage":{"alt":"Make a horror survival game in Unity","src":"https://3dcghub.com/wp-content/uploads/2026/04/9d184af1a92b_2390368_3d6f_4.webp"},"hasDownloadLink":true,"galleryImages":[],"accessPanel":{"kind":"video-resource","title":"Access this video resource","eyebrow":"Free video resource","message":"Sign in or create an account to continue to the protected video package through the managed storage service.","fileName":"Make a horror survival game in Unity.rar","safetyNote":"All resources are 100% manually reviewed to eliminate all risks.","actionLabel":"Download Free","resourceType":"Video package","sourceShortcode":"cryptomus_video"},"contentHtml":"\u003ch2\u003eA first-person horror project that grows into a full playable loop\u003c/h2\u003e \u003cp\u003eMake a Horror Survival Game in Unity follows a complete Unity 2021 project from the first setup steps to exporting the finished game. It starts with the basics, then moves into the systems that make a horror survival scene feel active: post processing for stronger visuals, a first person player, inventory handling, doors, pickups, enemies, combat, menus, and progression.\u003c/p\u003e \u003cp\u003eThe course runs for 67h 53m, so the material has space to move through a production-style workflow instead of jumping straight to isolated tricks. That makes it useful as a guided path through a full build, where each stage connects to the next one. The result is not just a set of separate lessons, but a single project that keeps expanding as new systems are added.\u003c/p\u003e \u003cp\u003eIt is aimed at all levels, and the coding is presented in an easy-to-understand way. Beginners can follow the foundation steps, while more experienced learners still get room to work with intermediate level coding and expand the project during development.\u003c/p\u003e \u003ch2\u003eWhat gets built into the game\u003c/h2\u003e \u003cp\u003eThe project introduces the core pieces that make the horror survival loop work. The learning path includes a player character, pickups, an inventory screen, combining items, opening doors, attacking enemies, shooting the gun, and throwing weapons. Combat is not limited to one approach; melee, guns, and throwable weapons are all part of the build.\u003c/p\u003e \u003cp\u003eEnemy work also gets significant attention. Zombies appear early in the curriculum, followed by zombie attacks, spawning, enemies, new enemies, and intelligent AI. That creates a progression from simple threats to more involved behavior, which is a practical way to develop tension in a survival game.\u003c/p\u003e \u003cul\u003e \u003cli\u003ePost processing for stronger visual presentation\u003c/li\u003e \u003cli\u003eFirst person player control\u003c/li\u003e \u003cli\u003eInventory screen and interactive inventory menu\u003c/li\u003e \u003cli\u003ePickups, item combination, and door systems\u003c/li\u003e \u003cli\u003eZombie encounters, attacks, spawning, and AI\u003c/li\u003e \u003cli\u003eMelee combat, gun shooting, and throwing weapons\u003c/li\u003e \u003c/ul\u003e \u003cp\u003eBecause the build keeps returning to these systems from different angles, the course gives a clear view of how a survival game stays connected. Inventory is not treated as a separate menu exercise. It links to pickups, item combinations, and door progression. Combat is not just one attack lesson. It connects to enemy behavior, weapons, and the wider pace of the level.\u003c/p\u003e \u003ch2\u003eMenus, UI, and the flow between scenes\u003c/h2\u003e \u003cp\u003eThe project also spends time on the parts that frame gameplay rather than sit inside it. A custom load screen, a main menu, an options menu, and user interface work all appear in the curriculum. Those systems matter because they help the game move cleanly from one state to another, whether the player is starting the game, adjusting settings, or managing items during play.\u003c/p\u003e \u003cp\u003eThe course includes a main menu more than once in the curriculum, along with an options menu and updated content for post processing, sounds and music, and UI. That makes the menu side of the project feel like part of the build, not an afterthought. The same is true of the save system, which sits alongside the rest of the gameplay structure rather than being isolated from it.\u003c/p\u003e \u003cp\u003eLevel design appears later in the workflow, after the core player, enemy, and menu systems are already in place. That order matters in practice. It means the project first establishes how the game plays, then shapes the spaces around that play. An animated cut scene and a final boss scene appear near the end, giving the project a stronger endpoint instead of leaving it as a collection of mechanics.\u003c/p\u003e \u003ch2\u003eWhere it fits in a real Unity workflow\u003c/h2\u003e \u003cp\u003eThis course fits best where a project needs a structured path from foundation to finish. It begins with setup, then moves through the player, inventory screen, pickups, doors, combining items, zombies, spawning, and final layout. Later sections add main menu work, sounds and music, UI, enemies, shooting, save handling, level design, and the final boss scene before exporting the game.\u003c/p\u003e \u003cp\u003eThat sequence makes it practical for someone who wants to see how a horror survival game comes together in Unity without breaking the process into disconnected demonstrations. The project includes room for fun activities to make the game your own, and it also adds bonus videos for extra material. For learners who want a complete first person horror survival workflow, the strongest takeaway is simple: the course covers the full path from setup and core mechanics through menus, saves, boss content, and export in one continuous build.\u003c/p\u003e\n\n\u003ch2\u003eExplore Similar Assets\u003c/h2\u003e\n\u003cul\u003e\n\u003cli\u003e\u003ca href=\"https://3dcghub.com/unity-shader-programming-beginners-to-advanced-techniques/\" title=\"Unity Shader Programming: Beginners to Advanced Techniques\"\u003eUnity Shader Programming: Beginners to Advanced Techniques\u003c/a\u003e\u003c/li\u003e\n\u003cli\u003e\u003ca href=\"https://3dcghub.com/mastering-editor-scripting-in-unity/\" title=\"Mastering Editor Scripting in Unity\"\u003eMastering Editor Scripting in Unity\u003c/a\u003e\u003c/li\u003e\n\u003cli\u003e\u003ca href=\"https://3dcghub.com/altos-volumetric-clouds-skybox-and-weather-for-unity-urp/\" title=\"Altos – Volumetric Clouds, Skybox, and Weather for Unity URP\"\u003eAltos – Volumetric Clouds, Skybox, and Weather for Unity URP\u003c/a\u003e\u003c/li\u003e\n\u003cli\u003e\u003ca href=\"https://3dcghub.com/toolkit-for-unity-physics-2026/\" title=\"Toolkit for Unity Physics 2026\"\u003eToolkit for Unity Physics 2026\u003c/a\u003e\u003c/li\u003e\n\u003cli\u003e\u003ca href=\"https://3dcghub.com/opencv-for-unity/\" title=\"OpenCV for Unity\"\u003eOpenCV for Unity\u003c/a\u003e\u003c/li\u003e\n\u003c/ul\u003e","contentTextLength":4784,"navigation":{"current":1730,"total":2549,"previous":{"id":"24282","slug":"level-design-master-class-all-in-one-complete-course","title":"Level Design Master Class: All in One Complete Course","category":"Unity","platform":"Unity","updatedAt":"2026-04-19"},"next":{"id":"24299","slug":"ice-world-2","title":"Ice World","category":"Shaders","platform":"Unity","updatedAt":"2026-04-20"}},"relatedResources":[{"id":"24474","slug":"make-a-multiplayer-game-in-unity","title":"Make a Multiplayer Game in Unity","category":"Unity","engine":"Video language: English","assetVersion":"Video language: English","engineVersion":"File content: video + supporting files + English subtitles","tag":"Unity","accent":"violet","visual":"mech","summary":"This Unity course walks through building a multiplayer game that connects to Photon Unity Network, spawns players over a network, and keeps key stats synchronized. It also covers menus, game modes, multiple levels, and room handling in a single project flow.","platform":"Unity","updatedAt":"2026-04-20","sourceNotes":[],"fileContents":[],"compatibility":["Unity","Video language: English","File content: video + supporting files + English subtitles"],"featuredImage":{"alt":"Make a Multiplayer Game in Unity","src":"https://3dcghub.com/wp-content/uploads/2026/04/7d16db9eaddb_5539734_b95e.webp"},"hasDownloadLink":true},{"id":"24514","slug":"create-2d-multiplayer-game-with-photon-in-unity","title":"Create 2D Multiplayer Game with photon in unity","category":"Unity","engine":"Video language: English","assetVersion":"Video language: English","engineVersion":"File content: video + supporting files + English subtitles","tag":"Unity","accent":"violet","visual":"mech","summary":"This Unity workflow follows the build of a 2D multiplayer game with Photon from the first menu screens through player setup, UI, enemies, and progression systems. It also includes mobile joystick support, game sound, and a range character type.","platform":"Unity","updatedAt":"2026-04-20","sourceNotes":[],"fileContents":[],"compatibility":["Unity","Video language: English","File content: video + supporting files + English subtitles"],"featuredImage":{"alt":"Create 2D Multiplayer Game with photon in unity","src":"https://3dcghub.com/wp-content/uploads/2026/04/d0bd75435e19_4751476_9c73.webp"},"hasDownloadLink":true},{"id":"24541","slug":"make-a-match-three-puzzle-game-in-unity","title":"Make a Match-Three Puzzle Game in Unity","category":"Unity","engine":"Video language: English","assetVersion":"Video language: English","engineVersion":"File content: video + supporting files + English subtitles","tag":"Unity","accent":"rose","visual":"audio","summary":"Make a Match-Three Puzzle Game in Unity is a 16h 9m intermediate course focused on building a tile-based 2D puzzle game from scratch. It suits Unity developers who already know basic C# scripting and want a structured path from core mechanics to mobile-read...","platform":"Unity","updatedAt":"2026-04-20","sourceNotes":[],"fileContents":[],"compatibility":["Unity","Video language: English","File content: video + supporting files + English subtitles"],"featuredImage":{"alt":"Make a Match-Three Puzzle Game in Unity","src":"https://3dcghub.com/wp-content/uploads/2026/04/884cab9427a1_942002_8051.webp"},"hasDownloadLink":true}]}
Unity
Make a horror survival game in Unity
This Unity course follows a complete horror survival project from setup through combat, menus, and export. It moves through player control, inventory handling, zombie encounters, save systems, and a final boss scene in a clear production order.
Platform: UnityVideo language: EnglishFile content: video + supporting files + English subtitlesUpdated 2026-04-19
Unity
Resource overview
A first-person horror project that grows into a full playable loop
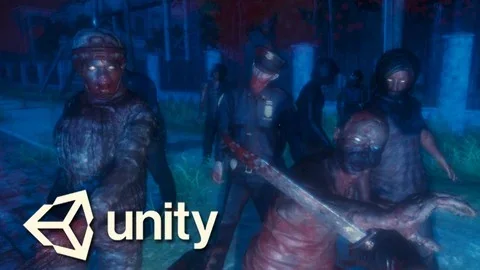
Make a Horror Survival Game in Unity follows a complete Unity 2021 project from the first setup steps to exporting the finished game. It starts with the basics, then moves into the systems that make a horror survival scene feel active: post processing for stronger visuals, a first person player, inventory handling, doors, pickups, enemies, combat, menus, and progression.
The course runs for 67h 53m, so the material has space to move through a production-style workflow instead of jumping straight to isolated tricks. That makes it useful as a guided path through a full build, where each stage connects to the next one. The result is not just a set of separate lessons, but a single project that keeps expanding as new systems are added.
It is aimed at all levels, and the coding is presented in an easy-to-understand way. Beginners can follow the foundation steps, while more experienced learners still get room to work with intermediate level coding and expand the project during development.
What gets built into the game
The project introduces the core pieces that make the horror survival loop work. The learning path includes a player character, pickups, an inventory screen, combining items, opening doors, attacking enemies, shooting the gun, and throwing weapons. Combat is not limited to one approach; melee, guns, and throwable weapons are all part of the build.
Enemy work also gets significant attention. Zombies appear early in the curriculum, followed by zombie attacks, spawning, enemies, new enemies, and intelligent AI. That creates a progression from simple threats to more involved behavior, which is a practical way to develop tension in a survival game.
Post processing for stronger visual presentation
First person player control
Inventory screen and interactive inventory menu
Pickups, item combination, and door systems
Zombie encounters, attacks, spawning, and AI
Melee combat, gun shooting, and throwing weapons
Because the build keeps returning to these systems from different angles, the course gives a clear view of how a survival game stays connected. Inventory is not treated as a separate menu exercise. It links to pickups, item combinations, and door progression. Combat is not just one attack lesson. It connects to enemy behavior, weapons, and the wider pace of the level.
Menus, UI, and the flow between scenes
The project also spends time on the parts that frame gameplay rather than sit inside it. A custom load screen, a main menu, an options menu, and user interface work all appear in the curriculum. Those systems matter because they help the game move cleanly from one state to another, whether the player is starting the game, adjusting settings, or managing items during play.
The course includes a main menu more than once in the curriculum, along with an options menu and updated content for post processing, sounds and music, and UI. That makes the menu side of the project feel like part of the build, not an afterthought. The same is true of the save system, which sits alongside the rest of the gameplay structure rather than being isolated from it.
Level design appears later in the workflow, after the core player, enemy, and menu systems are already in place. That order matters in practice. It means the project first establishes how the game plays, then shapes the spaces around that play. An animated cut scene and a final boss scene appear near the end, giving the project a stronger endpoint instead of leaving it as a collection of mechanics.
Where it fits in a real Unity workflow
This course fits best where a project needs a structured path from foundation to finish. It begins with setup, then moves through the player, inventory screen, pickups, doors, combining items, zombies, spawning, and final layout. Later sections add main menu work, sounds and music, UI, enemies, shooting, save handling, level design, and the final boss scene before exporting the game.
That sequence makes it practical for someone who wants to see how a horror survival game comes together in Unity without breaking the process into disconnected demonstrations. The project includes room for fun activities to make the game your own, and it also adds bonus videos for extra material. For learners who want a complete first person horror survival workflow, the strongest takeaway is simple: the course covers the full path from setup and core mechanics through menus, saves, boss content, and export in one continuous build.
 Unity
Unity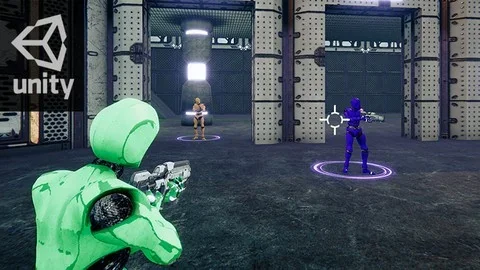 Unity
Unity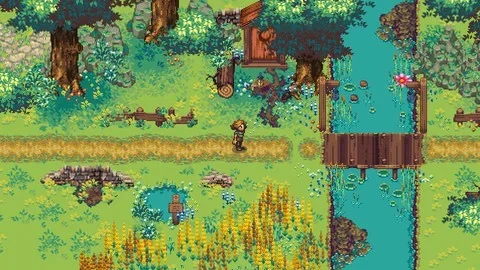 Unity
Unity Unity
Unity