"750ec32d29daad5e"{"id":"27443","slug":"procedural-mesh-blueprint","title":"Procedural Mesh Blueprint","category":"Procedural Systems","engine":"V2","assetVersion":"Engine version: 5.4+","engineVersion":"Asset Version: V2","tag":"Procedural Systems","accent":"blue","visual":"animation","summary":"Procedural Mesh Blueprint uses PCG to place child meshes on a parent mesh with a drag-and-drop workflow for environment artists. It focuses on overgrown details such as moss, grass, ivy, vines, and roots, while also supporting conversion back to static meshes.","platform":"Unreal Engine","publishedAt":"2026-04-25T12:18:37.000Z","updatedAt":"2026-07-05T06:17:14.277Z","sourceNotes":[],"fileContents":[],"compatibility":["Unreal Engine","Engine version: 5.4+","Asset Version: V2"],"featuredImage":{"alt":"Procedural Mesh Blueprint","src":"https://3dcghub.com/wp-content/uploads/2026/04/9f239b1c495b_e8794242-68b2-45e1-84c7-de84a7b8a153.webp"},"hasDownloadLink":true,"pageviews":11,"galleryImages":[{"src":"https://3dcghub.com/wp-content/uploads/2026/04/4fd738694d90_879628c3-96d5-4107-9f50-35093c00b2a6.webp","alt":"Procedural Mesh Blueprint"},{"src":"https://3dcghub.com/wp-content/uploads/2026/04/50bb6c5a674e_504f5f96-28d7-4a69-8b8c-60c90d6065f7.webp","alt":"Procedural Mesh Blueprint"},{"src":"https://3dcghub.com/wp-content/uploads/2026/04/5c8d19ffc54c_0e46f4bf-a4f6-4b40-baa7-12cf881090a6.webp","alt":"Procedural Mesh Blueprint"},{"src":"https://3dcghub.com/wp-content/uploads/2026/04/73dd10ad0892_a10a1a26-8f7b-42e2-96e8-eaa0fe645cf5.webp","alt":"Procedural Mesh Blueprint"},{"src":"https://3dcghub.com/wp-content/uploads/2026/04/a1ddb89721bf_9a05957b-b3cc-4f28-9cfd-3b8652fe8a18.webp","alt":"Procedural Mesh Blueprint"}],"accessPanel":{"kind":"resource","title":"Access this resource","eyebrow":"Free protected download","message":"Sign in or create an account to continue to the protected download through the managed storage service.","fileName":"Content.7z","safetyNote":"All resources are 100% manually reviewed to eliminate all risks.","actionLabel":"Download Free","resourceType":"Resource archive","sourceShortcode":"cryptomus_member"},"contentHtml":"\u003ch2\u003eParent mesh swapping and PCG-driven child meshes\u003c/h2\u003e\n\u003cp\u003eProcedural Mesh Blueprint centers on a straightforward environment workflow: drag in a static mesh, treat it as the parent, and generate child meshes onto it through PCG. The setup is aimed at adding surface detail without manual placement, so a rock, prop, or other scene object can carry overgrown elements such as moss or grass directly through the blueprint.\u003c/p\u003e\n\u003cp\u003eThe blueprint supports dynamically swapping the parent mesh by drag-and-drop, which makes it useful when the same setup needs to be tested across different assets. Child mesh arrays can also be added, removed, and swapped dynamically, so the generated result is not locked to a single detail set. That keeps the tool focused on iteration rather than on building one fixed decorative arrangement.\u003c/p\u003e\n\u003cp\u003eThe overall idea is simple: environment artists can attach procedural growth to a base mesh and let the system handle the placement of the child elements. The workflow is presented as artist-friendly and avoids the need to manually paint foliage on rocks or similar surfaces just to get a believable overgrown look.\u003c/p\u003e \u003ch2\u003eControls that shape the growth on the parent mesh\u003c/h2\u003e\n\u003cp\u003eThe blueprint includes parameters that control the falloff amount of the PCG-generated child meshes as well as pruning. Those controls matter because they change how dense or reduced the generated growth appears on the parent surface, giving the result a more deliberate shape instead of a uniform blanket of detail.\u003c/p\u003e\n\u003cp\u003eThere are also toggles for absolute scaling of the child mesh and for inverting them on the parent mesh. In the current version, the older \u003cem\u003eInvert Child Meshes\u003c/em\u003e Option has been removed and replaced with \u003cem\u003eVertical Mesh Amount\u003c/em\u003e, which makes it possible to generate additional separate child meshes along the XY axis of parent meshes. That change is aimed at cases like ivy, vines, and roots that need extra layers or runs of detail along the side of a mesh rather than only on its surface.\u003c/p\u003e\n\u003cp\u003eParameter hover states now include short descriptions, which makes the blueprint easier to read while adjusting values. That small addition fits the rest of the workflow, which is built around quick visual iteration instead of a heavy technical setup.\u003c/p\u003e \u003ch2\u003eVersion 2, reconnect behavior, and the saved graph\u003c/h2\u003e\n\u003cp\u003eThe blueprint and PCG graph are saved as \u003cem\u003eV2\u003c/em\u003e, keeping the updated setup separate from the earlier version. That means the revised blueprint exists as its own saved version rather than replacing the previous one. The update also keeps the newer parameter behavior and the revised child-mesh generation logic together in the same saved setup.\u003c/p\u003e\n\u003cp\u003eIf the child mesh PCG does not function right away, it only needs to be reconnected once. After that reconnect step, it continues to work going forward. A short guide for that reconnect step is included with the blueprint guide documentation, which suggests the workflow expects a quick initial setup adjustment before everything runs smoothly.\u003c/p\u003e\n\u003cp\u003eThe blueprint also includes the ability to break the PCG link and separate the parent and child meshes, along with their associated materials, so the result can be converted to static meshes. That makes the setup useful not only for procedural placement, but also for turning the generated arrangement into a more permanent asset state when needed.\u003c/p\u003e \u003ch2\u003eWhat the package is set up to handle in a scene\u003c/h2\u003e\n\u003cp\u003eThis blueprint is a strong fit for overgrown environment work where static meshes need quick procedural dressing. The clearest examples are rocks covered with moss or grass, but the same system also supports ivy, vines, and roots running along a parent mesh. Those are the kinds of details that usually take time to place by hand, especially when the same treatment needs to be repeated across multiple assets in a scene.\u003c/p\u003e\n\u003cp\u003eThe required plugins are \u003cem\u003ePCG\u003c/em\u003e And \u003cem\u003ePCGGeometryScriptInterop\u003c/em\u003e, which must be enabled for the blueprint to function. The setup also comes with sample meshes and associated textures, and those placeholders account for the nearly 1.8GB file size. They are only there to show what the blueprint can do visually, and they can be removed once your own assets are swapped in.\u003c/p\u003e\n\u003cp\u003eWhat stands out here is the focus on practical scene dressing rather than broad procedural complexity. It is built for environment artists who want to drop in a mesh, generate overgrown child details, adjust the result through a few targeted controls, and then either keep it procedural or break it into static meshes when the scene calls for it.\u003c/p\u003e\n\n\u003ch2\u003eMore From The Same Workflow\u003c/h2\u003e\n\u003cul\u003e\n\u003cli\u003e\u003ca href=\"https://3dcghub.com/shootlikeme-unreal-engine-third-person-shooter-template/\" title=\"ShootLikeMe – Unreal Engine Third Person Shooter Template\"\u003eShootLikeMe – Unreal Engine Third Person Shooter Template\u003c/a\u003e\u003c/li\u003e\n\u003cli\u003e\u003ca href=\"https://3dcghub.com/advanced-unreal-engine-5-multiplayer-gameplay-programming/\" title=\"Advanced Unreal Engine 5 Multiplayer Gameplay Programming\"\u003eAdvanced Unreal Engine 5 Multiplayer Gameplay Programming\u003c/a\u003e\u003c/li\u003e\n\u003cli\u003e\u003ca href=\"https://3dcghub.com/niagara-beginners-to-advanced-in-unreal-engine-5/\" title=\"Niagara Beginners to advanced in Unreal Engine 5\"\u003eNiagara Beginners to advanced in Unreal Engine 5\u003c/a\u003e\u003c/li\u003e\n\u003cli\u003e\u003ca href=\"https://3dcghub.com/create-zelda-like-skills-with-c-in-unreal-engine-5-2/\" title=\"Create Zelda-like skills with C++ in unreal engine 5\"\u003eCreate Zelda-like skills with C++ in unreal engine 5\u003c/a\u003e\u003c/li\u003e\n\u003cli\u003e\u003ca href=\"https://3dcghub.com/main-menus-beginner-class-unreal-engine-5/\" title=\"Main Menus Beginner Class – Unreal Engine 5\"\u003eMain Menus Beginner Class – Unreal Engine 5\u003c/a\u003e\u003c/li\u003e\n\u003c/ul\u003e","contentTextLength":4822,"navigation":{"current":428,"total":2687,"previous":{"id":"1000325","slug":"procedural-weapon-animation-system","title":"Procedural Weapon Animation System","category":"Animations","platform":"Unreal Engine","updatedAt":"2026-07-05T06:29:01.463Z"},"next":{"id":"15301","slug":"procedural-fps-recoil-system","title":"Procedural FPS Recoil System","category":"Procedural Systems","platform":"Unreal Engine","updatedAt":"2026-07-05T06:16:23.079Z"}},"relatedResources":[{"id":"11554","slug":"shadersource-procedural-water-foliage-tool","title":"SHADERSOURCE - Procedural Water Foliage Tool","category":"Procedural Systems","engine":"4.27,5.0+","assetVersion":"Engine version: 4.27,5.0+","engineVersion":"4.19","tag":"Procedural Systems","accent":"amber","visual":"character","summary":"Streamline your environment design with the SHADERSOURCE - Procedural Water Foliage Tool. This asset pack provides automated blueprints and PBR materials for realistic aquatic scenes.","platform":"Unreal Engine","publishedAt":"2026-03-05T17:47:13.000Z","updatedAt":"2026-04-19T15:48:10.000Z","sourceNotes":[],"fileContents":[],"compatibility":["Unreal Engine","Engine version: 4.27,5.0+"],"featuredImage":{"alt":"SHADERSOURCE - Procedural Water Foliage Tool","src":"https://3dcghub.com/wp-content/uploads/2026/03/942d40d2-4f9c-4d28-bb9a-6eca0ba332ae.webp"},"hasDownloadLink":true,"pageviews":3},{"id":"11369","slug":"easy-rain","title":"Easy Rain","category":"Procedural Systems","engine":"5.4+","assetVersion":"Engine version: 5.4+","engineVersion":"5.3","tag":"Procedural Systems","accent":"teal","visual":"luts","summary":"Easy Rain is a comprehensive Blueprint system that harnesses Niagara particles to create photorealistic weather effects. From light drizzles to stormy summer downpours, this tool offers high performance and deep customization for artists.","platform":"Unreal Engine","publishedAt":"2026-03-05T17:09:01.000Z","updatedAt":"2026-04-19T15:48:13.000Z","sourceNotes":[],"fileContents":[],"compatibility":["Unreal Engine","Engine version: 5.4+"],"featuredImage":{"alt":"Easy Rain","src":"https://3dcghub.com/wp-content/uploads/2026/03/fbfa88dc-7eef-45e3-867c-fad1aa6421d1.webp"},"hasDownloadLink":true,"pageviews":9},{"id":"11537","slug":"radio-system-and-interaction","title":"Radio System and Interaction","category":"Procedural Systems","engine":"5.4+","assetVersion":"Engine version: 5.4+","engineVersion":"4.16","tag":"Procedural Systems","accent":"violet","visual":"mech","summary":"This Radio System and Interaction package provides a highly detailed 3D model equipped with 4K PBR textures. It includes interactive features such as frequency searching, volume control, and an integrated flashlight for immersive gameplay.","platform":"Unreal Engine","publishedAt":"2026-03-05T17:42:18.000Z","updatedAt":"2026-04-19T15:48:10.000Z","sourceNotes":[],"fileContents":[],"compatibility":["Unreal Engine","Engine version: 5.4+"],"featuredImage":{"alt":"Radio System and Interaction","src":"https://3dcghub.com/wp-content/uploads/2026/03/05db4a02-e2ac-434b-8f79-203c3e425a71.webp"},"hasDownloadLink":true,"pageviews":4}]}
Procedural Systems
Procedural Mesh Blueprint
Procedural Mesh Blueprint uses PCG to place child meshes on a parent mesh with a drag-and-drop workflow for environment artists. It focuses on overgrown details such as moss, grass, ivy, vines, and roots, while also supporting conversion back to static meshes.
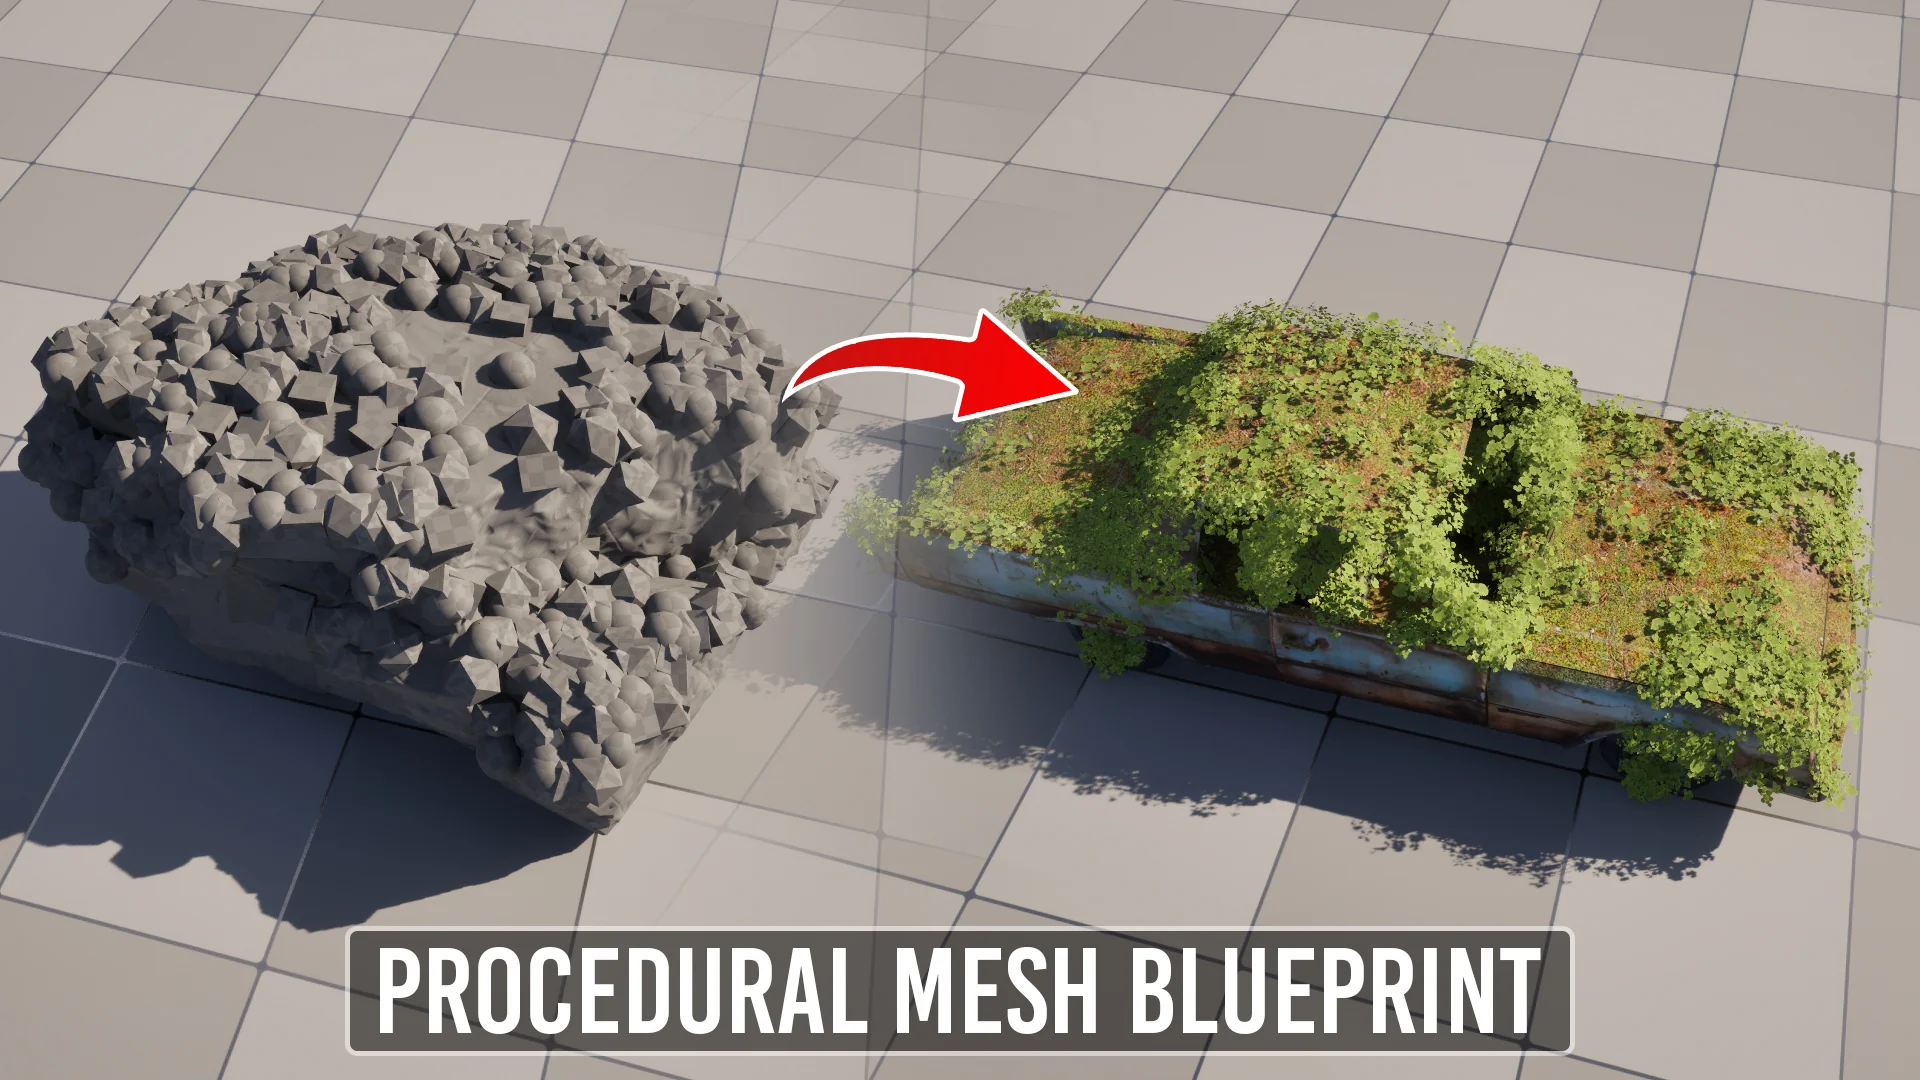
Procedural Mesh Blueprint centers on a straightforward environment workflow: drag in a static mesh, treat it as the parent, and generate child meshes onto it through PCG. The setup is aimed at adding surface detail without manual placement, so a rock, prop, or other scene object can carry overgrown elements such as moss or grass directly through the blueprint.
The blueprint supports dynamically swapping the parent mesh by drag-and-drop, which makes it useful when the same setup needs to be tested across different assets. Child mesh arrays can also be added, removed, and swapped dynamically, so the generated result is not locked to a single detail set. That keeps the tool focused on iteration rather than on building one fixed decorative arrangement.
The overall idea is simple: environment artists can attach procedural growth to a base mesh and let the system handle the placement of the child elements. The workflow is presented as artist-friendly and avoids the need to manually paint foliage on rocks or similar surfaces just to get a believable overgrown look.
Controls that shape the growth on the parent mesh
The blueprint includes parameters that control the falloff amount of the PCG-generated child meshes as well as pruning. Those controls matter because they change how dense or reduced the generated growth appears on the parent surface, giving the result a more deliberate shape instead of a uniform blanket of detail.
There are also toggles for absolute scaling of the child mesh and for inverting them on the parent mesh. In the current version, the older Invert Child Meshes Option has been removed and replaced with Vertical Mesh Amount, which makes it possible to generate additional separate child meshes along the XY axis of parent meshes. That change is aimed at cases like ivy, vines, and roots that need extra layers or runs of detail along the side of a mesh rather than only on its surface.
Parameter hover states now include short descriptions, which makes the blueprint easier to read while adjusting values. That small addition fits the rest of the workflow, which is built around quick visual iteration instead of a heavy technical setup.
Version 2, reconnect behavior, and the saved graph
The blueprint and PCG graph are saved as V2, keeping the updated setup separate from the earlier version. That means the revised blueprint exists as its own saved version rather than replacing the previous one. The update also keeps the newer parameter behavior and the revised child-mesh generation logic together in the same saved setup.
If the child mesh PCG does not function right away, it only needs to be reconnected once. After that reconnect step, it continues to work going forward. A short guide for that reconnect step is included with the blueprint guide documentation, which suggests the workflow expects a quick initial setup adjustment before everything runs smoothly.
The blueprint also includes the ability to break the PCG link and separate the parent and child meshes, along with their associated materials, so the result can be converted to static meshes. That makes the setup useful not only for procedural placement, but also for turning the generated arrangement into a more permanent asset state when needed.
What the package is set up to handle in a scene
This blueprint is a strong fit for overgrown environment work where static meshes need quick procedural dressing. The clearest examples are rocks covered with moss or grass, but the same system also supports ivy, vines, and roots running along a parent mesh. Those are the kinds of details that usually take time to place by hand, especially when the same treatment needs to be repeated across multiple assets in a scene.
The required plugins are PCG And PCGGeometryScriptInterop, which must be enabled for the blueprint to function. The setup also comes with sample meshes and associated textures, and those placeholders account for the nearly 1.8GB file size. They are only there to show what the blueprint can do visually, and they can be removed once your own assets are swapped in.
What stands out here is the focus on practical scene dressing rather than broad procedural complexity. It is built for environment artists who want to drop in a mesh, generate overgrown child details, adjust the result through a few targeted controls, and then either keep it procedural or break it into static meshes when the scene calls for it.
 Procedural Systems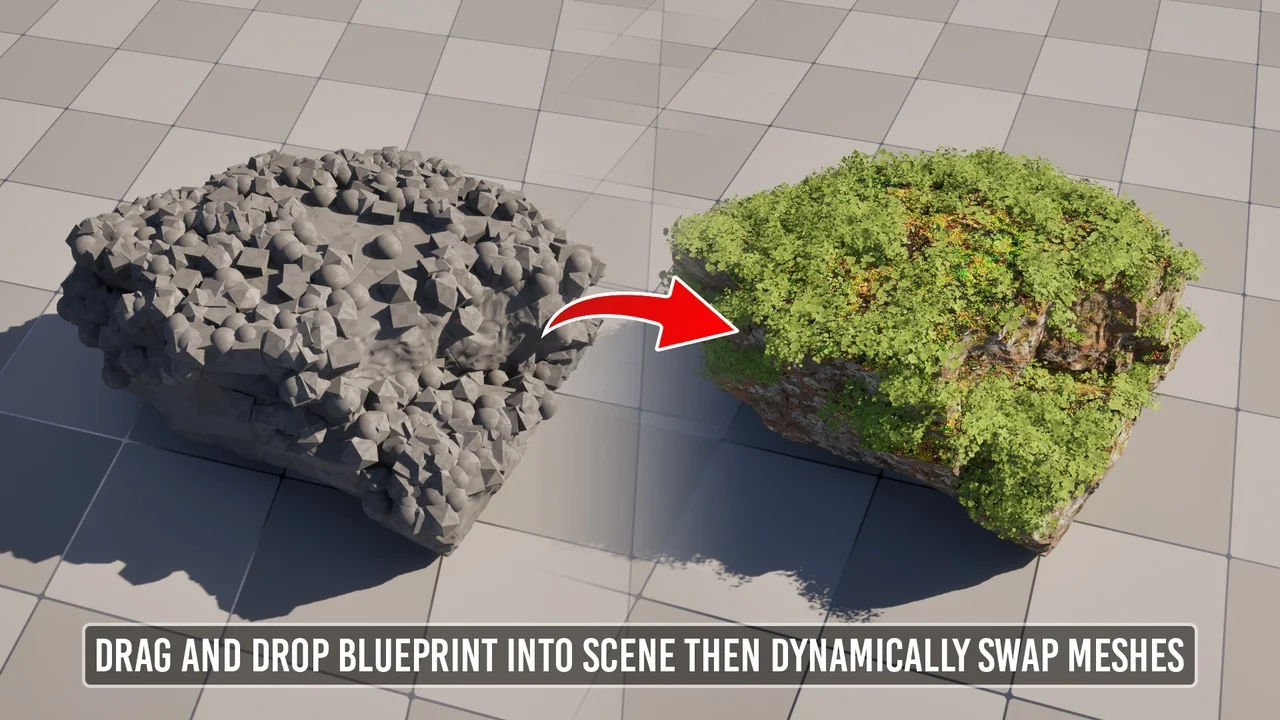
 Procedural Systems
 Procedural Systems
 Procedural Systems