"031373f479d9561a"{"id":"1000208","slug":"character-creation-for-unreal-engine","title":"Character creation for Unreal Engine","category":"Unreal Engine","engine":"File Content: video + English subtitles","assetVersion":"Video Language: English","engineVersion":"File Content: video + English subtitles","tag":"Unreal Engine","accent":"blue","visual":"character","summary":"A complete 7.5-hour pipeline covering AI model generation with Hunyuan 3D, Blender sculpting, Substance Painter texturing, and Unreal Engine integration.","platform":"Unreal Engine","publishedAt":"2026-06-24T14:26:38.594Z","updatedAt":"2026-06-24T14:26:38.594Z","sourceNotes":[],"fileContents":[],"compatibility":["Unreal Engine","Video Language: English","File Content: video + English subtitles"],"featuredImage":{"alt":"Character creation for Unreal Engine","src":"/wp-content/uploads/published/2026/06/86e5e5573fdf-6672309-8c7a-492ea80359.webp"},"hasDownloadLink":true,"downloads":2,"terms":[{"taxonomy":"category","slug":"tutoriallibrary-unrealengine","name":"Unreal Engine"}],"galleryImages":[],"accessPanel":{"kind":"video-resource","title":"Download this video resource","eyebrow":"Free Download","message":"Log in or create a free account to start your download.","fileName":"Character creation for Unreal Engine.part1.7z","safetyNote":"Resources are manually reviewed before listing to improve quality and reduce obvious risks.","actionLabel":"Download Free","resourceType":"Video download"},"contentHtml":"\u003cp\u003ePopulating interactive environments in Unreal Engine requires characters that are not only visually detailed but also structurally optimized for real-time rendering and animation. Establishing a pipeline that moves a character from an initial concept to a fully rigged actor inside an engine involves navigating multiple distinct software environments. The course \"Character creation for Unreal Engine\" outlines a complete workflow to achieve this, spanning 7 hours and 36 minutes of instructional material. Instead of relying solely on traditional modeling techniques from scratch, this curriculum integrates modern AI generation tools with industry-standard sculpting, texturing, and animation software.\u003c/p\u003e \u003ch2\u003eStructuring a Complete Character Pipeline\u003c/h2\u003e \u003cp\u003eThe early stages of character development often involve establishing base proportions and primary forms. The first chapter of the curriculum focuses heavily on generating base models using AI, specifically leveraging Hunyuan 3D. This modern approach allows developers to quickly produce an initial three-dimensional starting point, effectively bypassing the traditional, time-consuming blockout phase. By utilizing Hunyuan 3D, creators can rapidly iterate on the overall silhouette and volume of the character before committing to manual refinement.\u003c/p\u003e \u003ch3\u003eDetailing the High-Poly Mesh in Blender\u003c/h3\u003e \u003cp\u003eOnce the AI-generated base is established, the workflow transitions directly into Blender for structural and aesthetic refinement. Chapter two of the course centers entirely on creating the high-poly mesh. In this phase, the raw geometry generated by the AI is detailed and sculpted. Sculpting in Blender allows the creator to define the character's intricate physical features, adding the high-frequency details—such as muscle definition, clothing folds, or specific facial structures—that an AI generation might approximate or miss entirely.\u003c/p\u003e \u003cp\u003eBefore moving a highly detailed sculpt into a dedicated texturing pipeline, the model must be properly organized. Chapter three addresses material separation, a critical preparation step for defining different surface types on the character. Separating materials early in the Blender workflow ensures that the subsequent texturing phase will have distinct, hard boundaries for applying different surface properties. This organization is vital for efficiently managing complex characters that require distinct treatments for skin, fabric, leather, or metallic armor pieces.\u003c/p\u003e \u003ch2\u003ePreparing the Mesh for Real-Time Rendering\u003c/h2\u003e \u003cp\u003eFollowing material organization, the curriculum introduces the technical necessity of optimization in chapter four. High-poly sculpted meshes and raw AI-generated models are typically too geometrically dense and poorly structured for real-time skeletal animation. Retopology is required to create a clean, low-poly cage over the high-poly sculpt. This newly authored topology dramatically reduces the polygon count for Unreal Engine while ensuring that the edge flow is logically constructed. Proper edge flow guarantees that the character will deform correctly and naturally once it is eventually rigged for movement.\u003c/p\u003e \u003ch3\u003eRetopology and UV Mapping\u003c/h3\u003e \u003cp\u003eWith a game-ready mesh finalized through the retopology process, the workflow moves toward surface detailing. Chapter five focuses on UV mapping and exporting the model. UV mapping unwraps the optimized three-dimensional geometry into a flat two-dimensional space. This step is an absolute requirement before any custom textures can be painted or generated. The course covers the precise layout of these UV islands and the correct export procedures required to cleanly transition the model out of Blender and into the next software package.\u003c/p\u003e \u003ch3\u003eTexturing with Substance Painter\u003c/h3\u003e \u003cp\u003eOnce the UVs are laid out and the model is exported, the pipeline shifts to Adobe Substance Painter. Chapter six is entirely dedicated to the texturing process. Within Substance Painter, the separated materials defined earlier in Blender are utilized to isolate different parts of the mesh. This allows for the rapid application of detailed materials. The texturing phase brings the character to life visually, authoring the necessary color, roughness, and metallic maps that Unreal Engine relies on for its physically based rendering system.\u003c/p\u003e \u003ch2\u003eMixamo Rigging and Unreal Engine Implementation\u003c/h2\u003e \u003cp\u003eA fully textured character remains a static asset until it is bound to a skeleton. To streamline this process, chapter seven introduces automated rigging and animation utilizing Mixamo. By importing the finalized, retopologized mesh into the Mixamo platform, developers can bypass the complex and often tedious process of manual bone placement and weight painting. Mixamo instantly applies a standard automated rig and calculates the necessary skin weights.\u003c/p\u003e \u003cp\u003eThe utilization of Mixamo in this pipeline is particularly valuable for developers who need to populate scenes quickly without possessing deep technical animation skills. Rather than spending hours building custom armatures and painting influence weights for every individual vertex, the automated rigging system handles the technical skeleton. Users can then select from walking, running, or idle cycles, exporting this animation data alongside the mesh.\u003c/p\u003e \u003cp\u003eThe final phase of the workflow, detailed in chapter eight, is the direct integration of the asset into a game environment. This involves importing the fully textured and animated models directly into Unreal Engine. When bringing the asset into the engine, the pipeline culminates in configuring the imported data. The engine must correctly interpret the skeletal mesh, the associated animation sequences generated by Mixamo, and the complex material setups exported from Substance Painter. Organizing these imported assets correctly ensures that the character responds properly to scene lighting and game logic.\u003c/p\u003e \u003cp\u003eStructured specifically for a beginner level, the course workload provides a step-by-step path through these interconnected software systems. Published in June 2025, the curriculum is designed both for future users wishing to familiarize themselves with the complete Blender to Unreal pipeline, as well as for active professionals wanting to update their knowledge. By incorporating AI generation through Hunyuan 3D into a traditional high-poly to low-poly baking workflow, the material reflects a modern approach to rapid character iteration and game-ready asset production.\u003c/p\u003e\n\n\u003ch2\u003eExplore Similar Assets\u003c/h2\u003e\n\u003cul\u003e\n\u003cli\u003e\u003ca href=\"https://3dcghub.com/unreal-engine-5-blueprints-game-developer-masterclass/\" title=\"Unreal Engine 5 - Blueprints Game Developer Masterclass\"\u003eUnreal Engine 5 - Blueprints Game Developer Masterclass\u003c/a\u003e\u003c/li\u003e\n\u003cli\u003e\u003ca href=\"https://3dcghub.com/complete-modular-environments-in-unreal-engine/\" title=\"Complete Modular Environments in Unreal Engine\"\u003eComplete Modular Environments in Unreal Engine\u003c/a\u003e\u003c/li\u003e\n\u003cli\u003e\u003ca href=\"https://3dcghub.com/aaa-game-environment-creation-in-unreal-engine-5/\" title=\"AAA Game Environment Creation in Unreal Engine 5\"\u003eAAA Game Environment Creation in Unreal Engine 5\u003c/a\u003e\u003c/li\u003e\n\u003cli\u003e\u003ca href=\"https://3dcghub.com/make-a-2d-platformer-in-unreal-engine-5-c/\" title=\"Make a 2D platformer in Unreal engine 5 C++\"\u003eMake a 2D platformer in Unreal engine 5 C++\u003c/a\u003e\u003c/li\u003e\n\u003cli\u003e\u003ca href=\"https://3dcghub.com/main-menus-beginner-class-unreal-engine-5/\" title=\"Main Menus Beginner Class - Unreal Engine 5\"\u003eMain Menus Beginner Class - Unreal Engine 5\u003c/a\u003e\u003c/li\u003e\n\u003c/ul\u003e","contentTextLength":6673,"navigation":{"current":1141,"total":3223,"previous":{"id":"1000209","slug":"modular-sci-fi-base-indoor-outdoor-moon-theme","title":"Modular Sci-Fi Base - Indoor Outdoor - Moon Theme","category":"Sci-Fi","platform":"Unreal Engine","updatedAt":"2026-06-24T15:13:26.573Z"},"next":{"id":"1000207","slug":"theater-hall-environment-theater-concert-cinema-hall-exhibition-meeting-3d","title":"Theater Hall Environment ( Theater Concert Cinema Hall Exhibition Meeting 3d )","category":"Interior","platform":"Unreal Engine","updatedAt":"2026-06-24T14:23:22.611Z"}},"relatedResources":[{"id":"1000517","slug":"unreal-engine-5-crowd-creation-in-the-niagara-and-blueprint","title":"Unreal Engine 5: Crowd creation in the Niagara and Blueprint","category":"Unreal Engine","engine":"File Content: video + English subtitles","assetVersion":"Video Language: English","engineVersion":"File Content: video + English subtitles","tag":"Unreal Engine","accent":"blue","visual":"mech","summary":"A course covering vertex animation shaders, character retargeting, aim offsets, and Blueprint integration to build customizable crowds using Niagara in Unreal E","platform":"Unreal Engine","publishedAt":"2026-07-14T08:37:52.185Z","updatedAt":"2026-07-14T08:37:52.185Z","sourceNotes":[],"fileContents":[],"compatibility":["Unreal Engine","Video Language: English","File Content: video + English subtitles"],"featuredImage":{"alt":"Unreal Engine 5: Crowd creation in the Niagara and Blueprint","src":"/wp-content/uploads/published/2026/07/e592fc2aed15-6123673-1b32-3-a8544671f8.webp"},"hasDownloadLink":true,"downloads":0},{"id":"1000237","slug":"unreal-engine-5-for-absolute-beginners-build-subway-surfers","title":"Unreal Engine 5 for Absolute Beginners: Build Subway Surfers","category":"Unreal Engine","engine":"File Content: video + English subtitles","assetVersion":"Video Language: English","engineVersion":"File Content: video + English subtitles","tag":"Unreal Engine","accent":"blue","visual":"luts","summary":"Learn to build a complete endless runner game in Unreal Engine 5.4, covering Blueprint scripting, character movement, environment design, and UI creation.","platform":"Unreal Engine","publishedAt":"2026-06-29T10:37:54.187Z","updatedAt":"2026-06-29T10:37:54.187Z","sourceNotes":[],"fileContents":[],"compatibility":["Unreal Engine","Video Language: English","File Content: video + English subtitles"],"featuredImage":{"alt":"Unreal Engine 5 for Absolute Beginners: Build Subway Surfers","src":"/wp-content/uploads/published/2026/06/41db8a69840b-5970888-4aa8-4-42bda36ae9.webp"},"hasDownloadLink":true,"downloads":0},{"id":"1000178","slug":"unreal-engine-5-blueprints-game-developer-masterclass","title":"Unreal Engine 5 - Blueprints Game Developer Masterclass","category":"Unreal Engine","engine":"File Content: video + English subtitles","assetVersion":"Video Language: English","engineVersion":"File Content: video + English subtitles","tag":"Unreal Engine","accent":"blue","visual":"mech","summary":"A 14h 28m Unreal Engine course focused on Blueprints, gameplay logic, FPS character setup, UI, materials, and complete game creation.","platform":"Unreal Engine","publishedAt":"2026-06-20T07:37:16.401Z","updatedAt":"2026-06-20T07:37:16.401Z","sourceNotes":[],"fileContents":[],"compatibility":["Unreal Engine","Video Language: English","File Content: video + English subtitles"],"featuredImage":{"alt":"Unreal Engine 5 - Blueprints Game Developer Masterclass","src":"/wp-content/uploads/published/2026/06/71070a1b9e4a-4856352-728a-6-9312b9b506.webp"},"hasDownloadLink":true,"downloads":0}]}
Unreal Engine
Character creation for Unreal Engine
A complete 7.5-hour pipeline covering AI model generation with Hunyuan 3D, Blender sculpting, Substance Painter texturing, and Unreal Engine integration.
Category:Unreal EnginePlatform: Unreal EngineVideo Language: EnglishFile Content: video + English subtitlesPublished: Jun 24, 2026
Unreal Engine
Resource overview
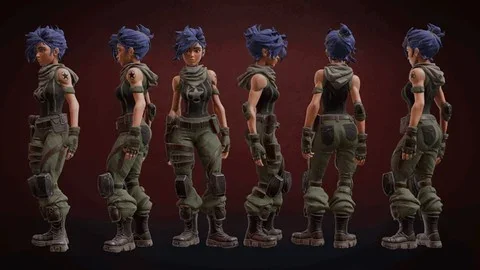
Populating interactive environments in Unreal Engine requires characters that are not only visually detailed but also structurally optimized for real-time rendering and animation. Establishing a pipeline that moves a character from an initial concept to a fully rigged actor inside an engine involves navigating multiple distinct software environments. The course "Character creation for Unreal Engine" outlines a complete workflow to achieve this, spanning 7 hours and 36 minutes of instructional material. Instead of relying solely on traditional modeling techniques from scratch, this curriculum integrates modern AI generation tools with industry-standard sculpting, texturing, and animation software.
Structuring a Complete Character Pipeline
The early stages of character development often involve establishing base proportions and primary forms. The first chapter of the curriculum focuses heavily on generating base models using AI, specifically leveraging Hunyuan 3D. This modern approach allows developers to quickly produce an initial three-dimensional starting point, effectively bypassing the traditional, time-consuming blockout phase. By utilizing Hunyuan 3D, creators can rapidly iterate on the overall silhouette and volume of the character before committing to manual refinement.
Detailing the High-Poly Mesh in Blender
Once the AI-generated base is established, the workflow transitions directly into Blender for structural and aesthetic refinement. Chapter two of the course centers entirely on creating the high-poly mesh. In this phase, the raw geometry generated by the AI is detailed and sculpted. Sculpting in Blender allows the creator to define the character's intricate physical features, adding the high-frequency details—such as muscle definition, clothing folds, or specific facial structures—that an AI generation might approximate or miss entirely.
Before moving a highly detailed sculpt into a dedicated texturing pipeline, the model must be properly organized. Chapter three addresses material separation, a critical preparation step for defining different surface types on the character. Separating materials early in the Blender workflow ensures that the subsequent texturing phase will have distinct, hard boundaries for applying different surface properties. This organization is vital for efficiently managing complex characters that require distinct treatments for skin, fabric, leather, or metallic armor pieces.
Preparing the Mesh for Real-Time Rendering
Following material organization, the curriculum introduces the technical necessity of optimization in chapter four. High-poly sculpted meshes and raw AI-generated models are typically too geometrically dense and poorly structured for real-time skeletal animation. Retopology is required to create a clean, low-poly cage over the high-poly sculpt. This newly authored topology dramatically reduces the polygon count for Unreal Engine while ensuring that the edge flow is logically constructed. Proper edge flow guarantees that the character will deform correctly and naturally once it is eventually rigged for movement.
Retopology and UV Mapping
With a game-ready mesh finalized through the retopology process, the workflow moves toward surface detailing. Chapter five focuses on UV mapping and exporting the model. UV mapping unwraps the optimized three-dimensional geometry into a flat two-dimensional space. This step is an absolute requirement before any custom textures can be painted or generated. The course covers the precise layout of these UV islands and the correct export procedures required to cleanly transition the model out of Blender and into the next software package.
Texturing with Substance Painter
Once the UVs are laid out and the model is exported, the pipeline shifts to Adobe Substance Painter. Chapter six is entirely dedicated to the texturing process. Within Substance Painter, the separated materials defined earlier in Blender are utilized to isolate different parts of the mesh. This allows for the rapid application of detailed materials. The texturing phase brings the character to life visually, authoring the necessary color, roughness, and metallic maps that Unreal Engine relies on for its physically based rendering system.
Mixamo Rigging and Unreal Engine Implementation
A fully textured character remains a static asset until it is bound to a skeleton. To streamline this process, chapter seven introduces automated rigging and animation utilizing Mixamo. By importing the finalized, retopologized mesh into the Mixamo platform, developers can bypass the complex and often tedious process of manual bone placement and weight painting. Mixamo instantly applies a standard automated rig and calculates the necessary skin weights.
The utilization of Mixamo in this pipeline is particularly valuable for developers who need to populate scenes quickly without possessing deep technical animation skills. Rather than spending hours building custom armatures and painting influence weights for every individual vertex, the automated rigging system handles the technical skeleton. Users can then select from walking, running, or idle cycles, exporting this animation data alongside the mesh.
The final phase of the workflow, detailed in chapter eight, is the direct integration of the asset into a game environment. This involves importing the fully textured and animated models directly into Unreal Engine. When bringing the asset into the engine, the pipeline culminates in configuring the imported data. The engine must correctly interpret the skeletal mesh, the associated animation sequences generated by Mixamo, and the complex material setups exported from Substance Painter. Organizing these imported assets correctly ensures that the character responds properly to scene lighting and game logic.
Structured specifically for a beginner level, the course workload provides a step-by-step path through these interconnected software systems. Published in June 2025, the curriculum is designed both for future users wishing to familiarize themselves with the complete Blender to Unreal pipeline, as well as for active professionals wanting to update their knowledge. By incorporating AI generation through Hunyuan 3D into a traditional high-poly to low-poly baking workflow, the material reflects a modern approach to rapid character iteration and game-ready asset production.
 Unreal Engine
 Unreal Engine
 Unreal Engine
 Unreal Engine