"7e6fc58c410f2894"{"id":"23365","slug":"see-through-shader","title":"See-through Shader","category":"Particles \u0026 Effects","engine":"Original Unity version: 2021.3.45","assetVersion":"Original Unity version: 2021.3.45","engineVersion":"Asset Version:1.8.6","tag":"Particles","accent":"cyan","visual":"city","summary":"The See-through Shader keeps playable characters visible even when they move behind walls, structures, or other meshes. It works without modifying the mesh and comes with tools that make the effect quick to set up in a project.","platform":"Unity","publishedAt":"2026-04-09T16:48:23.000Z","updatedAt":"2026-04-19T15:35:28.000Z","sourceNotes":[],"fileContents":[],"compatibility":["Unity","Original Unity version: 2021.3.45","Asset Version: 1.8.6"],"featuredImage":{"alt":"See-through Shader","src":"https://3dcghub.com/wp-content/uploads/2026/04/84b3e554d99e_4c3b4d7f-1c87-4855-b7d6-f6a2d3ca7f88_1280x720_stretch.webp"},"hasDownloadLink":true,"downloads":1,"terms":[{"taxonomy":"category","slug":"particles-and-effects","name":"Particles \u0026 Effects"},{"taxonomy":"post_tag","slug":"materials","name":"Materials"},{"taxonomy":"post_tag","slug":"unity","name":"Unity"},{"taxonomy":"post_tag","slug":"vfx","name":"VFX"}],"galleryImages":[{"src":"https://3dcghub.com/wp-content/uploads/2026/04/ca1c6aaf71bc_00bc5a1a-6645-4fc0-b6fe-04030a7c2eed_scaled.webp","alt":"See-through Shader"},{"src":"https://3dcghub.com/wp-content/uploads/2026/04/094a449515b6_cbe07b51-acc2-4bab-aea5-e1123e52a50f_scaled.webp","alt":"See-through Shader"},{"src":"https://3dcghub.com/wp-content/uploads/2026/04/e00e6bd75b87_9df3ff63-12a1-4f3b-a1d6-3e5487cb5a62_scaled.webp","alt":"See-through Shader"},{"src":"https://3dcghub.com/wp-content/uploads/2026/04/466ab64b78fd_c72bb447-ead7-46ac-a7ce-8e3c2fff87b2_scaled.webp","alt":"See-through Shader"},{"src":"https://3dcghub.com/wp-content/uploads/2026/04/cae725a80d33_e966a5a0-78d7-431a-b856-675def888f90_scaled.webp","alt":"See-through Shader"},{"src":"https://3dcghub.com/wp-content/uploads/2026/04/520f93982dd4_bbeb257b-fc36-4b02-b603-d8fcf5d969ae_scaled.webp","alt":"See-through Shader"},{"src":"https://3dcghub.com/wp-content/uploads/2026/04/4216d405dc57_0dd17af7-a236-4c0a-8d40-25a7be24c3f8_scaled.webp","alt":"See-through Shader"},{"src":"https://3dcghub.com/wp-content/uploads/2026/04/e2e1e72f9c09_a4c5d697-1b93-430e-984f-e614ee86e87c_scaled.webp","alt":"See-through Shader"},{"src":"https://3dcghub.com/wp-content/uploads/2026/04/ea4011270836_58b88faa-6103-4591-a0ad-4a5ba2c932cb_orig.webp","alt":"See-through Shader"},{"src":"https://3dcghub.com/wp-content/uploads/2026/04/a7b2b1e671f6_f0adf3eb-4a6b-4142-afd0-a9b08050c2cd_scaled.webp","alt":"See-through Shader"}],"accessPanel":{"kind":"resource","title":"Access this resource","eyebrow":"Free Download","message":"Log in or create a free account to start your download.","fileName":"See-through Shader v1.8.6 (31 Oct 2024).7z","safetyNote":"All resources are 100% manually reviewed to eliminate all risks.","actionLabel":"Download Free","resourceType":"Resource archive"},"contentHtml":"\u003ch2\u003eKeeping the player visible inside enclosed spaces\u003c/h2\u003e\n\u003cp\u003eThe See-through Shader solves a common scene problem: a playable character disappears from view when a mesh gets in the way. Instead of forcing the camera to fight against buildings, bridges, caves, or any other solid shape, the shader clears the obstruction so the character stays visible.\u003c/p\u003e\n\u003cp\u003eThat makes it useful anywhere the player can move behind geometry and still needs to be tracked clearly. The effect can be applied through the provided tools, and once a player is registered, it works without requiring extra changes to the mesh itself. For projects where visibility matters more than leaving objects fully opaque, that direct workflow keeps the scene readable while preserving the structure around it.\u003c/p\u003e \u003ch2\u003eApplying the effect without altering the mesh\u003c/h2\u003e\n\u003cp\u003eA notable part of the workflow is that the mesh does not need to be modified. The shader is applied through tools included with the asset, and the effect is activated after a player is registered. That keeps the process focused on setup rather than remodeling the environment.\u003c/p\u003e\n\u003cp\u003eThe shader is meant for standard shader and lit shader workflows, while also offering ways to add the effect to custom shaders. That gives the asset a clear base use case while still leaving room for projects that already rely on their own shading setup. It is also fully compatible with The Toon Shader asset, which makes it easier to place inside a stylized pipeline when that is already part of the project.\u003c/p\u003e \u003ch2\u003eSix obstruction modes for different kinds of geometry\u003c/h2\u003e\n\u003cp\u003eThe shader includes six obstruction modes, and each one targets a different way of clearing geometry between the camera and the player. That makes it possible to match the effect to the shape of a scene instead of forcing every environment to behave the same way.\u003c/p\u003e\n\u003cp\u003eOne mode removes parts of the mesh that are above a certain Y height. Another removes geometry that is angled toward the camera. There is also a cone mode that clears geometry inside a cone between the player and the camera, along with a combination of Angle and Cone. A circle mode removes geometry inside a circle around the player, while a cylinder mode removes geometry inside a cylinder between the player and the camera, again with a combination of Angle and Cylinder. The final mode uses a curve to define the region where geometry is removed.\u003c/p\u003e\n\u003cp\u003eThose options make the shader flexible across different silhouettes of level geometry. A building wall, a curved cave, a bridge section, or a more irregular enclosure can all call for different ways of deciding what should stay visible and what should fade out of the way. The presence of combinations also matters, since some scenes need more than one rule working together.\u003c/p\u003e \u003ch2\u003ePlayer-based control for different scene setups\u003c/h2\u003e\n\u003cp\u003eThe effect can be controlled in several ways, with player-based methods forming a large part of the system. One option is Effect Radius Only, where the see-through effect becomes active inside a sphere around the player. Any obstruction mode can be used with this method.\u003c/p\u003e\n\u003cp\u003eAuto-Detect takes a different route. As long as buildings and other structures have colliders that describe the geometry well enough, the shader can detect when a player is inside a mesh and activate the effect automatically. This method also works on a per-building basis, which supports enter and exit transitions rather than treating a whole scene as one block.\u003c/p\u003e\n\u003cp\u003eTriggerByParent, TriggerByBox, and TriggerById are included as trigger-based control options. Together with the other player-based modes, they give the developer multiple ways to decide when the see-through behavior should appear, depending on how the scene is organized and how precise the setup needs to be.\u003c/p\u003e \u003ch2\u003eWhere the shader fits in a production workflow\u003c/h2\u003e\n\u003cp\u003eThe asset is backed by plenty of tools that help get the effect working quickly, which makes it practical for scenes that need visibility handling early in production rather than after a long round of custom setup. It can be used for a player moving through enclosed environments, for structures that should not fully block the camera, or for cases where a standard player-based approach is not the right fit and the player-independent standard dissolve feature is preferred instead.\u003c/p\u003e\n\u003cp\u003eThat range keeps the shader grounded in real scene needs. It is not only about hiding walls; it is about making a character readable while the environment remains intact. With support for standard and lit shaders, a path toward custom shader integration, multiple obstruction modes, and several ways to trigger the effect, it fits projects that need controlled visibility inside dense geometry without changing the mesh itself.\u003c/p\u003e\n\n\u003ch2\u003eRelated Resources Worth Checking\u003c/h2\u003e\n\u003cul\u003e\n\u003cli\u003e\u003ca href=\"https://3dcghub.com/opencv-for-unity/\" title=\"OpenCV for Unity\"\u003eOpenCV for Unity\u003c/a\u003e\u003c/li\u003e\n\u003cli\u003e\u003ca href=\"https://3dcghub.com/exporter-for-unreal-to-for-unity-2026/\" title=\"Exporter for Unreal to/for Unity 2026\"\u003eExporter for Unreal to/for Unity 2026\u003c/a\u003e\u003c/li\u003e\n\u003cli\u003e\u003ca href=\"https://3dcghub.com/dialogue-system-for-unity/\" title=\"Dialogue System for Unity\"\u003eDialogue System for Unity\u003c/a\u003e\u003c/li\u003e\n\u003cli\u003e\u003ca href=\"https://3dcghub.com/ambient-sounds-interactive-soundscapes-for-unity-6/\" title=\"Ambient Sounds – Interactive Soundscapes for Unity 6\"\u003eAmbient Sounds – Interactive Soundscapes for Unity 6\u003c/a\u003e\u003c/li\u003e\n\u003cli\u003e\u003ca href=\"https://3dcghub.com/pegasus-flythroughs-for-unity-6/\" title=\"Pegasus – Flythroughs for Unity 6\"\u003ePegasus – Flythroughs for Unity 6\u003c/a\u003e\u003c/li\u003e\n\u003c/ul\u003e\n\n\u003ch2\u003eAsset Gallery\u003c/h2\u003e","contentTextLength":4926,"navigation":{"current":3528,"total":3618,"previous":{"id":"23378","slug":"sky-master-ultimate-volumetric-skies-clouds-weather","title":"Sky Master ULTIMATE: Volumetric Skies, Clouds \u0026 Weather","category":"Particles \u0026 Effects","platform":"Unity","updatedAt":"2026-04-19T15:35:28.000Z"},"next":{"id":"23426","slug":"easy-collider-editor","title":"Easy Collider Editor","category":"Physics","platform":"Unity","updatedAt":"2026-04-19T15:35:27.000Z"}},"relatedResources":[{"id":"23352","slug":"portal-effect-hdrp","title":"Portal Effect: HDRP","category":"Particles \u0026 Effects","engine":"Original Unity version: 2019.3.6","assetVersion":"Original Unity version: 2019.3.6","engineVersion":"Asset Version:1.1","tag":"Particles","accent":"cyan","visual":"luts","summary":"Portal Effect: HDRP focuses on portals players can see and walk through, with the sense that space itself has been warped. It includes open, idle, and close VFX states, seamless camera transition, and rigidbody velocity preservation for HDRP projects.","platform":"Unity","publishedAt":"2026-04-09T16:47:34.000Z","updatedAt":"2026-04-19T15:35:29.000Z","sourceNotes":[],"fileContents":[],"compatibility":["Unity","Original Unity version: 2019.3.6","Asset Version: 1.1"],"featuredImage":{"alt":"Portal Effect: HDRP","src":"https://3dcghub.com/wp-content/uploads/2026/04/678b07441c16_eaabcc67-6f49-424c-bc22-33e15018885a_1280x720_stretch.webp"},"hasDownloadLink":true,"downloads":0},{"id":"23276","slug":"feel","title":"Feel","category":"Particles \u0026 Effects","engine":"5.2 - 6.1","assetVersion":"Original Unity version: 2019.4.3","engineVersion":"Asset Version:5.2 - 6.1","tag":"Particles","accent":"cyan","visual":"city","summary":"Feel gathers a large set of feedbacks and springs for moments that need motion, response, and extra punch. It reaches across camera work, UI, text, shaders, sounds, physics, and haptics through a single workflow.","platform":"Unity","publishedAt":"2026-04-09T16:28:21.000Z","updatedAt":"2026-10-09T05:54:10.435Z","sourceNotes":[],"fileContents":[],"compatibility":["Unity","Original Unity version: 2019.4.3","Asset Version:5.2 - 6.1"],"featuredImage":{"alt":"Feel","src":"https://3dcghub.com/wp-content/uploads/2026/04/7ebb1dbba7d2_173c8845-1063-44dc-aa55-65738aa93cce_1280x720_stretch.webp"},"hasDownloadLink":true,"downloads":16},{"id":"23208","slug":"blood-damage-effect","title":"Blood-Damage Effect","category":"Particles \u0026 Effects","engine":"Original Unity version: 5.0.0","assetVersion":"Original Unity version: 5.0.0","engineVersion":"Asset Version:1.1","tag":"Particles","accent":"cyan","visual":"audio","summary":"This tool renders dynamic blood splatter onto the screen as a visual health indicator, utilizing shaders and normal maps to simulate realistic light refraction and drying effects.","platform":"Unity","publishedAt":"2026-04-08T16:39:01.000Z","updatedAt":"2026-04-19T15:36:49.000Z","sourceNotes":[],"fileContents":[],"compatibility":["Unity","Original Unity version: 5.0.0","Asset Version: 1.1"],"featuredImage":{"alt":"Blood-Damage Effect","src":"https://3dcghub.com/wp-content/uploads/2026/04/4959311d7e10_d99e0d45-1444-4fff-b5ee-2c8664268f89_1280x720_stretch.webp"},"hasDownloadLink":true,"downloads":0}]}
Particles
See-through Shader
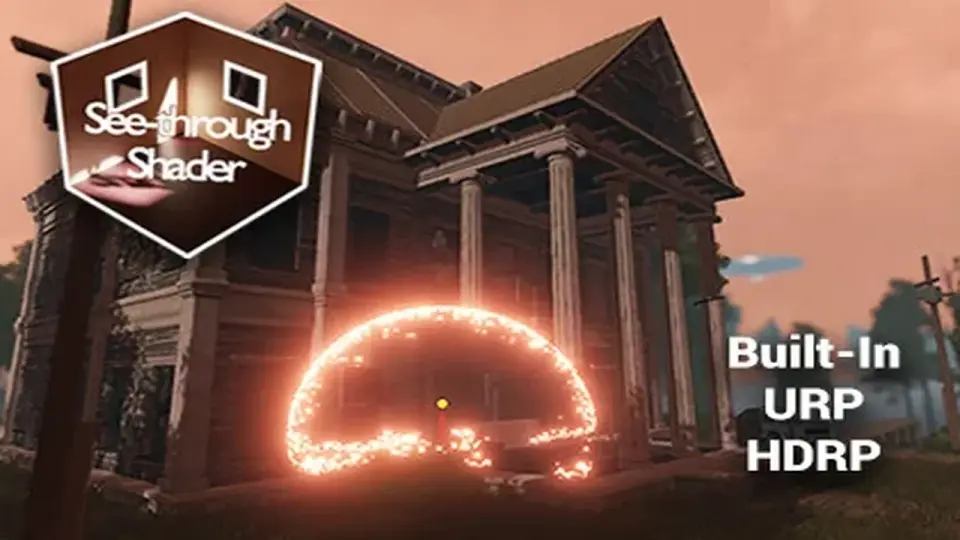
The See-through Shader keeps playable characters visible even when they move behind walls, structures, or other meshes. It works without modifying the mesh and comes with tools that make the effect quick to set up in a project.
The See-through Shader solves a common scene problem: a playable character disappears from view when a mesh gets in the way. Instead of forcing the camera to fight against buildings, bridges, caves, or any other solid shape, the shader clears the obstruction so the character stays visible.
That makes it useful anywhere the player can move behind geometry and still needs to be tracked clearly. The effect can be applied through the provided tools, and once a player is registered, it works without requiring extra changes to the mesh itself. For projects where visibility matters more than leaving objects fully opaque, that direct workflow keeps the scene readable while preserving the structure around it.
Applying the effect without altering the mesh
A notable part of the workflow is that the mesh does not need to be modified. The shader is applied through tools included with the asset, and the effect is activated after a player is registered. That keeps the process focused on setup rather than remodeling the environment.
The shader is meant for standard shader and lit shader workflows, while also offering ways to add the effect to custom shaders. That gives the asset a clear base use case while still leaving room for projects that already rely on their own shading setup. It is also fully compatible with The Toon Shader asset, which makes it easier to place inside a stylized pipeline when that is already part of the project.
Six obstruction modes for different kinds of geometry
The shader includes six obstruction modes, and each one targets a different way of clearing geometry between the camera and the player. That makes it possible to match the effect to the shape of a scene instead of forcing every environment to behave the same way.
One mode removes parts of the mesh that are above a certain Y height. Another removes geometry that is angled toward the camera. There is also a cone mode that clears geometry inside a cone between the player and the camera, along with a combination of Angle and Cone. A circle mode removes geometry inside a circle around the player, while a cylinder mode removes geometry inside a cylinder between the player and the camera, again with a combination of Angle and Cylinder. The final mode uses a curve to define the region where geometry is removed.
Those options make the shader flexible across different silhouettes of level geometry. A building wall, a curved cave, a bridge section, or a more irregular enclosure can all call for different ways of deciding what should stay visible and what should fade out of the way. The presence of combinations also matters, since some scenes need more than one rule working together.
Player-based control for different scene setups
The effect can be controlled in several ways, with player-based methods forming a large part of the system. One option is Effect Radius Only, where the see-through effect becomes active inside a sphere around the player. Any obstruction mode can be used with this method.
Auto-Detect takes a different route. As long as buildings and other structures have colliders that describe the geometry well enough, the shader can detect when a player is inside a mesh and activate the effect automatically. This method also works on a per-building basis, which supports enter and exit transitions rather than treating a whole scene as one block.
TriggerByParent, TriggerByBox, and TriggerById are included as trigger-based control options. Together with the other player-based modes, they give the developer multiple ways to decide when the see-through behavior should appear, depending on how the scene is organized and how precise the setup needs to be.
Where the shader fits in a production workflow
The asset is backed by plenty of tools that help get the effect working quickly, which makes it practical for scenes that need visibility handling early in production rather than after a long round of custom setup. It can be used for a player moving through enclosed environments, for structures that should not fully block the camera, or for cases where a standard player-based approach is not the right fit and the player-independent standard dissolve feature is preferred instead.
That range keeps the shader grounded in real scene needs. It is not only about hiding walls; it is about making a character readable while the environment remains intact. With support for standard and lit shaders, a path toward custom shader integration, multiple obstruction modes, and several ways to trigger the effect, it fits projects that need controlled visibility inside dense geometry without changing the mesh itself.
 Particles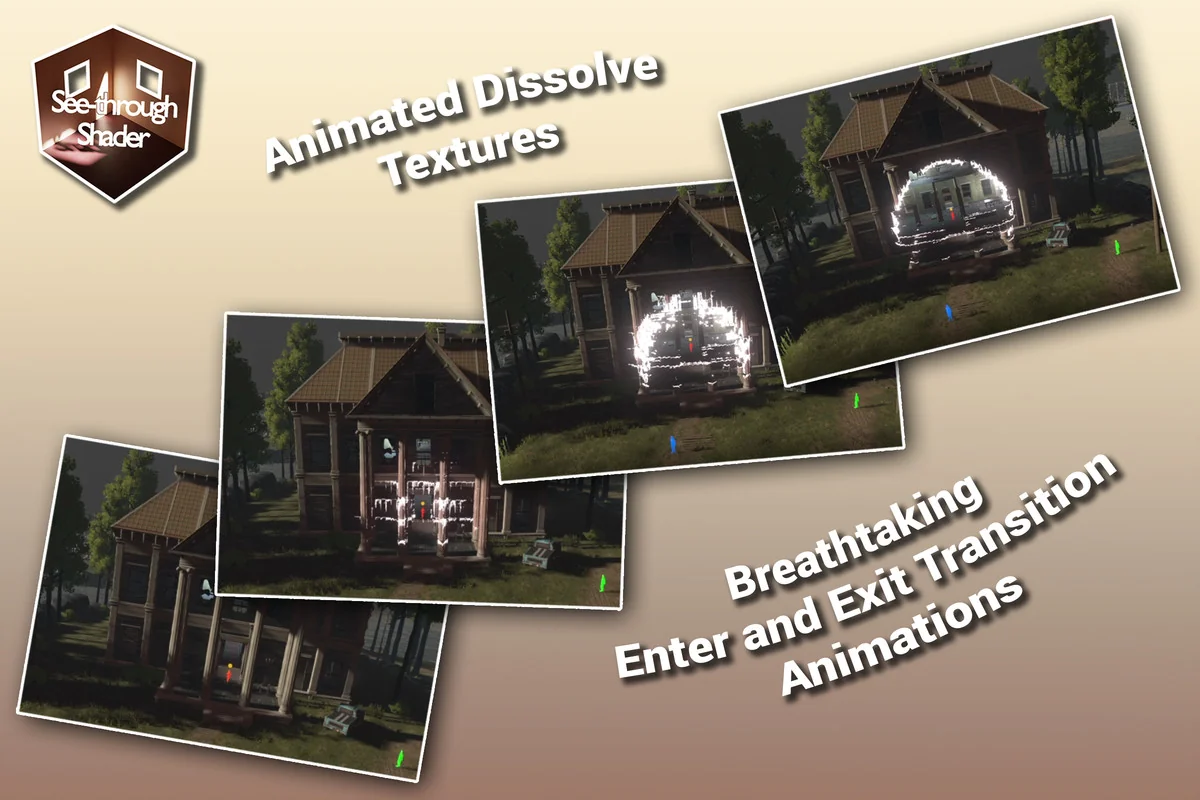
 Particles
 Particles
 Particles