"e289e030617784b2"{"id":"1000086","slug":"ork-rogue","title":"Ork Rogue","category":"Creatures \u0026 Monsters","engine":"Engine Version: 4.26+,5.0+","assetVersion":"Engine Version: 4.26+,5.0+","engineVersion":"","tag":"Creatures","accent":"cyan","visual":"character","summary":"Ork Rogue is a ready-made rigged fantasy character with a separate weapon mesh, blueprint connection, detailed UV sets, and stated mesh counts.","platform":"Unreal Engine","updatedAt":"2026-06-05T16:40:06.485Z","sourceNotes":[],"fileContents":[],"compatibility":["Unreal Engine","Engine Version: 4.26+,5.0+"],"featuredImage":{"alt":"Ork Rogue","src":"/wp-content/uploads/published/2026/06/f4a8f4e6cd0d-82beb052-39b1-42c2-a7f4-e33b267d5687-dc7de6eabd.webp"},"hasDownloadLink":true,"pageviews":4,"galleryImages":[{"src":"/wp-content/uploads/published/2026/06/c87885b20fbb-274f7aa5-f9a3-4a83-b1c1-dd3fd05bd7bc-a6c8a62500.webp","alt":"Ork Rogue"},{"src":"/wp-content/uploads/published/2026/06/4b3cee8c4dfe-4b7b67d1-dde7-454a-94da-cbfdf6317769-42066188d6.webp","alt":"Ork Rogue"},{"src":"/wp-content/uploads/published/2026/06/65c5ba52c5c1-7bb6d209-ba72-486f-aa1a-c24e4a27aba4-2b168f35ad.webp","alt":"Ork Rogue"},{"src":"/wp-content/uploads/published/2026/06/38bc5bcb1bae-ef72ca1f-4c50-4695-b67f-db82ad14e8ef-0b5a43f58b.webp","alt":"Ork Rogue"},{"src":"/wp-content/uploads/published/2026/06/6df196241e0a-8f01db60-5232-4cec-84ea-4965839ac7e3-6fc2c9c357.webp","alt":"Ork Rogue"},{"src":"/wp-content/uploads/published/2026/06/bff6fc273b39-c5130d04-c0f6-40e3-a2ac-dd8402b67818-8ddc23f07e.webp","alt":"Ork Rogue"},{"src":"/wp-content/uploads/published/2026/06/4187cc0758ad-f488ee85-92d6-4de2-b305-71508bbad7b1-3b3be68ab1.webp","alt":"Ork Rogue"},{"src":"/wp-content/uploads/published/2026/06/9508e91a50dd-45a65919-3974-4875-8730-0f8918a90a60-ca8e9c5c01.webp","alt":"Ork Rogue"},{"src":"/wp-content/uploads/published/2026/06/4d69d60854f4-19b2a5a8-5069-4a65-ae9b-cd631f286498-ffedb5bd6a.webp","alt":"Ork Rogue"},{"src":"/wp-content/uploads/published/2026/06/08024f1597d1-c609cdde-a8c5-4964-a661-1ee88bdbb7ba-b2a44e5d6c.webp","alt":"Ork Rogue"}],"accessPanel":{"kind":"resource","title":"Access this resource","eyebrow":"Free protected download","message":"Sign in or create an account to continue to the protected download through the managed storage service.","fileName":"Content.7z","safetyNote":"Resources are manually reviewed before listing to improve quality and reduce obvious risks.","actionLabel":"Download Free","resourceType":"Resource archive","sourceShortcode":"cryptomus_member"},"contentHtml":"\u003cp\u003eGetting a usable enemy or playable character into a scene often takes more than just finding the right silhouette. A game-ready model needs its parts separated in sensible ways, texture space allocated clearly, and attachment points handled in a way that supports implementation. Ork Rogue targets that exact stage of production with a completely ready-made character model intended for games, paired with a separate weapon mesh that connects to the character through a blueprint.\u003c/p\u003e\n\u003cp\u003eThis gives a fantasy orc rogue that can slot into a medieval, horror, or broader fantasy setting while keeping the setup practical. Its tag set points toward a lowpoly, rigged character, but the published mesh statistics and texture breakdown make the resource more concrete than a simple style label. Instead of treating it as a vague creature asset, it makes more sense to look at it through the actual production steps it supports: placing the character, handling the weapon setup, assigning materials, and understanding the texture and geometry layout before it enters a scene.\u003c/p\u003e \u003ch2\u003eDropping Ork Rogue into a game character workflow\u003c/h2\u003e\n\u003cp\u003eOrk Rogue is presented as a completely ready-made model for use in games. That directly speaks to teams or solo developers who want to move past base character creation and get to scene assembly, combat prototyping, or encounter building faster.\u003c/p\u003e\n\u003cp\u003eThe model is also stated to look good in all game contexts, which places the focus on broad in-game usability rather than on a single narrow presentation setup. Its tags reinforce the kind of role it can fill: fantasy, medieval, horror, and orc all point toward creature-heavy environments, while rigged suggests it is already aligned with character animation workflows rather than being only a static sculpt or decorative prop. For projects that need a rogue-type silhouette with weapon support already considered, that makes the asset easier to place in active gameplay scenes instead of treating it as background dressing.\u003c/p\u003e \u003ch2\u003eWeapon mesh and blueprint connection\u003c/h2\u003e\n\u003cp\u003eOne of the clearest implementation details here is the weapon arrangement. The weapon has a separate mesh and is connected to the character through a blueprint.\u003c/p\u003e\n\u003cp\u003eThat matters most during setup. A separate weapon mesh gives the character and weapon their own geometry instead of collapsing everything into a single body object. In practice, that makes the character easier to stage for scenes where the weapon needs to be treated as its own element while still remaining linked to the character through blueprint logic. The published mesh counts also confirm that the weapon is not just a minor extension of the body mesh but a distinct part with its own geometry budget: the weapon has 714 vertices and 1,218 tris, while the character itself carries 42,634 vertices and 65,665 tris. For implementation, that kind of separation is useful when reviewing attachments, checking material assignments, or deciding how the character should appear in different gameplay moments.\u003c/p\u003e\n\u003cp\u003eA video is also available for the weapon-equipped version, indicating a presentation of the character with the weapon setup in place. Even without going beyond the stated details, that reinforces the asset’s intended use as a character-plus-weapon package rather than a body mesh that still needs core attachment work solved separately.\u003c/p\u003e \u003ch2\u003eUV layout across body, clothing, head, and weapon\u003c/h2\u003e\n\u003cp\u003eThe texture allocation is laid out piece by piece, which is one of the more useful technical details for anyone planning materials or texture memory.\u003c/p\u003e\n\u003cp\u003eThe asset uses UV sets at 4096x4096, with support down to 1024x1024. The breakdown is explicit: Body uses 4096x4096, Top uses 4096x4096, Bot uses 4096x4096, Weapon uses 4096x4096, and Head uses 4096x4096. Smaller supporting elements are assigned lower sizes, with Beard at 1024x1024 and Eye at 512x512. This creates a clear hierarchy across the model. Large, visually dominant components such as the body, clothing pieces, head, and weapon receive high-resolution space, while smaller details use more compact maps.\u003c/p\u003e\n\u003cp\u003eFor implementation, this kind of layout makes it easier to understand where visual emphasis is expected to sit on the character. The body and worn elements are treated as major texture surfaces, and the weapon gets the same 4096x4096 treatment as the primary character sections. That gives the weapon a comparable level of surface attention instead of leaving it as an afterthought. The beard and eye maps are notably smaller, which fits their narrower screen presence relative to the larger clothing and body sections.\u003c/p\u003e \u003ch2\u003eMesh counts for the character and weapon\u003c/h2\u003e\n\u003cp\u003ePublished geometry counts are often the quickest way to place an asset in a production plan, and Ork Rogue gives exact numbers for both the character and the weapon.\u003c/p\u003e\n\u003cp\u003eThe character is listed at 42,634 vertices and 65,665 tris. The weapon is listed separately at 714 vertices and 1,218 tris. Taken together, those counts show a model that is far more substantial than a minimal placeholder while still being documented in a way that helps with scene planning. Because the character and weapon are broken out independently, teams can review the body and equipment with clearer expectations before placing the asset into combat encounters, cinematic staging, or character roster planning.\u003c/p\u003e\n\u003cp\u003eThe tag combination of lowpoly and realistic is also notable when read alongside these counts. The important point is not to force the asset into a broader label, but to recognize that it is positioned as a game-ready character with a fantasy-medieval-orc identity and a documented triangle structure. For production work, the explicit numbers are more useful than style shorthand alone, since they let artists and technical teams evaluate the model directly as part of a working scene.\u003c/p\u003e \u003ch2\u003eTwo-sided polygon display and material setup\u003c/h2\u003e\n\u003cp\u003eThere is one direct rendering note attached to the model: it is desirable to use a shader with a two-sided display of polygons.\u003c/p\u003e\n\u003cp\u003eThat instruction is small but important. It points to a specific expectation in the asset’s material setup, and it should be considered during import or shader assignment rather than after visual issues appear in-engine. When a character includes surfaces that benefit from two-sided display, using the expected shader treatment helps preserve the intended look of those polygon areas. Since the note is phrased as desirable rather than optional decoration, it belongs in the implementation checklist alongside the weapon blueprint connection and the UV breakdown.\u003c/p\u003e\n\u003cp\u003eThis also helps explain why Ork Rogue reads less like a raw model drop and more like a character package that expects practical setup attention. The blueprint-linked weapon addresses attachment, the UV layout addresses texture planning, and the two-sided shader note addresses material behavior. Those details do not overcomplicate the asset, but they do define the minimum points a developer should review before treating the character as ready for active scene use.\u003c/p\u003e \u003ch2\u003eWhere Ork Rogue fits in fantasy and horror scenes\u003c/h2\u003e\n\u003cp\u003eThe strongest creative fit is right in the tag set: fantasy, medieval, horror, and orc. Those labels give the character a clear role in dark worldbuilding, hostile factions, dungeon encounters, or rougher hand-built environments where a rogue archetype belongs naturally.\u003c/p\u003e\n\u003cp\u003eBecause the model is rigged and includes a separate weapon mesh already connected through blueprint logic, it fits best where a character needs to do more than simply stand in place. The practical value here is not abstract versatility but the fact that the setup details already point toward use in playable or animated scenes. The high-resolution texture allocation across the main body regions, head, and weapon also suggests a character meant to hold up as a visible on-screen figure rather than disappearing into a crowd. In production terms, Ork Rogue makes the most sense as a ready-to-place fantasy orc character for teams that want a finished game model with the weapon relationship, UV structure, and shader note already spelled out before scene integration begins.\u003c/p\u003e\n\n\u003ch2\u003eMore From The Same Workflow\u003c/h2\u003e\n\u003cul\u003e\n\u003cli\u003e\u003ca href=\"https://3dcghub.com/demon-7/\" title=\"Demon 7\"\u003eDemon 7\u003c/a\u003e\u003c/li\u003e\n\u003cli\u003e\u003ca href=\"https://3dcghub.com/goblin-shaman/\" title=\"Goblin Shaman\"\u003eGoblin Shaman\u003c/a\u003e\u003c/li\u003e\n\u003cli\u003e\u003ca href=\"https://3dcghub.com/undead-knight/\" title=\"Undead Knight\"\u003eUndead Knight\u003c/a\u003e\u003c/li\u003e\n\u003cli\u003e\u003ca href=\"https://3dcghub.com/stylized-halloween-pack-2/\" title=\"Stylized Halloween Pack #2\"\u003eStylized Halloween Pack #2\u003c/a\u003e\u003c/li\u003e\n\u003cli\u003e\u003ca href=\"https://3dcghub.com/cave-troll-lightweight/\" title=\"Cave Troll Lightweight\"\u003eCave Troll Lightweight\u003c/a\u003e\u003c/li\u003e\n\u003c/ul\u003e","contentTextLength":8195,"navigation":{"current":594,"total":2611,"previous":{"id":"14365","slug":"prismatiscape-interaction-plugin","title":"Prismatiscape Interaction Plugin","category":"Engine Tools","platform":"Unreal Engine","updatedAt":"2026-06-05T16:50:19.620Z"},"next":{"id":"1000085","slug":"old-shipyard","title":"Old Shipyard","category":"Industrial","platform":"Unreal Engine","updatedAt":"2026-06-05T16:15:41.441Z"}},"relatedResources":[{"id":"1000198","slug":"monsters-wraith","title":"Monsters - Wraith","category":"Creatures \u0026 Monsters","engine":"4.26+,5.0+","assetVersion":"","engineVersion":"Engine Version: 4.26+,5.0+","tag":"Creatures","accent":"cyan","visual":"character","summary":"Monsters - Wraith brings a fully rigged horror character with 15 animations, retargeting support, 4K PBR textures, and three LOD stages.","platform":"Unreal Engine","updatedAt":"2026-06-23T11:17:03.690Z","sourceNotes":[],"fileContents":[],"compatibility":["Unreal Engine","Engine Version: 4.26+,5.0+"],"featuredImage":{"alt":"Monsters - Wraith","src":"/wp-content/uploads/published/2026/06/634d5e446402-356eea60-c9a0-47fa-a911-4eeaa36c9538-45f0eb0911.webp"},"hasDownloadLink":true,"pageviews":3},{"id":"1000352","slug":"wyvern","title":"Wyvern","category":"Creatures \u0026 Monsters","engine":"4.26+,5.0+","assetVersion":"","engineVersion":"Engine Version: 4.26+,5.0+","tag":"Creatures","accent":"cyan","visual":"character","summary":"A production-ready animated Wyvern optimized for Unreal Engine, featuring 25 animations, quad-based low-poly geometry, and 4K PBR texturing.","platform":"Unreal Engine","updatedAt":"2026-07-05T10:06:48.949Z","sourceNotes":[],"fileContents":[],"compatibility":["Unreal Engine","Engine Version: 4.26+,5.0+"],"featuredImage":{"alt":"Wyvern","src":"/wp-content/uploads/published/2026/07/c427cb373033-f988494e-d641-48f2-9b26-eb1aad7f5d8a-1a4d079702.webp"},"hasDownloadLink":true,"pageviews":0},{"id":"1000279","slug":"baby-vampire","title":"Baby Vampire","category":"Creatures \u0026 Monsters","engine":"4.26+,5.0+","assetVersion":"","engineVersion":"Engine Version: 4.26+,5.0+","tag":"Creatures","accent":"cyan","visual":"character","summary":"A technical breakdown of the Baby Vampire creature asset, detailing its 31,320-triangle base mesh, optimized LODs, and robust 72-animation movement library.","platform":"Unreal Engine","updatedAt":"2026-07-02T18:23:20.451Z","sourceNotes":[],"fileContents":[],"compatibility":["Unreal Engine","Engine Version: 4.26+,5.0+"],"featuredImage":{"alt":"Baby Vampire","src":"/wp-content/uploads/published/2026/07/d41d761c622d-c5d334f4-4961-4049-b04c-bc8ad1658722-28872bbf41.webp"},"hasDownloadLink":true,"pageviews":0}]}
Creatures
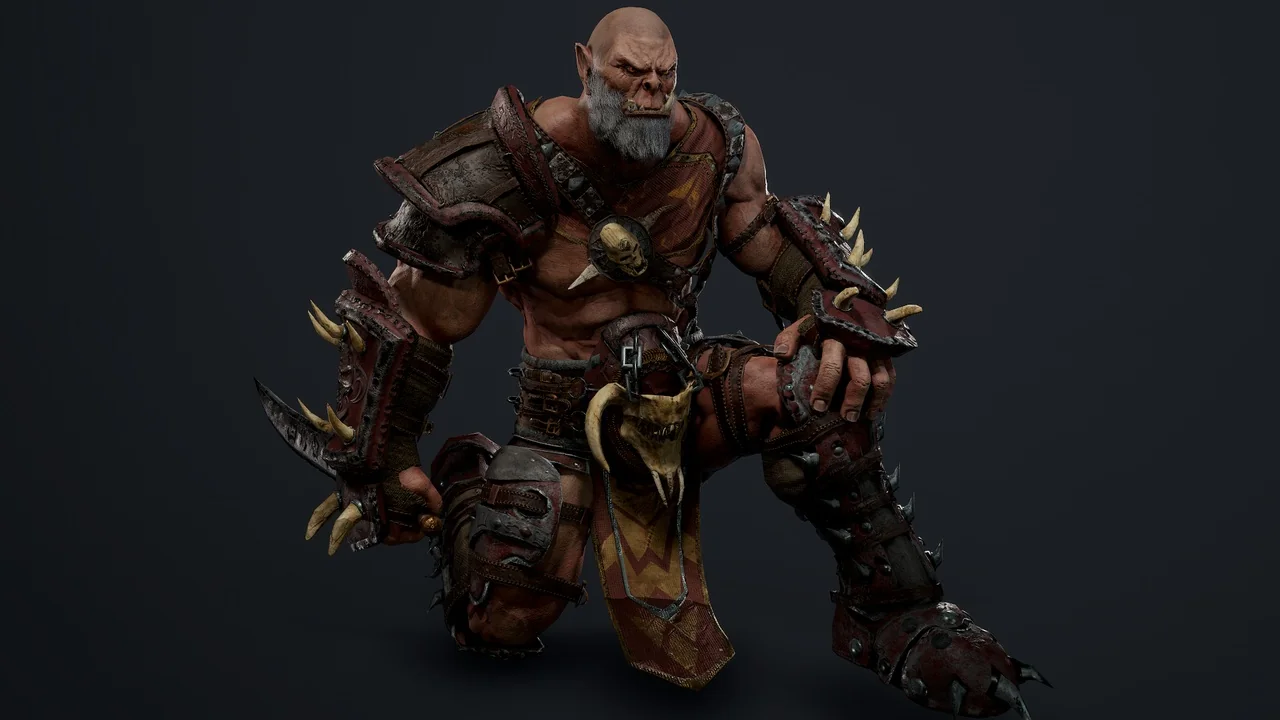
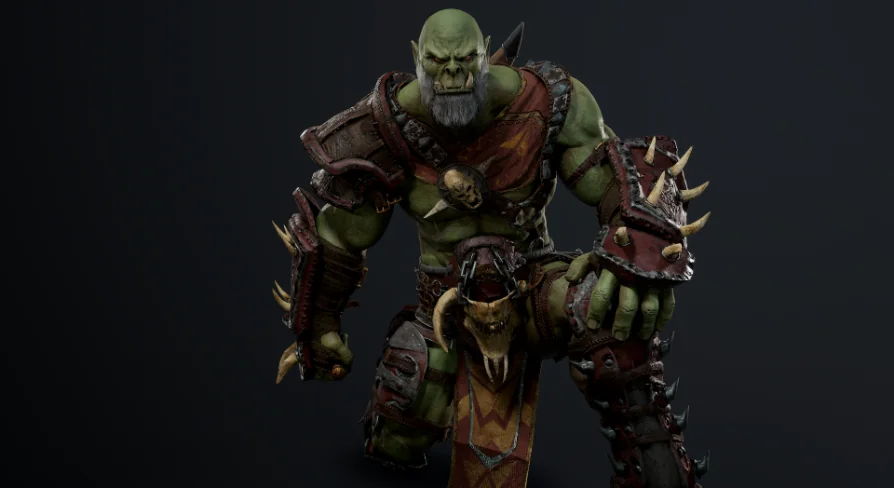
Ork Rogue
Ork Rogue is a ready-made rigged fantasy character with a separate weapon mesh, blueprint connection, detailed UV sets, and stated mesh counts.
Getting a usable enemy or playable character into a scene often takes more than just finding the right silhouette. A game-ready model needs its parts separated in sensible ways, texture space allocated clearly, and attachment points handled in a way that supports implementation. Ork Rogue targets that exact stage of production with a completely ready-made character model intended for games, paired with a separate weapon mesh that connects to the character through a blueprint.
This gives a fantasy orc rogue that can slot into a medieval, horror, or broader fantasy setting while keeping the setup practical. Its tag set points toward a lowpoly, rigged character, but the published mesh statistics and texture breakdown make the resource more concrete than a simple style label. Instead of treating it as a vague creature asset, it makes more sense to look at it through the actual production steps it supports: placing the character, handling the weapon setup, assigning materials, and understanding the texture and geometry layout before it enters a scene.
Dropping Ork Rogue into a game character workflow
Ork Rogue is presented as a completely ready-made model for use in games. That directly speaks to teams or solo developers who want to move past base character creation and get to scene assembly, combat prototyping, or encounter building faster.
The model is also stated to look good in all game contexts, which places the focus on broad in-game usability rather than on a single narrow presentation setup. Its tags reinforce the kind of role it can fill: fantasy, medieval, horror, and orc all point toward creature-heavy environments, while rigged suggests it is already aligned with character animation workflows rather than being only a static sculpt or decorative prop. For projects that need a rogue-type silhouette with weapon support already considered, that makes the asset easier to place in active gameplay scenes instead of treating it as background dressing.
Weapon mesh and blueprint connection
One of the clearest implementation details here is the weapon arrangement. The weapon has a separate mesh and is connected to the character through a blueprint.
That matters most during setup. A separate weapon mesh gives the character and weapon their own geometry instead of collapsing everything into a single body object. In practice, that makes the character easier to stage for scenes where the weapon needs to be treated as its own element while still remaining linked to the character through blueprint logic. The published mesh counts also confirm that the weapon is not just a minor extension of the body mesh but a distinct part with its own geometry budget: the weapon has 714 vertices and 1,218 tris, while the character itself carries 42,634 vertices and 65,665 tris. For implementation, that kind of separation is useful when reviewing attachments, checking material assignments, or deciding how the character should appear in different gameplay moments.
A video is also available for the weapon-equipped version, indicating a presentation of the character with the weapon setup in place. Even without going beyond the stated details, that reinforces the asset’s intended use as a character-plus-weapon package rather than a body mesh that still needs core attachment work solved separately.
UV layout across body, clothing, head, and weapon
The texture allocation is laid out piece by piece, which is one of the more useful technical details for anyone planning materials or texture memory.
The asset uses UV sets at 4096x4096, with support down to 1024x1024. The breakdown is explicit: Body uses 4096x4096, Top uses 4096x4096, Bot uses 4096x4096, Weapon uses 4096x4096, and Head uses 4096x4096. Smaller supporting elements are assigned lower sizes, with Beard at 1024x1024 and Eye at 512x512. This creates a clear hierarchy across the model. Large, visually dominant components such as the body, clothing pieces, head, and weapon receive high-resolution space, while smaller details use more compact maps.
For implementation, this kind of layout makes it easier to understand where visual emphasis is expected to sit on the character. The body and worn elements are treated as major texture surfaces, and the weapon gets the same 4096x4096 treatment as the primary character sections. That gives the weapon a comparable level of surface attention instead of leaving it as an afterthought. The beard and eye maps are notably smaller, which fits their narrower screen presence relative to the larger clothing and body sections.
Mesh counts for the character and weapon
Published geometry counts are often the quickest way to place an asset in a production plan, and Ork Rogue gives exact numbers for both the character and the weapon.
The character is listed at 42,634 vertices and 65,665 tris. The weapon is listed separately at 714 vertices and 1,218 tris. Taken together, those counts show a model that is far more substantial than a minimal placeholder while still being documented in a way that helps with scene planning. Because the character and weapon are broken out independently, teams can review the body and equipment with clearer expectations before placing the asset into combat encounters, cinematic staging, or character roster planning.
The tag combination of lowpoly and realistic is also notable when read alongside these counts. The important point is not to force the asset into a broader label, but to recognize that it is positioned as a game-ready character with a fantasy-medieval-orc identity and a documented triangle structure. For production work, the explicit numbers are more useful than style shorthand alone, since they let artists and technical teams evaluate the model directly as part of a working scene.
Two-sided polygon display and material setup
There is one direct rendering note attached to the model: it is desirable to use a shader with a two-sided display of polygons.
That instruction is small but important. It points to a specific expectation in the asset’s material setup, and it should be considered during import or shader assignment rather than after visual issues appear in-engine. When a character includes surfaces that benefit from two-sided display, using the expected shader treatment helps preserve the intended look of those polygon areas. Since the note is phrased as desirable rather than optional decoration, it belongs in the implementation checklist alongside the weapon blueprint connection and the UV breakdown.
This also helps explain why Ork Rogue reads less like a raw model drop and more like a character package that expects practical setup attention. The blueprint-linked weapon addresses attachment, the UV layout addresses texture planning, and the two-sided shader note addresses material behavior. Those details do not overcomplicate the asset, but they do define the minimum points a developer should review before treating the character as ready for active scene use.
Where Ork Rogue fits in fantasy and horror scenes
The strongest creative fit is right in the tag set: fantasy, medieval, horror, and orc. Those labels give the character a clear role in dark worldbuilding, hostile factions, dungeon encounters, or rougher hand-built environments where a rogue archetype belongs naturally.
Because the model is rigged and includes a separate weapon mesh already connected through blueprint logic, it fits best where a character needs to do more than simply stand in place. The practical value here is not abstract versatility but the fact that the setup details already point toward use in playable or animated scenes. The high-resolution texture allocation across the main body regions, head, and weapon also suggests a character meant to hold up as a visible on-screen figure rather than disappearing into a crowd. In production terms, Ork Rogue makes the most sense as a ready-to-place fantasy orc character for teams that want a finished game model with the weapon relationship, UV structure, and shader note already spelled out before scene integration begins.
 Creatures