"c14ff6bd758dadb1"{"id":"24662","slug":"lodmod","title":"Lodmod","category":"Blender Add-ons \u0026 Plugins","engine":"1.0","assetVersion":"","engineVersion":"Asset Version:1.0","tag":"Blender Add","accent":"amber","visual":"animation","summary":"Lodmod brings LOD creation into a Blender workflow that starts from selected meshes and turns a repetitive reduction task into a single operation. It also gives room to inspect, adjust, and organize the generated versions before they stay in the scene.","platform":"Blender","publishedAt":"2026-04-16T12:29:56.000Z","updatedAt":"2026-04-20T06:12:40.000Z","sourceNotes":[],"fileContents":[],"compatibility":["Blender","Asset Version: 1.0"],"featuredImage":{"alt":"Lodmod","src":"https://3dcghub.com/wp-content/uploads/2026/04/d5093940382b_ebdfc3b3c291de8e6f1b081fcf9927f3.webp"},"hasDownloadLink":true,"downloads":0,"terms":[{"taxonomy":"category","slug":"blender-add-ons-plugins","name":"Blender Add-ons \u0026 Plugins"},{"taxonomy":"post_tag","slug":"blender","name":"Blender"},{"taxonomy":"post_tag","slug":"environment","name":"Environment"},{"taxonomy":"post_tag","slug":"ui","name":"UI"}],"galleryImages":[{"src":"https://3dcghub.com/wp-content/uploads/2026/04/13e3ea29d3e6_a5e9a9e81a79908cb0ed10f1eebcac4c.webp","alt":"Lodmod"},{"src":"https://3dcghub.com/wp-content/uploads/2026/04/99e7cdc97ab9_dc4004a4a821bba6220085db961f9944.webp","alt":"Lodmod"},{"src":"https://3dcghub.com/wp-content/uploads/2026/04/90608b922090_b9a89e58a1b174f65e10a2e61250a7b5.webp","alt":"Lodmod"},{"src":"https://3dcghub.com/wp-content/uploads/2026/04/41ed03993148_87bb82af9614418df4ae563a4eb5831c.webp","alt":"Lodmod"}],"accessPanel":{"kind":"resource","title":"Access this resource","eyebrow":"Free Download","message":"Log in or create a free account to start your download.","fileName":"Lodmod V1.0.7z","safetyNote":"All resources are 100% manually reviewed to eliminate all risks.","actionLabel":"Download Free","resourceType":"Resource archive"},"contentHtml":"\u003ch2\u003eMesh detail changes when a scene needs more than one distance view\u003c/h2\u003e\n\u003cp\u003eWhen a project includes meshes that need to read well at different distances, the work quickly shifts from shaping the main object to preparing lighter versions of it. Lodmod focuses on that part of the Blender workflow. It automates the creation of LODs for meshes using the Decimate modifier, which makes the repeated reduction process feel much less manual.\u003c/p\u003e\n\u003cp\u003eThe addon is aimed at the kind of task that usually turns into a cycle of collapsing geometry and counting verts again and again. Instead of rebuilding each lower-detail version by hand, it gives a faster path for creating multiple LOD meshes and then adjusting them afterwards. That makes it useful when several selected objects need to move through the same reduction process in one pass.\u003c/p\u003e \u003ch2\u003eWhat happens when the LODs are created\u003c/h2\u003e\n\u003cp\u003eThe workflow starts with selected objects. After clicking the create LODs button, the addon duplicates the object for the number of LODs chosen, then renames each duplicate with the suffix \u003cstrong\u003e_LODx\u003c/strong\u003e. It also adds a Decimate modifier set to collapse, using a preset ratio calculated from the ratio value and the number of LODs selected.\u003c/p\u003e\n\u003cp\u003eThat structure keeps the process simple: the addon takes what is already selected, produces the required variants, and applies the same reduction logic across them. The original mesh can stay as it is, or it can be given the \u003cstrong\u003e_LOD0\u003c/strong\u003e Suffix if that option is turned on. Either way, the generated LODs begin with \u003cstrong\u003e_LOD1\u003c/strong\u003e.\u003c/p\u003e\n\u003cp\u003eBecause the addon works from the selected objects rather than from a separate setup step, it suits situations where several meshes need matching LOD chains at once. The same operation can be used to duplicate, rename, and prepare the lower-detail versions without repeating the setup for each object individually.\u003c/p\u003e \u003ch2\u003eThe settings that shape each LOD set\u003c/h2\u003e\n\u003cp\u003eThe menu includes a small set of controls that directly affect how the generated LODs behave. Each one changes a different part of the workflow:\u003c/p\u003e\n\u003cul\u003e \u003cli\u003e\u003cstrong\u003eNumber of LODs:\u003c/strong\u003e Sets how many LODs are created for each selected object.\u003c/li\u003e \u003cli\u003e\u003cstrong\u003eDecimation ratio:\u003c/strong\u003e Sets how much each LOD is reduced, from 0 to 1. The default is 0.5, so each LOD halves in vertex count from the previous one.\u003c/li\u003e \u003cli\u003e\u003cstrong\u003eLineup Offset:\u003c/strong\u003e Offsets each generated LOD by the chosen amount so they can be viewed in a lineup after creation.\u003c/li\u003e \u003cli\u003e\u003cstrong\u003eApply Modifiers:\u003c/strong\u003e Applies the Decimate modifiers to the LODs, which turns the process into a destructive workflow and removes the need to apply them one by one.\u003c/li\u003e \u003cli\u003e\u003cstrong\u003eAdd _LOD0 suffix:\u003c/strong\u003e Gives the original mesh the _LOD0 suffix when enabled. When it is off, the original mesh keeps its name.\u003c/li\u003e \u003cli\u003e\u003cstrong\u003eMake Collections:\u003c/strong\u003e Packs the original meshes into a collection with their respective LODs, keeping each set together and helping the outliner stay tidy.\u003c/li\u003e\n\u003c/ul\u003e\n\u003cp\u003eThese controls make the addon flexible enough to cover both quick generation and more deliberate review. The ratio setting handles the general level of reduction, while the number of LODs determines how many steps will be created. Together, they define the chain that follows the original mesh.\u003c/p\u003e \u003ch2\u003eChecking the results before they settle into the scene\u003c/h2\u003e\n\u003cp\u003eThe Lineup Offset option is especially practical when the goal is to inspect the generated versions immediately. By spacing the LODs apart, it creates a visible lineup that makes it easier to examine the results and tweak values before recreating them. That keeps the process from becoming a blind reduction pass.\u003c/p\u003e\n\u003cp\u003eThe option to apply modifiers also matters when the work needs to be committed right away. Since the Decimate modifiers can be applied automatically, the addon avoids the need to do that step object by object. It is a direct route for users who want the generated LODs to become part of the scene without extra manual cleanup.\u003c/p\u003e\n\u003cp\u003eMake Collections helps in a different way. When LODMOD is used on lots of objects at once, the collection option keeps each original mesh together with its LODs. That makes the outliner easier to read and prevents the generated versions from drifting away from the object they belong to.\u003c/p\u003e \u003ch2\u003eA practical fit for repeated LOD work in Blender\u003c/h2\u003e\n\u003cp\u003eLodmod fits projects where LOD creation is a recurring task rather than a one-off adjustment. It is built for selected meshes, uses the Decimate modifier to automate reduction, and gives enough control to adjust how aggressive each step should be. The lineup view, suffix option, modifier application, and collection handling all support the same goal: making lower-detail meshes easier to generate, inspect, and keep organized inside Blender.\u003c/p\u003e\n\u003cp\u003eFor scenes that need many objects processed in the same way, it offers a straightforward path from the main mesh to a full set of LODs without turning the work into a long manual cycle.\u003c/p\u003e\n\n\u003ch2\u003eExplore Similar Assets\u003c/h2\u003e\n\u003cul\u003e\n\u003cli\u003e\u003ca href=\"https://3dcghub.com/command-box-addon-for-blender/\" title=\"Command Box Addon For Blender\"\u003eCommand Box Addon For Blender\u003c/a\u003e\u003c/li\u003e\n\u003cli\u003e\u003ca href=\"https://3dcghub.com/auto-upscale-addon/\" title=\"Auto Upscale Addon\"\u003eAuto Upscale Addon\u003c/a\u003e\u003c/li\u003e\n\u003cli\u003e\u003ca href=\"https://3dcghub.com/animated-render-border/\" title=\"Animated Render Border\"\u003eAnimated Render Border\u003c/a\u003e\u003c/li\u003e\n\u003cli\u003e\u003ca href=\"https://3dcghub.com/geppetto-ai-powered-lip-sync-animation/\" title=\"Geppetto – AI-Powered Lip Sync Animation\"\u003eGeppetto – AI-Powered Lip Sync Animation\u003c/a\u003e\u003c/li\u003e\n\u003cli\u003e\u003ca href=\"https://3dcghub.com/tropical-forest-pack/\" title=\"Tropical Forest Pack\"\u003eTropical Forest Pack\u003c/a\u003e\u003c/li\u003e\n\u003c/ul\u003e","contentTextLength":4922,"navigation":{"current":2039,"total":3719,"previous":{"id":"24599","slug":"3d-pool-in-ue5-c-aaa-quality-beginner-to-advance","title":"3D pool in UE5 C++ AAA Quality (Beginner to Advance)","category":"Unreal Engine","platform":"Unreal Engine","updatedAt":"2026-04-20T06:12:41.000Z"},"next":{"id":"24650","slug":"lazy-shapekeys-shape-keys-folder-utility","title":"Lazy Shapekeys [Shape Keys Folder \u0026 Utility]","category":"Blender Add-ons \u0026 Plugins","platform":"Blender","updatedAt":"2026-04-20T06:12:40.000Z"}},"relatedResources":[{"id":"24665","slug":"node-pie","title":"Node Pie","category":"Blender Add-ons \u0026 Plugins","engine":"1.2.50","assetVersion":"","engineVersion":"Asset Version:1.2.50","tag":"Blender Add","accent":"amber","visual":"audio","summary":"Node Pie adds a pie menu to Blenderâs node editor so nodes can be added faster and with fewer interruptions. Its shortcuts also support auto-connection, link insertion, and node groups. The extension focuses on discoverability, muscle memory, and a more d...","platform":"Blender","publishedAt":"2026-04-16T12:31:39.000Z","updatedAt":"2026-04-20T06:12:39.000Z","sourceNotes":[],"fileContents":[],"compatibility":["Blender","Asset Version: 1.2.50"],"featuredImage":{"alt":"Node Pie","src":"https://3dcghub.com/wp-content/uploads/2026/04/dde925bee02f_7b6e1544a9b797b075d9f77330e5ee1a23ab94509d2be8a35c.webp"},"hasDownloadLink":true,"downloads":0},{"id":"24703","slug":"sakuga-toon-shader-cycles-eevee","title":"Sakuga Toon Shader Cycles \u0026 Eevee","category":"Blender Add-ons \u0026 Plugins","engine":"Version details listed","assetVersion":"","engineVersion":"","tag":"Blender Add","accent":"amber","visual":"luts","summary":"Sakuga Toon Shader Cycles \u0026 Eevee brings a procedural toon-shading workflow to Blender models without UV mapping. It combines Metallic and Point Light lighting modes with rimlights, outlines, paint textures, flares, and a monkey demo scene for testing the s...","platform":"Blender","publishedAt":"2026-04-16T12:45:27.000Z","updatedAt":"2026-04-20T06:12:39.000Z","sourceNotes":[],"fileContents":[],"compatibility":["Blender"],"featuredImage":{"alt":"Sakuga Toon Shader Cycles \u0026 Eevee","src":"https://3dcghub.com/wp-content/uploads/2026/04/9bab9e400a7b_bd11f54388192f292bbd226ff6818e04.webp"},"hasDownloadLink":true,"downloads":1},{"id":"24627","slug":"auto-upscale-addon","title":"Auto Upscale Addon","category":"Blender Add-ons \u0026 Plugins","engine":"3.0.7","assetVersion":"","engineVersion":"Asset Version:3.0.7","tag":"Blender Add","accent":"amber","visual":"audio","summary":"Auto Upscale Add-on for Blender gives rendered images a higher-resolution finish without adding friction to the workflow. It supports automatic and manual control, scale factors from 2x to 8x, and a choice between speed and quality priorities.","platform":"Blender","publishedAt":"2026-04-15T15:13:26.000Z","updatedAt":"2026-04-20T06:12:41.000Z","sourceNotes":[],"fileContents":[],"compatibility":["Blender","Asset Version: 3.0.7"],"featuredImage":{"alt":"Auto Upscale Addon","src":"https://3dcghub.com/wp-content/uploads/2026/04/f9189afbb669_0a812f61763544e6f8be11d3259f9b21.webp"},"hasDownloadLink":true,"downloads":0}]}
Blender Add
Lodmod
Lodmod brings LOD creation into a Blender workflow that starts from selected meshes and turns a repetitive reduction task into a single operation. It also gives room to inspect, adjust, and organize the generated versions before they stay in the scene.
Mesh detail changes when a scene needs more than one distance view
When a project includes meshes that need to read well at different distances, the work quickly shifts from shaping the main object to preparing lighter versions of it. Lodmod focuses on that part of the Blender workflow. It automates the creation of LODs for meshes using the Decimate modifier, which makes the repeated reduction process feel much less manual.
The addon is aimed at the kind of task that usually turns into a cycle of collapsing geometry and counting verts again and again. Instead of rebuilding each lower-detail version by hand, it gives a faster path for creating multiple LOD meshes and then adjusting them afterwards. That makes it useful when several selected objects need to move through the same reduction process in one pass.
What happens when the LODs are created
The workflow starts with selected objects. After clicking the create LODs button, the addon duplicates the object for the number of LODs chosen, then renames each duplicate with the suffix _LODx. It also adds a Decimate modifier set to collapse, using a preset ratio calculated from the ratio value and the number of LODs selected.
That structure keeps the process simple: the addon takes what is already selected, produces the required variants, and applies the same reduction logic across them. The original mesh can stay as it is, or it can be given the _LOD0 Suffix if that option is turned on. Either way, the generated LODs begin with _LOD1.
Because the addon works from the selected objects rather than from a separate setup step, it suits situations where several meshes need matching LOD chains at once. The same operation can be used to duplicate, rename, and prepare the lower-detail versions without repeating the setup for each object individually.
The settings that shape each LOD set
The menu includes a small set of controls that directly affect how the generated LODs behave. Each one changes a different part of the workflow:
Number of LODs: Sets how many LODs are created for each selected object.
Decimation ratio: Sets how much each LOD is reduced, from 0 to 1. The default is 0.5, so each LOD halves in vertex count from the previous one.
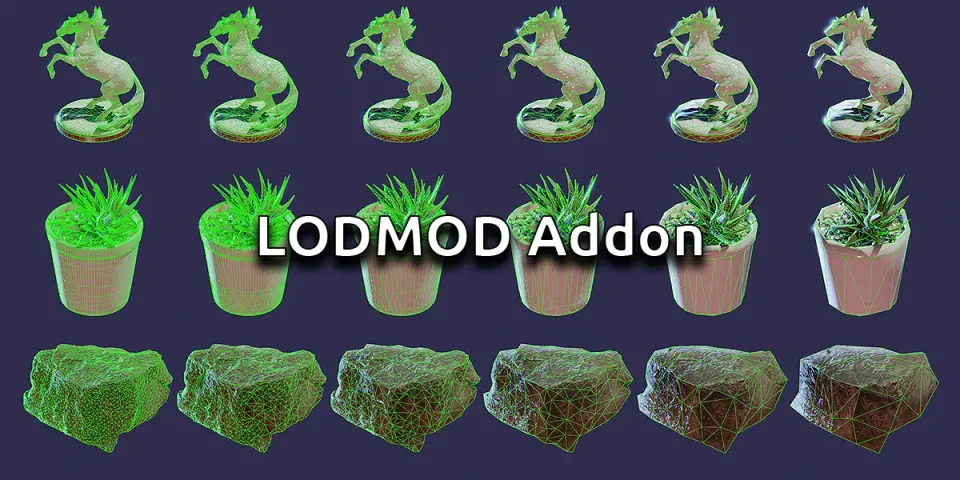
Lineup Offset: Offsets each generated LOD by the chosen amount so they can be viewed in a lineup after creation.
Apply Modifiers: Applies the Decimate modifiers to the LODs, which turns the process into a destructive workflow and removes the need to apply them one by one.
Add _LOD0 suffix: Gives the original mesh the _LOD0 suffix when enabled. When it is off, the original mesh keeps its name.
Make Collections: Packs the original meshes into a collection with their respective LODs, keeping each set together and helping the outliner stay tidy.
These controls make the addon flexible enough to cover both quick generation and more deliberate review. The ratio setting handles the general level of reduction, while the number of LODs determines how many steps will be created. Together, they define the chain that follows the original mesh.
Checking the results before they settle into the scene
The Lineup Offset option is especially practical when the goal is to inspect the generated versions immediately. By spacing the LODs apart, it creates a visible lineup that makes it easier to examine the results and tweak values before recreating them. That keeps the process from becoming a blind reduction pass.
The option to apply modifiers also matters when the work needs to be committed right away. Since the Decimate modifiers can be applied automatically, the addon avoids the need to do that step object by object. It is a direct route for users who want the generated LODs to become part of the scene without extra manual cleanup.
Make Collections helps in a different way. When LODMOD is used on lots of objects at once, the collection option keeps each original mesh together with its LODs. That makes the outliner easier to read and prevents the generated versions from drifting away from the object they belong to.
A practical fit for repeated LOD work in Blender
Lodmod fits projects where LOD creation is a recurring task rather than a one-off adjustment. It is built for selected meshes, uses the Decimate modifier to automate reduction, and gives enough control to adjust how aggressive each step should be. The lineup view, suffix option, modifier application, and collection handling all support the same goal: making lower-detail meshes easier to generate, inspect, and keep organized inside Blender.
For scenes that need many objects processed in the same way, it offers a straightforward path from the main mesh to a full set of LODs without turning the work into a long manual cycle.
 Blender Add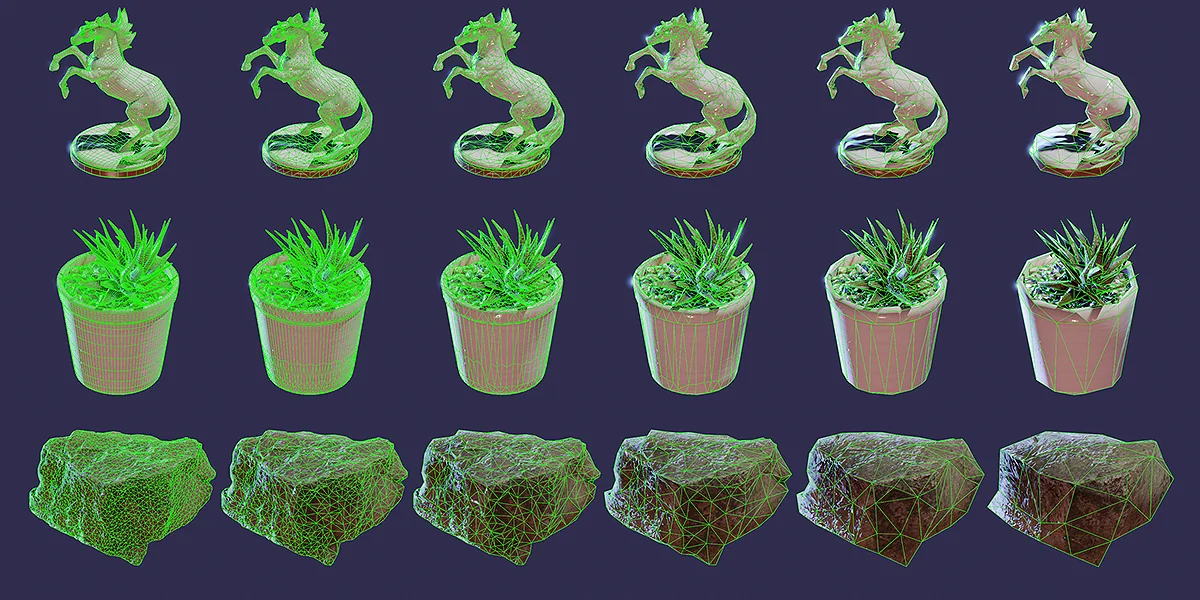
 Blender Add
 Blender Add
 Blender Add