"95fdaf16012263fa"{"id":"1002316","slug":"force-shields","title":"Force Shields","category":"Shaders","engine":"4.27,5.0+","assetVersion":"","engineVersion":"Engine Version: 4.27,5.0+","tag":"Shaders","accent":"blue","visual":"mech","summary":"Force Shields splits its materials into basic and advanced groups, adds Hit and Refraction effects, and ships two showcase levels for testing every parameter.","platform":"Unreal Engine","indexPolicy":"index","publishedAt":"2026-11-06T06:18:05.220Z","updatedAt":"2026-11-06T06:18:05.220Z","sourceNotes":[],"fileContents":[],"compatibility":["Unreal Engine","Engine Version: 4.27,5.0+"],"featuredImage":{"alt":"Force Shields","src":"/wp-content/uploads/published/2026/11/ecbbea2a1ee8-27783fc7-94ad-4115-b559-1d9ce784a2df-a5c1096fc5.webp"},"hasDownloadLink":true,"downloads":0,"terms":[{"taxonomy":"category","slug":"shaders","name":"Shaders"}],"galleryImages":[{"src":"/wp-content/uploads/published/2026/11/edd1cf3f2744-4ed8964e-c8d9-4311-94af-315c6c642c1d-79a1b76c9d.webp","alt":"Force Shields"},{"src":"/wp-content/uploads/published/2026/11/5cdfcf44a68f-91944e22-ba32-4bde-bfe8-b07e4884097a-1208c53023.webp","alt":"Force Shields"},{"src":"/wp-content/uploads/published/2026/11/037a4a98bbbd-3239ec7d-acf3-46eb-8553-89c18f4165f1-edf54ba988.webp","alt":"Force Shields"},{"src":"/wp-content/uploads/published/2026/11/e1dfb1e43cb8-9584d581-6278-410a-95ad-442c31d7b502-260e2d8a6f.webp","alt":"Force Shields"},{"src":"/wp-content/uploads/published/2026/11/7c4a0d609ad2-b8f654bb-61ca-47e1-b684-8187035c7280-8cd7d74f58.webp","alt":"Force Shields"}],"accessPanel":{"kind":"resource","title":"Get this resource","eyebrow":"Free resource","message":"3DCGHUB is the service provider for this listing. Access is fulfilled through the official publisher channel.","fileName":"Force Shields.7z","safetyNote":"Resources are manually reviewed before listing to improve quality and reduce obvious risks.","actionLabel":"Get this resource","resourceType":"Resource archive","versions":[]},"contentHtml":"\u003cp\u003eThe first thing to do with Force Shields is not to drag a material onto a mesh. It is to open the two included levels. They are split into showcase rooms, and each room holds a display of the effects and the parameters behind them. Walking the rooms gives you a working map of what the package can produce before you commit anything to a scene.\u003c/p\u003e \u003ch2\u003eTwo levels, split into showcase rooms\u003c/h2\u003e \u003cp\u003eThe showcase levels exist for a practical reason: a shield material can look like one thing at rest and something else entirely when it is pushed. Rather than flattening everything into a single demo scene, the package separates its displays into rooms, so the effects and their parameters sit apart from one another and can be studied one at a time.\u003c/p\u003e \u003cp\u003eThat structure changes how you audition the pack. You compare a shield in one room with a shield in the next, note the parameter values that produced the difference, and carry those values into your own material instances. It is closer to reading a reference sheet than to watching a trailer.\u003c/p\u003e \u003ch2\u003eBasic and advanced material groups\u003c/h2\u003e \u003cp\u003eThe materials themselves are divided into two groups: basic and advanced. The division runs through the whole package, including the preview material, which is presented separately for the basic set, the advanced set, and the hit effect.\u003c/p\u003e \u003cp\u003eBoth groups are built to be customized. Each force shield exposes multiple parameters, and those parameters are what shift a shield from one look to another. A scene that needs a barrier sitting quietly in the background and a scene that needs the same barrier to read as dense and active can share a material and diverge at the parameter level.\u003c/p\u003e \u003cp\u003eThe grouping is useful when you are budgeting attention. You can work entirely inside the basic set while blocking out a level, then move a specific shield over to the advanced side once the shot is locked and the effect has to hold up close to camera.\u003c/p\u003e \u003ch2\u003eHit and Refraction, added in the update\u003c/h2\u003e \u003cp\u003eThe package has been updated with two new effects: Hit and Refraction. Both are named as additions to the existing effect set rather than replacements, which means the shield vocabulary now covers impact response and a refracting look alongside what was already there.\u003c/p\u003e \u003cp\u003eHit is the effect to reach for when something in the scene strikes the barrier and the surface needs to acknowledge it. Refraction is the one that lets the field bend what sits behind it instead of only sitting on top of it. Between the two, a shield stops being decoration and starts behaving like a surface with its own optical character.\u003c/p\u003e \u003cp\u003eThe update is signposted at the top of the package, and the previews are organized to match — one for the hit effect, one for basic, one for advanced — so you can check a specific effect without scrubbing through an undifferentiated demo.\u003c/p\u003e \u003ch2\u003eWhere the parameters actually get used\u003c/h2\u003e \u003cp\u003eBecause the customization lives in parameters, the same shield material can serve several jobs in one project. A stylized field around a doorway, a barrier that reads as a wall of force across a corridor, and a shield carried by a character can all come from the same starting point and be pulled apart through the exposed controls.\u003c/p\u003e \u003cp\u003eThe showcase rooms are the place to find those settings. Each room displays the potential effects and the parameters that drive them, so when a look in your own scene drifts too far in one direction, you have a known-good reference to return to instead of guessing at values.\u003c/p\u003e \u003cp\u003eSci-fi and space settings are the obvious home for this kind of material — barriers and fields belong there by default. The stylized tag matters too: these are not photoreal glass simulations, and they are not trying to be. The visual, effect-driven approach makes them easy to read at gameplay distance, which is usually where a shield needs to work hardest.\u003c/p\u003e \u003cp\u003eThe modular tag points at the same flexibility from a different angle. Shields come apart into materials and parameters that can be applied independently, so a project is not locked into one uniform barrier treatment across every surface that needs one.\u003c/p\u003e \u003ch2\u003eWorking alongside Modular Magic Circles\u003c/h2\u003e \u003cp\u003eForce Shields is compatible with Modular Magic Circles. Projects that already use that set for circular spell and magic effects can add these barrier materials without treating them as a separate visual system — the two sit in the same stylized, effect-based register.\u003c/p\u003e \u003ch2\u003eWho gets the most out of it\u003c/h2\u003e \u003cp\u003eEffects artists building sci-fi environments will find the most direct use. So will anyone assembling a stylized project where barriers, fields, and shields appear often enough that a single hard-coded material would not survive the variety.\u003c/p\u003e \u003cp\u003eLevel designers get something slightly different out of it: the two showcase levels double as a testing space. You can drop a shield into a room, push the parameters, and judge the result in context before the material ever reaches the real level.\u003c/p\u003e \u003cp\u003eThe package is a material set, not a framework, and it behaves accordingly. Once you have settled on parameter values, the maintenance work is ordinary — keep instances organized, keep the reference rooms around as documentation, and the shields stay predictable as the project grows.\u003c/p\u003e\n\n\u003ch2\u003eContinue Browsing Similar Packs\u003c/h2\u003e\n\u003cul\u003e\n\u003cli\u003e\u003ca href=\"https://3dcghub.com/wall-fx-pack/\" rel=\"noopener noreferrer\"\u003eWall FX pack\u003c/a\u003e\u003c/li\u003e\n\u003cli\u003e\u003ca href=\"https://3dcghub.com/retro-graphics/\" rel=\"noopener noreferrer\"\u003eRetro Graphics\u003c/a\u003e\u003c/li\u003e\n\u003cli\u003e\u003ca href=\"https://3dcghub.com/slime-vfx/\" rel=\"noopener noreferrer\"\u003eSlime VFX\u003c/a\u003e\u003c/li\u003e\n\u003cli\u003e\u003ca href=\"https://3dcghub.com/art-of-shader-distortion-and-glitches/\" rel=\"noopener noreferrer\"\u003eArt Of Shader - Distortion And Glitches\u003c/a\u003e\u003c/li\u003e\n\u003cli\u003e\u003ca href=\"https://3dcghub.com/good-fx-ui-icon-trail/\" rel=\"noopener noreferrer\"\u003eGood FX : UI Icon Trail\u003c/a\u003e\u003c/li\u003e\n\u003c/ul\u003e","contentTextLength":5295,"navigation":{"current":52,"total":4291,"previous":{"id":"1002317","slug":"forest-trunks-photoscanned-vol-2-by-unimodels","title":"Forest Trunks Photoscanned Vol. 2 by Unimodels","category":"Trees","platform":"Unreal Engine","updatedAt":"2026-11-06T06:18:58.089Z"},"next":{"id":"1002315","slug":"cyberpunk-vehicle-hovermod-flymod","title":"Cyberpunk Vehicle ( HoverMod + FlyMod )","category":"Gameplay Features","platform":"Unreal Engine","updatedAt":"2026-11-06T06:17:19.865Z"}},"relatedResources":[{"id":"15973","slug":"wall-fx-pack","title":"Wall FX pack","category":"Shaders","engine":"4.26+,5.0+","assetVersion":"Engine version: 4.26+,5.0+","engineVersion":"4.24","tag":"Shaders","accent":"blue","visual":"audio","summary":"The Wall FX pack is a versatile collection of visual effects designed for futuristic and cyberpunk environments. It features stylized assets like holograms, electric shields, and glitch effects.","platform":"Unreal Engine","indexPolicy":"noindex","publishedAt":"2026-03-12T13:38:58.000Z","updatedAt":"2026-04-19T15:44:38.000Z","sourceNotes":[],"fileContents":[],"compatibility":["Unreal Engine","Engine version: 4.26+,5.0+"],"featuredImage":{"alt":"Wall FX pack","src":"https://3dcghub.com/wp-content/uploads/2026/03/ed2e601e-04c7-4770-8d41-c42abec5f623.webp"},"hasDownloadLink":true,"downloads":0},{"id":"1002168","slug":"retro-graphics","title":"Retro Graphics","category":"Shaders","engine":"4.27+,5.0+","assetVersion":"","engineVersion":"Engine Version: 4.27+,5.0+","tag":"Shaders","accent":"blue","visual":"mech","summary":"Retro Graphics provides shaders, blueprints, vertex snapping, and custom lighting workflows to produce authentic 1990s visuals inside Unreal Engine.","platform":"Unreal Engine","indexPolicy":"index","publishedAt":"2026-10-29T10:10:32.120Z","updatedAt":"2026-10-29T10:10:32.120Z","sourceNotes":[],"fileContents":[],"compatibility":["Unreal Engine","Engine Version: 4.27+,5.0+"],"featuredImage":{"alt":"Retro Graphics","src":"/wp-content/uploads/published/2026/10/8e9cb9662d1d-c1267182-3e0d-41da-b727-8b0ee7be996a-40c3e0fb55.webp"},"hasDownloadLink":true,"downloads":0},{"id":"15935","slug":"slime-vfx","title":"Slime VFX","category":"Shaders","engine":"4.27,5.0+","assetVersion":"Engine version: 4.27,5.0+","engineVersion":"4.27","tag":"Shaders","accent":"blue","visual":"luts","summary":"Enhance your digital environments with Slime VFX, a versatile asset pack featuring wobbly materials, diverse particle systems, and integrated audio for a complete slime-themed experience.","platform":"Unreal Engine","indexPolicy":"index","publishedAt":"2026-03-12T13:30:50.000Z","updatedAt":"2026-04-19T15:44:39.000Z","sourceNotes":[],"fileContents":[],"compatibility":["Unreal Engine","Engine version: 4.27,5.0+"],"featuredImage":{"alt":"Slime VFX","src":"https://3dcghub.com/wp-content/uploads/2026/03/d22f3a87-e384-454f-9c22-f14e061e7395.webp"},"hasDownloadLink":true,"downloads":5}]}
Shaders
Force Shields
Force Shields splits its materials into basic and advanced groups, adds Hit and Refraction effects, and ships two showcase levels for testing every parameter.
Category:Unreal Engine,ShadersPlatform: Unreal EngineEngine Version: 4.27,5.0+Published: Nov 6, 2026
Shaders
Resource overview
The first thing to do with Force Shields is not to drag a material onto a mesh. It is to open the two included levels. They are split into showcase rooms, and each room holds a display of the effects and the parameters behind them. Walking the rooms gives you a working map of what the package can produce before you commit anything to a scene.
Two levels, split into showcase rooms
The showcase levels exist for a practical reason: a shield material can look like one thing at rest and something else entirely when it is pushed. Rather than flattening everything into a single demo scene, the package separates its displays into rooms, so the effects and their parameters sit apart from one another and can be studied one at a time.
That structure changes how you audition the pack. You compare a shield in one room with a shield in the next, note the parameter values that produced the difference, and carry those values into your own material instances. It is closer to reading a reference sheet than to watching a trailer.
Basic and advanced material groups
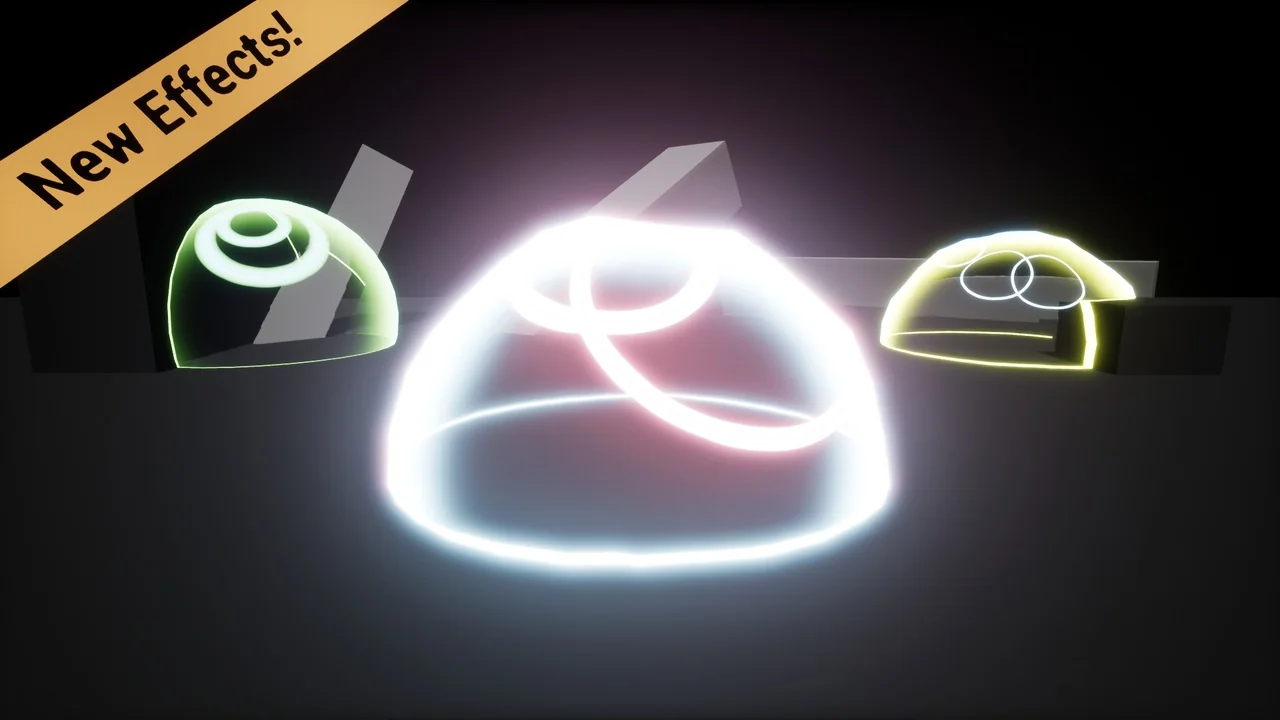
The materials themselves are divided into two groups: basic and advanced. The division runs through the whole package, including the preview material, which is presented separately for the basic set, the advanced set, and the hit effect.
Both groups are built to be customized. Each force shield exposes multiple parameters, and those parameters are what shift a shield from one look to another. A scene that needs a barrier sitting quietly in the background and a scene that needs the same barrier to read as dense and active can share a material and diverge at the parameter level.
The grouping is useful when you are budgeting attention. You can work entirely inside the basic set while blocking out a level, then move a specific shield over to the advanced side once the shot is locked and the effect has to hold up close to camera.
Hit and Refraction, added in the update
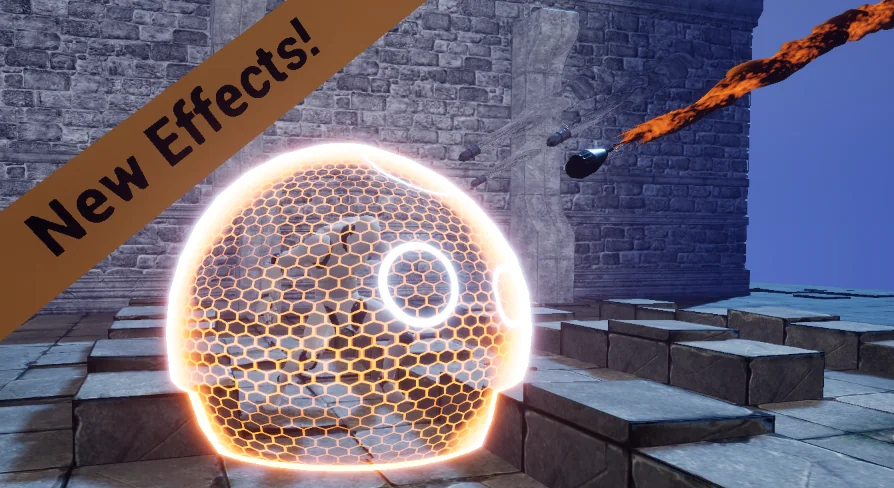
The package has been updated with two new effects: Hit and Refraction. Both are named as additions to the existing effect set rather than replacements, which means the shield vocabulary now covers impact response and a refracting look alongside what was already there.
Hit is the effect to reach for when something in the scene strikes the barrier and the surface needs to acknowledge it. Refraction is the one that lets the field bend what sits behind it instead of only sitting on top of it. Between the two, a shield stops being decoration and starts behaving like a surface with its own optical character.
The update is signposted at the top of the package, and the previews are organized to match — one for the hit effect, one for basic, one for advanced — so you can check a specific effect without scrubbing through an undifferentiated demo.
Where the parameters actually get used
Because the customization lives in parameters, the same shield material can serve several jobs in one project. A stylized field around a doorway, a barrier that reads as a wall of force across a corridor, and a shield carried by a character can all come from the same starting point and be pulled apart through the exposed controls.
The showcase rooms are the place to find those settings. Each room displays the potential effects and the parameters that drive them, so when a look in your own scene drifts too far in one direction, you have a known-good reference to return to instead of guessing at values.
Sci-fi and space settings are the obvious home for this kind of material — barriers and fields belong there by default. The stylized tag matters too: these are not photoreal glass simulations, and they are not trying to be. The visual, effect-driven approach makes them easy to read at gameplay distance, which is usually where a shield needs to work hardest.
The modular tag points at the same flexibility from a different angle. Shields come apart into materials and parameters that can be applied independently, so a project is not locked into one uniform barrier treatment across every surface that needs one.
Working alongside Modular Magic Circles
Force Shields is compatible with Modular Magic Circles. Projects that already use that set for circular spell and magic effects can add these barrier materials without treating them as a separate visual system — the two sit in the same stylized, effect-based register.
Who gets the most out of it
Effects artists building sci-fi environments will find the most direct use. So will anyone assembling a stylized project where barriers, fields, and shields appear often enough that a single hard-coded material would not survive the variety.
Level designers get something slightly different out of it: the two showcase levels double as a testing space. You can drop a shield into a room, push the parameters, and judge the result in context before the material ever reaches the real level.
The package is a material set, not a framework, and it behaves accordingly. Once you have settled on parameter values, the maintenance work is ordinary — keep instances organized, keep the reference rooms around as documentation, and the shields stay predictable as the project grows.
 Shaders
 Shaders
 Shaders
 Shaders