"6ac84fdb0bd06614"{"id":"23658","slug":"component-names","title":"Component Names","category":"Utilities","engine":"Original Unity version: 2021.3.45","assetVersion":"Original Unity version: 2021.3.45","engineVersion":"Asset Version:1.2.1","tag":"Utilities","accent":"cyan","visual":"city","summary":"Component Names adds in-Inspector renaming for Unity components, along with custom suffixes, tooltips, and clearer labels in Object fields and UnityEvents. It also includes code helpers for reading and setting names while keeping the custom data out of builds.","platform":"Unity","publishedAt":"2026-04-10T17:11:20.000Z","updatedAt":"2026-04-19T15:35:17.000Z","sourceNotes":[],"fileContents":[],"compatibility":["Unity","Original Unity version: 2021.3.45","Asset Version: 1.2.1"],"featuredImage":{"alt":"Component Names","src":"https://3dcghub.com/wp-content/uploads/2026/04/4728cc689c71_ee09c304-1c7a-414d-8c01-2da004386eda_1280x720_stretch.webp"},"hasDownloadLink":true,"downloads":0,"terms":[{"taxonomy":"category","slug":"utilities","name":"Utilities"},{"taxonomy":"post_tag","slug":"tools","name":"Tools"},{"taxonomy":"post_tag","slug":"ui","name":"UI"},{"taxonomy":"post_tag","slug":"unity","name":"Unity"}],"galleryImages":[{"src":"https://3dcghub.com/wp-content/uploads/2026/04/40d7fc365033_dc01789d-1fd3-4a26-9d86-4642cac97882_scaled.webp","alt":"Component Names"},{"src":"https://3dcghub.com/wp-content/uploads/2026/04/14a6393f98c8_a1d0c01f-845c-4584-b104-5df9f1424a93_scaled.webp","alt":"Component Names"},{"src":"https://3dcghub.com/wp-content/uploads/2026/04/b9464dc72a8d_49435295-e905-4567-95f6-cb27500acec2_scaled.webp","alt":"Component Names"}],"accessPanel":{"kind":"resource","title":"Access this resource","eyebrow":"Free Download","message":"Log in or create a free account to start your download.","fileName":"Component Names v1.2.1 (16 Dec 2024).7z","safetyNote":"All resources are 100% manually reviewed to eliminate all risks.","actionLabel":"Download Free","resourceType":"Resource archive"},"contentHtml":"\u003ch2\u003eInspector headers that can be renamed in place\u003c/h2\u003e\n\u003cp\u003eComponent Names centers on a simple change that makes a scene easier to read: component headers in the Inspector can be renamed directly. A component header can be selected and renamed with F2, or through the context menuâs Rename command. That makes it possible to turn generic labels into names that match the job a component is doing in a specific GameObject.\u003c/p\u003e\n\u003cp\u003eThis is especially useful when several components of the same type sit together on one object. Instead of opening each one to figure out which collider, trigger, or state handler is which, the header itself can carry the identifying text. The component still behaves like a normal Unity component, but its label can now reflect the way it is being used in the scene.\u003c/p\u003e\n\u003cp\u003eThe default name remains visible in parentheses after the custom name, so the original component type is still readable. That keeps the Inspector informative while letting the custom label do the more specific work.\u003c/p\u003e \u003ch2\u003eNames that do more than label the Inspector\u003c/h2\u003e\n\u003cp\u003eThe custom name is not limited to the component header. It is also shown in Object fields and in UnityEvent dropdowns, which helps keep those selection menus tied to the same naming scheme seen in the Inspector. When a project relies on multiple similarly named components, that extra clarity can reduce second-guessing during setup.\u003c/p\u003e\n\u003cp\u003eThe naming format is flexible enough to support both short labels and added context. A suffix can be appended after the default name by typing it in parentheses. A custom name and suffix can be entered together, and a name can also be written without the default suffix when needed.\u003c/p\u003e\n\u003cul\u003e \u003cli\u003eType a suffix after the default name with parentheses.\u003c/li\u003e \u003cli\u003eEnter a custom name and suffix in the same field.\u003c/li\u003e \u003cli\u003eLeave the parentheses empty to hide the default name suffix.\u003c/li\u003e\n\u003c/ul\u003e\n\u003cp\u003eThat gives the component header a practical range of uses, from compact identifiers to more descriptive labels that explain what the component is doing in a particular setup.\u003c/p\u003e \u003ch2\u003eTooltips and summary text on the component header\u003c/h2\u003e\n\u003cp\u003eComponent Names also turns the header into a place for brief guidance. A custom tooltip can be added by typing a name and tooltip separated with a vertical bar, such as \u003cstrong\u003eName | Tooltip\u003c/strong\u003e. Hovering over the component header then reveals that note in the Inspector.\u003c/p\u003e\n\u003cp\u003eThere is also support for summary documentation already written on a component class. When summary documentation exists, it is shown automatically as a tooltip when the header is mouseovered. That makes the component label do more than identify the element; it can also explain its purpose without forcing the user to unfold the component every time.\u003c/p\u003e\n\u003cp\u003eFor components that carry a state the creator wants visible at a glance, this approach can make the header itself more informative. The component name can reflect current behavior, while the tooltip can provide a short reminder of what the component is meant to do.\u003c/p\u003e \u003ch2\u003eCode helpers for naming from state\u003c/h2\u003e\n\u003cp\u003eThe package also includes code-side support for working with custom component names. Extension methods named \u003cstrong\u003eComponent.GetName\u003c/strong\u003e And \u003cstrong\u003eComponent.SetName\u003c/strong\u003e Make it straightforward to read or assign names in code. That keeps the naming workflow available both in the Inspector and in scripts.\u003c/p\u003e\n\u003cp\u003eOne listed pattern is generating names from the current state by calling \u003cstrong\u003eComponent.SetName\u003c/strong\u003e In \u003cstrong\u003eOnValidate\u003c/strong\u003e. That can be useful when a componentâs visible label should mirror values already present on the object. Instead of updating the Inspector manually, the script can keep the displayed name in step with the componentâs state.\u003c/p\u003e\n\u003cp\u003eIt is also possible to make \u003cstrong\u003eComponent.name\u003c/strong\u003e And \u003cstrong\u003eComponent.ToString()\u003c/strong\u003e Return custom component names by deriving from a custom base class. That broadens the naming system beyond the Inspector itself and into the places where component names are read in code.\u003c/p\u003e\n\u003cp\u003eThese helpers keep the naming workflow practical for teams that want their component labels to stay consistent without treating the Inspector as the only place where the name matters.\u003c/p\u003e \u003ch2\u003eBuilds stay clean, and custom editors still fit in\u003c/h2\u003e\n\u003cp\u003eAll custom name data is fully stripped from builds. That means the naming layer is for editor-time clarity rather than runtime baggage, which keeps the projectâs final build free of the extra naming information.\u003c/p\u003e\n\u003cp\u003eThe package is also marked as highly compatible. It works with Odin Inspector, Power Inspector, and any custom editors that may already be part of the project. That matters for teams with a customized workflow, because the naming system is meant to sit alongside those tools rather than replace them.\u003c/p\u003e\n\u003cp\u003eFor artists and developers, that makes the package a straightforward way to keep complex objects readable. Component headers, object references, UnityEvent lists, and code-side lookups can all point to the same clearer naming pattern, while the build itself remains stripped of the custom data.\u003c/p\u003e\n\u003cp\u003eComponent Names is set up for projects where the Inspector needs to communicate more than a default class name, and where component labels should stay useful both in editor work and in supporting scripts.\u003c/p\u003e\n\n\u003ch2\u003eContinue Browsing Similar Packs\u003c/h2\u003e\n\u003cul\u003e\n\u003cli\u003e\u003ca href=\"https://3dcghub.com/toolkit-for-unity-physics-2026/\" title=\"Toolkit for Unity Physics 2026\"\u003eToolkit for Unity Physics 2026\u003c/a\u003e\u003c/li\u003e\n\u003cli\u003e\u003ca href=\"https://3dcghub.com/opencv-for-unity/\" title=\"OpenCV for Unity\"\u003eOpenCV for Unity\u003c/a\u003e\u003c/li\u003e\n\u003cli\u003e\u003ca href=\"https://3dcghub.com/exporter-for-unreal-to-for-unity-2026/\" title=\"Exporter for Unreal to/for Unity 2026\"\u003eExporter for Unreal to/for Unity 2026\u003c/a\u003e\u003c/li\u003e\n\u003cli\u003e\u003ca href=\"https://3dcghub.com/dialogue-system-for-unity/\" title=\"Dialogue System for Unity\"\u003eDialogue System for Unity\u003c/a\u003e\u003c/li\u003e\n\u003cli\u003e\u003ca href=\"https://3dcghub.com/ambient-sounds-interactive-soundscapes-for-unity-6/\" title=\"Ambient Sounds – Interactive Soundscapes for Unity 6\"\u003eAmbient Sounds – Interactive Soundscapes for Unity 6\u003c/a\u003e\u003c/li\u003e\n\u003c/ul\u003e","contentTextLength":5318,"navigation":{"current":3115,"total":3181,"previous":{"id":"23604","slug":"voxelica-voxel-engine","title":"Voxelica - Voxel Engine","category":"Terrain","platform":"Unity","updatedAt":"2026-04-19T15:35:18.000Z"},"next":{"id":"23652","slug":"build-report-tool","title":"Build Report Tool","category":"Utilities","platform":"Unity","updatedAt":"2026-04-19T15:35:17.000Z"}},"relatedResources":[{"id":"18206","slug":"heat-complete-modern-ui","title":"Heat - Complete Modern UI","category":"GUI","engine":"Original Unity version: 2021.3.37","assetVersion":"Original Unity version: 2021.3.37","engineVersion":"Asset Version:1.1.6","tag":"GUI","accent":"cyan","visual":"mech","summary":"Heat - Complete Modern UI provides a comprehensive toolkit for building stylish, high-performance interfaces in Unity. This modern asset includes over 15 unique components and integrated systems for achievements and localization.","platform":"Unity","publishedAt":"2026-03-15T16:29:04.000Z","updatedAt":"2026-04-19T15:43:22.000Z","sourceNotes":[],"fileContents":[],"compatibility":["Unity","Original Unity version: 2021.3.37","Asset Version: 1.1.6"],"featuredImage":{"alt":"Heat - Complete Modern UI","src":"https://3dcghub.com/wp-content/uploads/2026/03/86c2b5a04d6b_b594a41f-2d15-4485-9360-2399635a178e_1280x720_stretch.webp"},"hasDownloadLink":true,"downloads":1},{"id":"23628","slug":"amplify-impostors","title":"Amplify Impostors","category":"Utilities","engine":"Original Unity version: 2019.4.31","assetVersion":"Original Unity version: 2019.4.31","engineVersion":"","tag":"Utilities","accent":"cyan","visual":"character","summary":"Amplify Impostors turns complex models into simplified impostors with 1-click baking, octahedron and spherical shapes, and a billboard shape editor. It also includes smart blending, depth-write intersections, and support for forward and deferred rendering a...","platform":"Unity","publishedAt":"2026-04-10T16:57:43.000Z","updatedAt":"2026-04-19T15:35:18.000Z","sourceNotes":[],"fileContents":[],"compatibility":["Unity","Original Unity version: 2019.4.31"],"featuredImage":{"alt":"Amplify Impostors","src":"https://3dcghub.com/wp-content/uploads/2026/04/36bc9e806878_f5dc3cdc-1baf-422b-828d-acf24937e624_1280x720_stretch.webp"},"hasDownloadLink":true,"downloads":2},{"id":"23652","slug":"build-report-tool","title":"Build Report Tool","category":"Utilities","engine":"Original Unity version: 4.6.5","assetVersion":"Original Unity version: 4.6.5","engineVersion":"Asset Version:3.11.11","tag":"Utilities","accent":"cyan","visual":"luts","summary":"Build Report Tool turns Unityâs build info into a readable report, showing which assets are included and how much space each one uses. It also tracks unused assets, project settings, and managed DLLs, while noting that Asset Bundles and Addressables are n...","platform":"Unity","publishedAt":"2026-04-10T17:08:30.000Z","updatedAt":"2026-04-19T15:35:17.000Z","sourceNotes":[],"fileContents":[],"compatibility":["Unity","Original Unity version: 4.6.5","Asset Version: 3.11.11"],"featuredImage":{"alt":"Build Report Tool","src":"https://3dcghub.com/wp-content/uploads/2026/04/e4ac5bff9a2c_cbf8a053-aa26-4e05-9c26-589468b2ce4b_1280x720_stretch.webp"},"hasDownloadLink":true,"downloads":1}]}
Utilities
Component Names
Component Names adds in-Inspector renaming for Unity components, along with custom suffixes, tooltips, and clearer labels in Object fields and UnityEvents. It also includes code helpers for reading and setting names while keeping the custom data out of builds.
Component Names centers on a simple change that makes a scene easier to read: component headers in the Inspector can be renamed directly. A component header can be selected and renamed with F2, or through the context menuâs Rename command. That makes it possible to turn generic labels into names that match the job a component is doing in a specific GameObject.
This is especially useful when several components of the same type sit together on one object. Instead of opening each one to figure out which collider, trigger, or state handler is which, the header itself can carry the identifying text. The component still behaves like a normal Unity component, but its label can now reflect the way it is being used in the scene.
The default name remains visible in parentheses after the custom name, so the original component type is still readable. That keeps the Inspector informative while letting the custom label do the more specific work.
Names that do more than label the Inspector
The custom name is not limited to the component header. It is also shown in Object fields and in UnityEvent dropdowns, which helps keep those selection menus tied to the same naming scheme seen in the Inspector. When a project relies on multiple similarly named components, that extra clarity can reduce second-guessing during setup.
The naming format is flexible enough to support both short labels and added context. A suffix can be appended after the default name by typing it in parentheses. A custom name and suffix can be entered together, and a name can also be written without the default suffix when needed.
Type a suffix after the default name with parentheses.
Enter a custom name and suffix in the same field.
Leave the parentheses empty to hide the default name suffix.
That gives the component header a practical range of uses, from compact identifiers to more descriptive labels that explain what the component is doing in a particular setup.
Tooltips and summary text on the component header
Component Names also turns the header into a place for brief guidance. A custom tooltip can be added by typing a name and tooltip separated with a vertical bar, such as Name | Tooltip. Hovering over the component header then reveals that note in the Inspector.
There is also support for summary documentation already written on a component class. When summary documentation exists, it is shown automatically as a tooltip when the header is mouseovered. That makes the component label do more than identify the element; it can also explain its purpose without forcing the user to unfold the component every time.
For components that carry a state the creator wants visible at a glance, this approach can make the header itself more informative. The component name can reflect current behavior, while the tooltip can provide a short reminder of what the component is meant to do.
Code helpers for naming from state
The package also includes code-side support for working with custom component names. Extension methods named Component.GetName And Component.SetName Make it straightforward to read or assign names in code. That keeps the naming workflow available both in the Inspector and in scripts.
One listed pattern is generating names from the current state by calling Component.SetName In OnValidate. That can be useful when a componentâs visible label should mirror values already present on the object. Instead of updating the Inspector manually, the script can keep the displayed name in step with the componentâs state.
It is also possible to make Component.name And Component.ToString() Return custom component names by deriving from a custom base class. That broadens the naming system beyond the Inspector itself and into the places where component names are read in code.
These helpers keep the naming workflow practical for teams that want their component labels to stay consistent without treating the Inspector as the only place where the name matters.
Builds stay clean, and custom editors still fit in
All custom name data is fully stripped from builds. That means the naming layer is for editor-time clarity rather than runtime baggage, which keeps the projectâs final build free of the extra naming information.
The package is also marked as highly compatible. It works with Odin Inspector, Power Inspector, and any custom editors that may already be part of the project. That matters for teams with a customized workflow, because the naming system is meant to sit alongside those tools rather than replace them.
For artists and developers, that makes the package a straightforward way to keep complex objects readable. Component headers, object references, UnityEvent lists, and code-side lookups can all point to the same clearer naming pattern, while the build itself remains stripped of the custom data.
Component Names is set up for projects where the Inspector needs to communicate more than a default class name, and where component labels should stay useful both in editor work and in supporting scripts.
 Utilities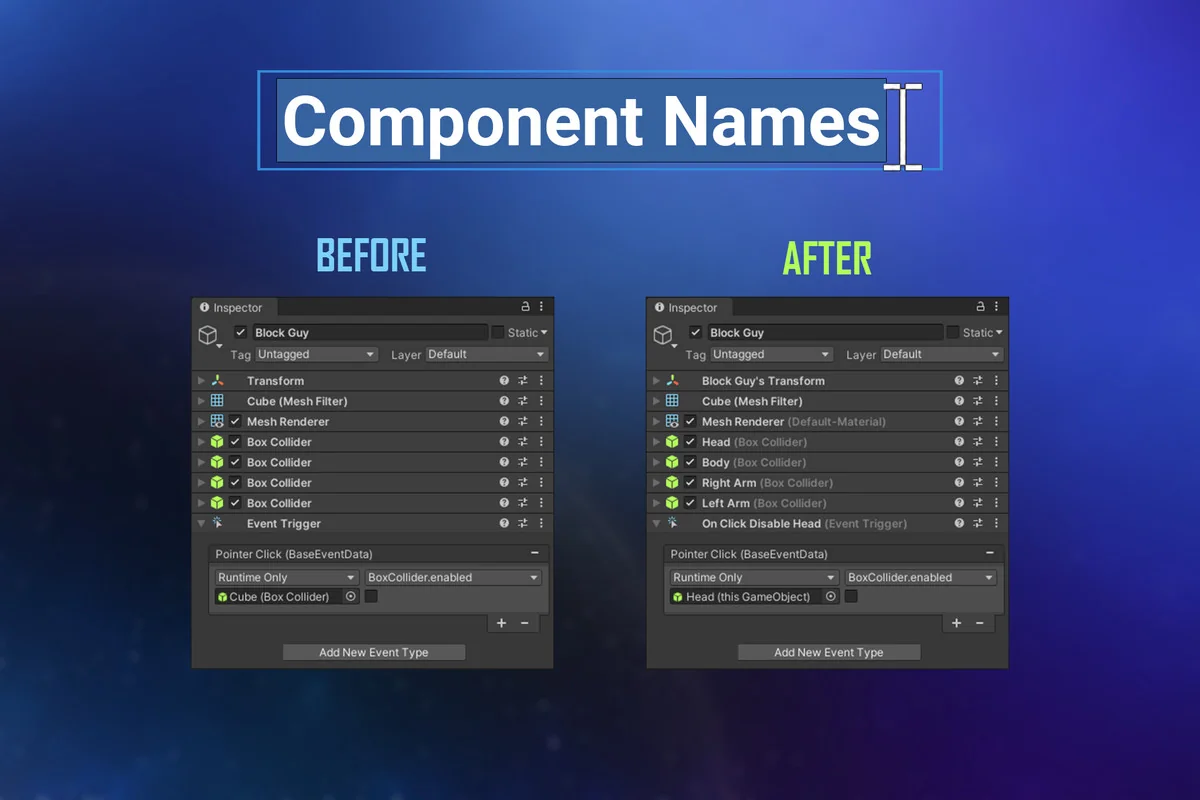
 GUI
GUI Utilities
 Utilities