"6f9bd6df1f44a86f"{"id":"1002292","slug":"ak-47-fpsk-ready","title":"AK-47 (FPSK Ready)","category":"Guns","engine":"4.26+,5.0+","assetVersion":"","engineVersion":"Engine Version: 4.26+,5.0+","tag":"Guns","accent":"blue","visual":"mech","summary":"AK-47 (FPSK Ready) ships as a skeletal-mesh gun with attachments in modular and full versions, a foam-inset carry case, and an open-close case blueprint.","platform":"Unreal Engine","indexPolicy":"index","publishedAt":"2026-11-04T05:21:02.045Z","updatedAt":"2026-11-04T05:21:02.045Z","sourceNotes":[],"fileContents":[],"compatibility":["Unreal Engine","Engine Version: 4.26+,5.0+"],"featuredImage":{"alt":"AK-47 (FPSK Ready)","src":"/wp-content/uploads/published/2026/11/ca9bfc78dac5-64ab03dc-0468-4762-acf0-9e434811b4b9-9d57438df2.webp"},"hasDownloadLink":true,"downloads":0,"terms":[{"taxonomy":"category","slug":"guns","name":"Guns"}],"galleryImages":[{"src":"/wp-content/uploads/published/2026/11/f1dc1c8a1c37-bfd0e5b4-f6b5-49a9-9a37-dce68646c01b-313c14b9d3.webp","alt":"AK-47 (FPSK Ready)"},{"src":"/wp-content/uploads/published/2026/11/a44a081f0eed-dd4879c9-721e-4870-ae08-987c44483d84-857b2a3b37.webp","alt":"AK-47 (FPSK Ready)"},{"src":"/wp-content/uploads/published/2026/11/b3ec146e8ae8-bd9f3193-10f7-480f-a444-183378863bfa-95b5fc23c0.webp","alt":"AK-47 (FPSK Ready)"},{"src":"/wp-content/uploads/published/2026/11/ad3ea8edd101-b021c077-7282-4a43-b0b8-20a3df74d489-ce3e204142.webp","alt":"AK-47 (FPSK Ready)"},{"src":"/wp-content/uploads/published/2026/11/2b947c4e8b7e-a50003fd-8164-46fb-b6f3-d2d34adfb82f-000440268e.webp","alt":"AK-47 (FPSK Ready)"},{"src":"/wp-content/uploads/published/2026/11/2709c8902fec-90ea69ca-1d33-413c-b431-1edbe2eadc8c-f0b07736fd.webp","alt":"AK-47 (FPSK Ready)"},{"src":"/wp-content/uploads/published/2026/11/c45cf0804289-3f65e747-e7b5-483d-a4f1-37a6a9449e2a-f56081a362.webp","alt":"AK-47 (FPSK Ready)"},{"src":"/wp-content/uploads/published/2026/11/fb1f2db1900b-310d46bb-8c57-4869-8ef1-bf7316dcc6e3-ed182675d2.webp","alt":"AK-47 (FPSK Ready)"}],"accessPanel":{"kind":"resource","title":"Download this resource","eyebrow":"Free Download","message":"Log in or create a free account to start your download.","fileName":"Content.7z","safetyNote":"Resources are manually reviewed before listing to improve quality and reduce obvious risks.","actionLabel":"Download Free","resourceType":"Resource archive"},"contentHtml":"\u003cp\u003eThe awkward part of adding a weapon to a first-person shooter is rarely the model itself — it is the stretch between files on disk and a gun that behaves in hand. AK-47 (FPSK Ready) takes its name from where that work happens: the import process through the FPS Kit is made to be as seamless and easy as possible, and an image guide inside the FPS Kit documents the steps visually rather than leaving them to guesswork. Everything else in the package hangs off that starting point.\u003c/p\u003e \u003ch2\u003eImporting the AK-47 Through the FPS Kit Path\u003c/h2\u003e\n\u003cp\u003eFollow the FPS Kit route first. The image guide sits inside the kit, so the reference material is next to the pipeline it describes rather than in a separate document you have to hunt for. That placement matters in practice: when something needs re-importing later — a fresh project, a second weapon slot, a rebuilt test level — the instructions are already where the work is happening.\u003c/p\u003e\n\u003cp\u003eThe emphasis on seamlessness is worth reading literally. The import process is the piece the package leads with, which suggests the mesh and its attachments are prepared with that handoff in mind. Load the guide, work through the images, and the gun arrives in the kit in the state the rest of the package assumes.\u003c/p\u003e \u003ch2\u003eSkeletal Mesh Build: Modular and Full Mesh Versions\u003c/h2\u003e\n\u003cp\u003eThe gun is delivered as a skeletal mesh model with its attachments. Two versions are included. The modular version breaks the weapon into its constituent parts, while the full mesh version arrives as a completed whole. Which one you reach for depends on the job: modular gives you room to work on individual pieces and to keep parts distinct inside the rig, and the full mesh version gives you the assembled weapon in a single form when you do not need to touch the internals.\u003c/p\u003e\n\u003cp\u003eAttachments belong to the same package, so the gun and its add-ons are not split across separate drops. Keeping both variants in the same download also means the decision between them stays reversible — you can start with the full mesh for a quick placement and switch to the modular build when a scene calls for more granular control.\u003c/p\u003e\n\u003cp\u003eA video showcase accompanies the weapon, which is the fastest way to see how the parts sit together before committing to either version in a project.\u003c/p\u003e \u003ch2\u003eThe Gun Carry Case and Its Tailored Foam Insets\u003c/h2\u003e\n\u003cp\u003eStorage is handled properly rather than as an afterthought. The carry case uses tailored box sizes and foam insets cut for the gun and its attachments when those attachments are included in the package. The sizing is not generic — a case structured through a specific weapon and a specific set of add-ons means the interior actually matches the contents.\u003c/p\u003e\n\u003cp\u003eThat detail pays off in staging. A case that fits its contents convinces in a cutscene, an inventory screen, or an equipment room, because the foam tells the viewer what belongs in the box. It also makes the case usable as a standalone prop in scenes where the weapon is stowed rather than held.\u003c/p\u003e \u003ch2\u003eCarry Case Blueprint for Opening and Closing\u003c/h2\u003e\n\u003cp\u003eThe case is not a locked-shut prop. A Carry Case Blueprint handles opening and closing, so the lid can be worked with in-engine rather than requiring a swap between two static states. The blueprint is the interactive half of the case: the model supplies the tailored interior, and the blueprint supplies the movement that lets the weapon be revealed or packed away.\u003c/p\u003e\n\u003cp\u003ePairing the blueprint with the mesh also keeps the case consistent across scenes. One controlled open-close behaviour is easier to reuse than a set of hand-animated lid positions scattered through different levels.\u003c/p\u003e \u003ch2\u003eWhere a First-Person Shooter Weapon Slot Fits\u003c/h2\u003e\n\u003cp\u003eThe labelling is unambiguous — the tags read first person, shooter, weapon. This is a gun for the player's hands and the camera behind them, not a background dressing piece. The skeletal mesh setup and the attachments point the same direction: the weapon is meant to be equipped, carried, and moved.\u003c/p\u003e\n\u003cp\u003eUseful places for it include a playable weapon slot in a shooter project, an equipment or loadout screen where the modular parts can be inspected separately, a staging area or safehouse scene where the carry case sits open on a bench, and any sequence where a character draws or stows the gun. The case and the weapon being part of one package makes those transitions simpler to stage, since the stowed and held states come from the same source.\u003c/p\u003e \u003ch2\u003eCompatibility With the FPS Kit and the All in One Gun Bundle\u003c/h2\u003e\n\u003cp\u003eThe AK-47 is built to sit inside the FPS Kit workflow, and it is compatible with the All in One Gun Bundle. That combination matters for anyone assembling a weapon roster instead of one gun: the same import path and the same handling conventions apply across the collection, so adding this rifle does not introduce a second, different procedure.\u003c/p\u003e\n\u003cp\u003eIf the project already runs an FPS Kit, this drops into an existing structure. If the bundle is in use, the AK-47 joins a line-up that shares the same foundations — which is the difference between a one-off asset and a piece that fits a growing set.\u003c/p\u003e \u003ch2\u003ePractical Notes Before You Start\u003c/h2\u003e\n\u003cp\u003eKeep the image guide from the FPS Kit open during the first import; it is the intended reference for the process and the fastest way past a step that does not behave as expected. Decide early whether the scene needs the modular or full mesh version, since the modular build is the one to reach for when individual parts have to be handled separately.\u003c/p\u003e\n\u003cp\u003eFor anyone already working inside the FPS Kit or the All in One Gun Bundle, the package removes most of the setup friction: skeletal mesh and attachments together, a case sized to its contents, and a blueprint that makes the case usable. The benefit lands hardest on first-person shooter projects that need a weapon and its storage to behave as one coherent piece of kit.\u003c/p\u003e\n\n\u003ch2\u003eMore From The Same Workflow\u003c/h2\u003e\n\u003cul\u003e\n\u003cli\u003e\u003ca href=\"https://3dcghub.com/br-50-fpsk-ready/\" rel=\"noopener noreferrer\"\u003eBR-50 (FPSK Ready)\u003c/a\u003e\u003c/li\u003e\n\u003cli\u003e\u003ca href=\"https://3dcghub.com/cgr-shotguns-pack/\" rel=\"noopener noreferrer\"\u003eCGr Shotguns Pack\u003c/a\u003e\u003c/li\u003e\n\u003cli\u003e\u003ca href=\"https://3dcghub.com/6-versions-apc-military-vehicle/\" rel=\"noopener noreferrer\"\u003e6 Versions APC Military Vehicle\u003c/a\u003e\u003c/li\u003e\n\u003cli\u003e\u003ca href=\"https://3dcghub.com/bank-heist-vol-2/\" rel=\"noopener noreferrer\"\u003eBank Heist - VOL.2\u003c/a\u003e\u003c/li\u003e\n\u003cli\u003e\u003ca href=\"https://3dcghub.com/gun-weapon-grenade/\" rel=\"noopener noreferrer\"\u003eGun Weapon Grenade\u003c/a\u003e\u003c/li\u003e\n\u003c/ul\u003e","contentTextLength":5908,"navigation":{"current":4,"total":4218,"previous":{"id":"1002293","slug":"align-tool","title":"Align Tool","category":"Engine Tools","platform":"Unreal Engine","updatedAt":"2026-11-04T05:21:40.897Z"},"next":{"id":"1002291","slug":"advancedwidgetease","title":"AdvancedWidgetEase","category":"Animations","platform":"Unreal Engine","updatedAt":"2026-11-04T05:20:11.578Z"}},"relatedResources":[{"id":"1000286","slug":"br-50-fpsk-ready","title":"BR-50 (FPSK Ready)","category":"Weapons \u0026 Combat","engine":"4.26+,5.0+","assetVersion":"","engineVersion":"Engine Version: 4.26+,5.0+","tag":"Weapons \u0026 Combat","accent":"blue","visual":"mech","summary":"A skeletal mesh sniper rifle packaged with an interactive, tailored carry case. Built for seamless integration into the FPS Kit with pre-configured Blueprints.","platform":"Unreal Engine","indexPolicy":"index","publishedAt":"2026-07-03T17:04:35.254Z","updatedAt":"2026-07-03T17:04:35.254Z","sourceNotes":[],"fileContents":[],"compatibility":["Unreal Engine","Engine Version: 4.26+,5.0+"],"featuredImage":{"alt":"BR-50 (FPSK Ready)","src":"/wp-content/uploads/published/2026/07/685beddadcc1-0fed6734-8377-4b2b-9fb5-cbf415c4aea0-9f8a69d65f.webp"},"hasDownloadLink":true,"downloads":0},{"id":"1000040","slug":"cgr-shotguns-pack","title":"CGr Shotguns Pack","category":"Guns","engine":"5.0+","assetVersion":"","engineVersion":"5.0+","tag":"Guns","accent":"blue","visual":"mech","summary":"A UE5 shotgun asset pack with three shotgun types, attachments, animations, assembly blueprints, projectile logic, and presentation-ready FPS systems.","platform":"Unreal Engine","indexPolicy":"index","publishedAt":"2026-05-22T07:23:04.999Z","updatedAt":"2026-05-22T07:23:04.999Z","sourceNotes":[],"fileContents":[],"compatibility":["Unreal Engine","Engine version: 5.0+"],"featuredImage":{"alt":"CGr Shotguns Pack","src":"/wp-content/uploads/published/2026/05/e6eaeb9374b9-7540bf76-ac2f-4dbb-bf8b-3fee8c709309-5aca621bb2.webp"},"hasDownloadLink":true,"downloads":2},{"id":"1001855","slug":"6-versions-apc-military-vehicle","title":"6 Versions APC Military Vehicle","category":"Guns","engine":"4.24+,5.0+","assetVersion":"","engineVersion":"Engine Version: 4.24+,5.0+","tag":"Guns","accent":"blue","visual":"mech","summary":"Examine the 6 Versions APC Military Vehicle package, featuring a Russian BTR70 with 6 camouflage and solid paint schemes, 10 blueprints, and Lumen support.","platform":"Unreal Engine","indexPolicy":"index","publishedAt":"2026-10-22T10:35:31.256Z","updatedAt":"2026-10-22T10:35:31.256Z","sourceNotes":[],"fileContents":[],"compatibility":["Unreal Engine","Engine Version: 4.24+,5.0+"],"featuredImage":{"alt":"6 Versions APC Military Vehicle","src":"/wp-content/uploads/published/2026/10/a4ebf57d161a-685dc58a-a9eb-40b8-9125-90f1a5727389-4b5615b659.webp"},"hasDownloadLink":true,"downloads":0}]}
Guns
AK-47 (FPSK Ready)
AK-47 (FPSK Ready) ships as a skeletal-mesh gun with attachments in modular and full versions, a foam-inset carry case, and an open-close case blueprint.
Category:Unreal Engine,GunsPlatform: Unreal EngineEngine Version: 4.26+,5.0+Published: Nov 4, 2026
Guns
Resource overview
The awkward part of adding a weapon to a first-person shooter is rarely the model itself — it is the stretch between files on disk and a gun that behaves in hand. AK-47 (FPSK Ready) takes its name from where that work happens: the import process through the FPS Kit is made to be as seamless and easy as possible, and an image guide inside the FPS Kit documents the steps visually rather than leaving them to guesswork. Everything else in the package hangs off that starting point.
Importing the AK-47 Through the FPS Kit Path
Follow the FPS Kit route first. The image guide sits inside the kit, so the reference material is next to the pipeline it describes rather than in a separate document you have to hunt for. That placement matters in practice: when something needs re-importing later — a fresh project, a second weapon slot, a rebuilt test level — the instructions are already where the work is happening.
The emphasis on seamlessness is worth reading literally. The import process is the piece the package leads with, which suggests the mesh and its attachments are prepared with that handoff in mind. Load the guide, work through the images, and the gun arrives in the kit in the state the rest of the package assumes.
Skeletal Mesh Build: Modular and Full Mesh Versions
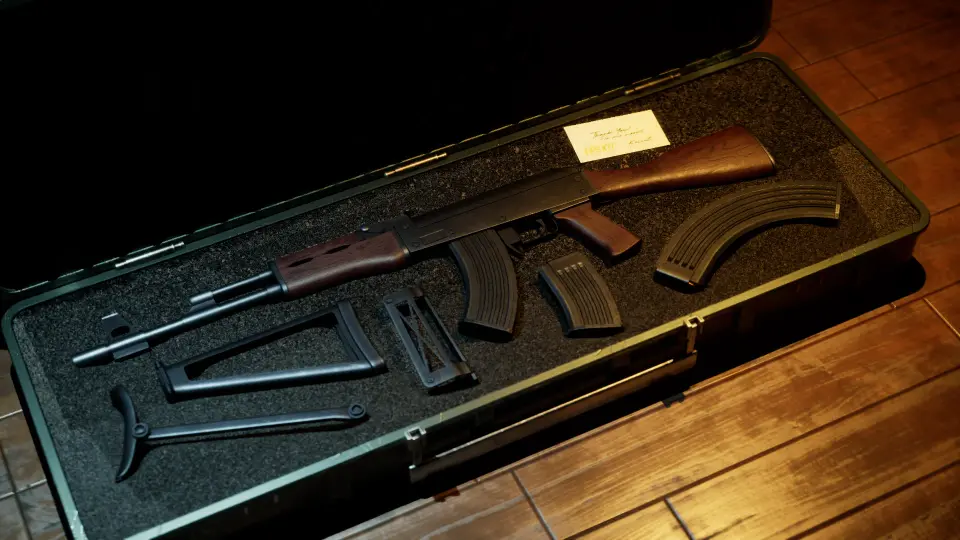
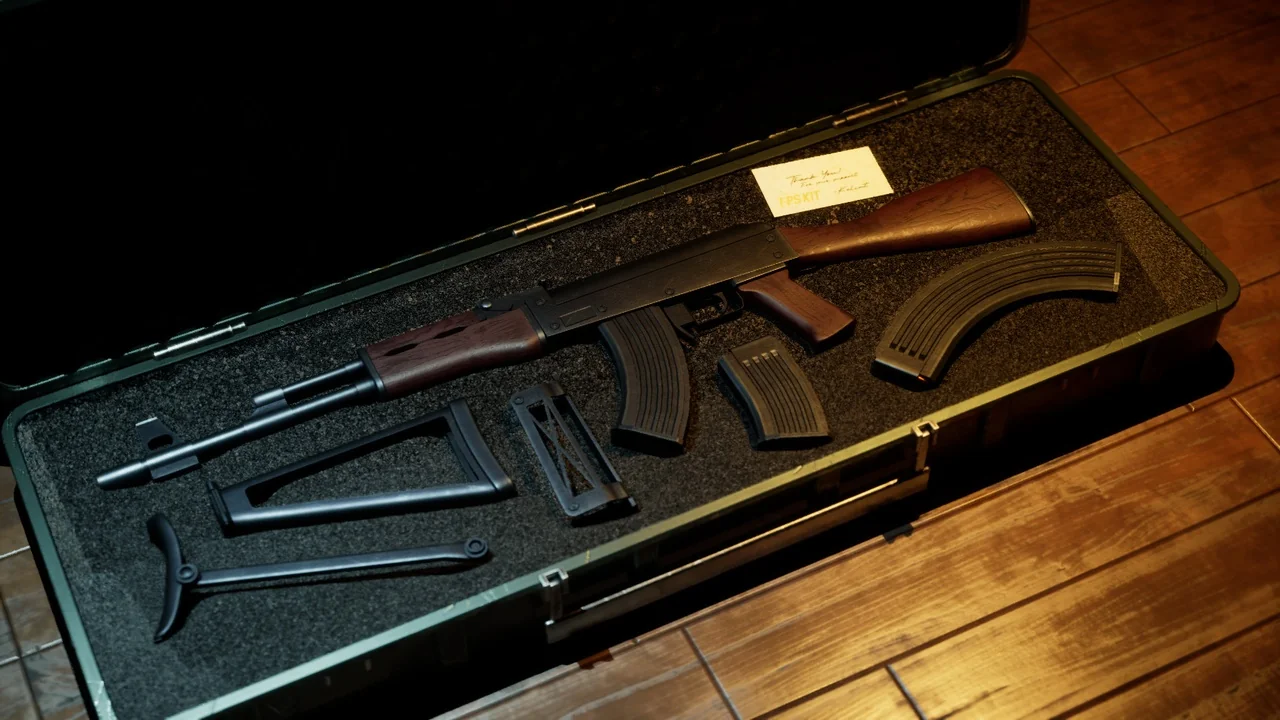
The gun is delivered as a skeletal mesh model with its attachments. Two versions are included. The modular version breaks the weapon into its constituent parts, while the full mesh version arrives as a completed whole. Which one you reach for depends on the job: modular gives you room to work on individual pieces and to keep parts distinct inside the rig, and the full mesh version gives you the assembled weapon in a single form when you do not need to touch the internals.
Attachments belong to the same package, so the gun and its add-ons are not split across separate drops. Keeping both variants in the same download also means the decision between them stays reversible — you can start with the full mesh for a quick placement and switch to the modular build when a scene calls for more granular control.
A video showcase accompanies the weapon, which is the fastest way to see how the parts sit together before committing to either version in a project.
The Gun Carry Case and Its Tailored Foam Insets
Storage is handled properly rather than as an afterthought. The carry case uses tailored box sizes and foam insets cut for the gun and its attachments when those attachments are included in the package. The sizing is not generic — a case structured through a specific weapon and a specific set of add-ons means the interior actually matches the contents.
That detail pays off in staging. A case that fits its contents convinces in a cutscene, an inventory screen, or an equipment room, because the foam tells the viewer what belongs in the box. It also makes the case usable as a standalone prop in scenes where the weapon is stowed rather than held.
Carry Case Blueprint for Opening and Closing
The case is not a locked-shut prop. A Carry Case Blueprint handles opening and closing, so the lid can be worked with in-engine rather than requiring a swap between two static states. The blueprint is the interactive half of the case: the model supplies the tailored interior, and the blueprint supplies the movement that lets the weapon be revealed or packed away.
Pairing the blueprint with the mesh also keeps the case consistent across scenes. One controlled open-close behaviour is easier to reuse than a set of hand-animated lid positions scattered through different levels.
Where a First-Person Shooter Weapon Slot Fits
The labelling is unambiguous — the tags read first person, shooter, weapon. This is a gun for the player's hands and the camera behind them, not a background dressing piece. The skeletal mesh setup and the attachments point the same direction: the weapon is meant to be equipped, carried, and moved.
Useful places for it include a playable weapon slot in a shooter project, an equipment or loadout screen where the modular parts can be inspected separately, a staging area or safehouse scene where the carry case sits open on a bench, and any sequence where a character draws or stows the gun. The case and the weapon being part of one package makes those transitions simpler to stage, since the stowed and held states come from the same source.
Compatibility With the FPS Kit and the All in One Gun Bundle
The AK-47 is built to sit inside the FPS Kit workflow, and it is compatible with the All in One Gun Bundle. That combination matters for anyone assembling a weapon roster instead of one gun: the same import path and the same handling conventions apply across the collection, so adding this rifle does not introduce a second, different procedure.
If the project already runs an FPS Kit, this drops into an existing structure. If the bundle is in use, the AK-47 joins a line-up that shares the same foundations — which is the difference between a one-off asset and a piece that fits a growing set.
Practical Notes Before You Start
Keep the image guide from the FPS Kit open during the first import; it is the intended reference for the process and the fastest way past a step that does not behave as expected. Decide early whether the scene needs the modular or full mesh version, since the modular build is the one to reach for when individual parts have to be handled separately.
For anyone already working inside the FPS Kit or the All in One Gun Bundle, the package removes most of the setup friction: skeletal mesh and attachments together, a case sized to its contents, and a blueprint that makes the case usable. The benefit lands hardest on first-person shooter projects that need a weapon and its storage to behave as one coherent piece of kit.
 Guns
 Weapons & Combat
 Guns
 Guns