"1f00f67f9253451b"{"id":"1000938","slug":"anamorphic-depth-of-field-for-cinematics","title":"Anamorphic Depth of Field for Cinematics","category":"Gameplay Features","engine":"5.1+","assetVersion":"Asset Version: 7.1","engineVersion":"Engine Version: 5.1+","tag":"Gameplay Features","accent":"blue","visual":"mech","summary":"A look at the Anamorphic Depth of Field for Cinematics Blueprint for Unreal Engine — HLSL-based physically accurate DOF, bokeh customization, and pipeline-focus","platform":"Unreal Engine","publishedAt":"2026-08-10T02:56:09.529Z","updatedAt":"2026-08-10T02:56:09.529Z","sourceNotes":[],"fileContents":[],"compatibility":["Unreal Engine","Asset Version: 7.1","Engine Version: 5.1+"],"featuredImage":{"alt":"Anamorphic Depth of Field for Cinematics","src":"/wp-content/uploads/published/2026/08/c46032f1d058-b5c2873e-6de5-4d9a-ad22-0ae9916b359d-1d708d4ed1.webp"},"hasDownloadLink":true,"downloads":0,"terms":[{"taxonomy":"category","slug":"gameplay-features","name":"Gameplay Features"}],"galleryImages":[{"src":"/wp-content/uploads/published/2026/08/8e7b5a1e4763-ebdb57e6-19e8-41d7-ae5b-1023a769bc15-a7e182976d.webp","alt":"Anamorphic Depth of Field for Cinematics"},{"src":"/wp-content/uploads/published/2026/08/65a1b17255f7-d2678a08-5672-4e10-8e88-08f64eaa25d0-ad45ba13cd.webp","alt":"Anamorphic Depth of Field for Cinematics"},{"src":"/wp-content/uploads/published/2026/08/bbef0d58d20b-408382bd-947a-4a8e-963d-ba61187467d5-e7f4ece6b2.webp","alt":"Anamorphic Depth of Field for Cinematics"},{"src":"/wp-content/uploads/published/2026/08/6b4230c7c0cf-0d9962dc-0700-4da2-9b56-e0400a545f99-af36d030f0.webp","alt":"Anamorphic Depth of Field for Cinematics"},{"src":"/wp-content/uploads/published/2026/08/4fad4bc55780-444a06db-613c-4df5-9694-70fb4d5abf9f-2fb2a48d96.webp","alt":"Anamorphic Depth of Field for Cinematics"},{"src":"/wp-content/uploads/published/2026/08/05b26ba980ea-0de9f6db-a2f1-4e6d-b524-c7563c005419-022356b559.webp","alt":"Anamorphic Depth of Field for Cinematics"},{"src":"/wp-content/uploads/published/2026/08/29064b84931f-65195200-6f84-4c6c-b052-a981f58be2d6-af0209171e.webp","alt":"Anamorphic Depth of Field for Cinematics"},{"src":"/wp-content/uploads/published/2026/08/ab4b2c956bae-e2c8ec36-b7a2-44ab-80fb-3dd332db3cbc-730abc7147.webp","alt":"Anamorphic Depth of Field for Cinematics"},{"src":"/wp-content/uploads/published/2026/08/bd67cfe688fe-d3b8c305-1acb-4c44-8bfd-bfa2d6863035-074c46e221.webp","alt":"Anamorphic Depth of Field for Cinematics"},{"src":"/wp-content/uploads/published/2026/08/054124207bd0-699e3cea-33b7-4106-8b31-bedb88a141b3-6e09f31740.webp","alt":"Anamorphic Depth of Field for Cinematics"}],"accessPanel":{"kind":"resource","title":"Download this resource","eyebrow":"Free Download","message":"Log in or create a free account to start your download.","fileName":"Anamorphic Depth of Field for Cinematics v7.1.7z","safetyNote":"Resources are manually reviewed before listing to improve quality and reduce obvious risks.","actionLabel":"Download Free","resourceType":"Resource archive"},"contentHtml":"\u003cp\u003eMatching the look of an anamorphic lens inside Unreal Engine usually means stacking Post-Process tricks or fighting the built-in Depth of Field (DOF). The \u003cem\u003eAnamorphic Depth of Field for Cinematics Blueprint\u003c/em\u003e takes a more direct approach: it’s an \u003ccode\u003eAnamorphic Cine Camera Blueprint\u003c/code\u003e that emulates the Depth of Field of an anamorphic lens, complete with Bokeh customization options that let you switch between different combinations of attributes.\u003c/p\u003e\n\n\u003cp\u003eThe core of the system is a custom \u003ccode\u003eDOF\u003c/code\u003e blur written in High-Level Shader Language (HLSL). It’s physically based, so the focus values line up with standard Unreal \u003ccode\u003eCine Camera Depth of Field\u003c/code\u003e settings. That removes a lot of guesswork when you’re trying to match focal lengths and distances from a real production script.\u003c/p\u003e\n\n\u003ch2\u003eA Physically Based \u003ccode\u003eDOF\u003c/code\u003e Written in \u003ccode\u003eHLSL\u003c/code\u003e\u003c/h2\u003e\n\n\u003cp\u003eWhat sets this \u003ccode\u003eBlueprint\u003c/code\u003e apart is that it doesn’t fake the Depth of Field with a standard Post-Process Material. The \u003ccode\u003eDOF\u003c/code\u003e component is a custom blur written in \u003ccode\u003eHLSL\u003c/code\u003e, and it’s calibrated to behave like real optical physics. That means the focus distance, aperture, and other values behave similarly to what you’d get from Unreal’s own \u003ccode\u003eCine Camera Depth of Field\u003c/code\u003e settings, but with an anamorphic twist.\u003c/p\u003e\n\n\u003cp\u003eThe Bokeh customization options add another layer of control. Instead of 1 fixed look, you can cycle through a few combinations of attributes to get the oval Bokeh and horizontal flare characteristics associated with anamorphic lenses. For artists who need a specific lens signature, that extra flexibility is useful when you’re matching shots or trying to sell a particular vintage of optics.\u003c/p\u003e\n\n\u003ch2\u003eBuilt for the \u003ccode\u003eMovie Render Queue\u003c/code\u003e Pipeline\u003c/h2\u003e\n\n\u003cp\u003eThis system is suited to Cinematic renders through the \u003ccode\u003eMovie Render Queue\u003c/code\u003e (\u003ccode\u003eMRQ\u003c/code\u003e) at 100% screen percentage. That’s a clear statement about its intended place in a production pipeline—it’s a render-time effect for final frames, not a lightweight gameplay Post-Process. When you’re running it that way, the quality holds up as a proper anamorphic look without temporal artifacts.\u003c/p\u003e\n\n\u003cp\u003eThat said, it is possible to use it in Real-Time. The trade-off appears in the form of flickering on thin or distant details when they fall out of focus, because the \u003ccode\u003eTemporalAA\u003c/code\u003e jitter is baked into the scene color within the Post-Process Material chain. If you need to run it live, the included \u003ccode\u003eAfter Tonemapping\u003c/code\u003e version of the Material reduces that flicker, but the Bokeh becomes less lively. So, if you’re planning a Real-Time showcase, you’ll likely be making a quality compromise.\u003c/p\u003e\n\n\u003ch2\u003eVersion Updates and Reference Material\u003c/h2\u003e\n\n\u003cp\u003eThe developer has been iterating on this system with regular updates. The Version 8 additions are shown in a dedicated video, and a separate clip demonstrates the \u003ccode\u003eDepth Sample Rejection\u003c/code\u003e feature that was added on April 27th. Those videos walk through the changes and give a practical sense of how the \u003ccode\u003eBlueprint\u003c/code\u003e behaves in motion. There’s also an updated example and tutorial linked from the main page, which is a good starting point if you’re setting this up for the first time.\u003c/p\u003e\n\n\u003cp\u003eBecause the \u003ccode\u003eBlueprint\u003c/code\u003e is meant to complement Unreal’s existing camera system, it’s not an isolated tool. You drop it into a scene, adjust the focus values to match your shot, and run it through the \u003ccode\u003eMovie Render Queue\u003c/code\u003e. The \u003ccode\u003eHLSL\u003c/code\u003e-based \u003ccode\u003eDOF\u003c/code\u003e does the anamorphic distortion that ordinary Cine Cameras don’t handle natively.\u003c/p\u003e\n\n\u003ch2\u003eDealing with Known UE5 Limitations\u003c/h2\u003e\n\n\u003cp\u003eThe developer is transparent about several known issues, especially when working in Unreal Engine 5 (UE5). One involves \u003ccode\u003eLumen\u003c/code\u003e: in scenes that rely heavily on screen traces, the \u003ccode\u003eLumen\u003c/code\u003e contribution can blow out because it traces against the blurred scene color. This is still under investigation, so heavy \u003ccode\u003eLumen\u003c/code\u003e users should test early before committing to a final render.\u003c/p\u003e\n\n\u003cp\u003eAnother UE5-specific issue appears when Temporal Super Resolution (TSR) is not the active Anti-Aliasing (AA) method. Intermittently, \u003ccode\u003eNaN\u003c/code\u003e values show up on the right and bottom edge of the \u003ccode\u003eViewport\u003c/code\u003e. This doesn’t happen in Unreal Engine 4 (UE4), and the developer is looking into it. If you’re using UE5 with a non-\u003ccode\u003eTSR\u003c/code\u003e \u003ccode\u003eAA\u003c/code\u003e setting, it’s worth checking edges in your frames during test renders.\u003c/p\u003e\n\n\u003cp\u003eThere’s also a note about Auto Exposure. The \u003ccode\u003eAnamorphic Cine Camera\u003c/code\u003e tends to appear brighter than a normal Cine Camera when Auto Exposure is enabled. The developer recommends manual exposure for Cinematic work, which is a common practice for consistent lighting anyway. If you do need Auto Exposure, it’s a known issue that’s still being worked on.\u003c/p\u003e\n\n\u003ch2\u003eWhere It Sits in Production\u003c/h2\u003e\n\n\u003cp\u003eFor a camera-related tool, the \u003ccode\u003eBlueprint\u003c/code\u003e lives somewhere between a plugin and a template. It gives you a specific lens behavior that you’d otherwise have to build and calibrate yourself. The inclusion of Bokeh attributes and the physical focus matching makes it a practical fit for Cinematics that need that anamorphic look without renting real anamorphic glass.\u003c/p\u003e\n\n\u003cp\u003eWhen you’re setting up a sequence, the main thing to remember is that this is a render-focused effect. Plan for \u003ccode\u003eMovie Render Queue\u003c/code\u003e output at full resolution, keep manual exposure in mind, and test your scene’s \u003ccode\u003eLumen\u003c/code\u003e settings early if you’re on UE5. With those steps, the \u003ccode\u003eBlueprint\u003c/code\u003e gives you a clear path to Anamorphic Depth of Field in a virtual camera.\u003c/p\u003e\n\n\u003ch2\u003eMore From The Same Workflow\u003c/h2\u003e\n\u003cul\u003e\n\u003cli\u003e\u003ca href=\"https://3dcghub.com/cinematic-cutscene-system/\" title=\"Cinematic Cutscene System\"\u003eCinematic Cutscene System\u003c/a\u003e\u003c/li\u003e\n\u003cli\u003e\u003ca href=\"https://3dcghub.com/bcd-closeup-camera/\" title=\"BCD Closeup Camera\"\u003eBCD Closeup Camera\u003c/a\u003e\u003c/li\u003e\n\u003cli\u003e\u003ca href=\"https://3dcghub.com/euphoria-close-combat/\" title=\"Euphoria - Close Combat\"\u003eEuphoria - Close Combat\u003c/a\u003e\u003c/li\u003e\n\u003cli\u003e\u003ca href=\"https://3dcghub.com/cinematic-duel-system/\" title=\"Cinematic Duel System\"\u003eCinematic Duel System\u003c/a\u003e\u003c/li\u003e\n\u003cli\u003e\u003ca href=\"https://3dcghub.com/freeflow-combat/\" title=\"Freeflow Combat\"\u003eFreeflow Combat\u003c/a\u003e\u003c/li\u003e\n\u003c/ul\u003e","contentTextLength":5364,"navigation":{"current":391,"total":3222,"previous":{"id":"1000939","slug":"atmospheric-horror-music","title":"Atmospheric Horror Music","category":"Music","platform":"Unreal Engine","updatedAt":"2026-08-10T02:59:50.290Z"},"next":{"id":"1000937","slug":"allosaurus-dinosaur-character-rig-and-animations","title":"Allosaurus Dinosaur Character Rig and Animations","category":"Creatures \u0026 Monsters","platform":"Unreal Engine","updatedAt":"2026-08-10T02:52:27.202Z"}},"relatedResources":[{"id":"10589","slug":"bcd-closeup-camera","title":"BCD Closeup Camera","category":"Gameplay Features","engine":"5.6+","assetVersion":"Engine version: 5.6+","engineVersion":"4.27","tag":"Gameplay Features","accent":"blue","visual":"character","summary":"Discover how BCD Closeup Camera streamlines the creation of complex cinematic shots for action games. This data-driven tool allows for dynamic execution and attack sequences without the need for level sequences or manual blueprint logic.","platform":"Unreal Engine","publishedAt":"2026-03-03T15:46:42.000Z","updatedAt":"2026-04-19T15:49:59.000Z","sourceNotes":[],"fileContents":[],"compatibility":["Unreal Engine","Engine version: 5.6+"],"featuredImage":{"alt":"BCD Closeup Camera","src":"https://3dcghub.com/wp-content/uploads/2026/03/231f265f-e78d-4deb-970e-4b137655fb9a.webp"},"hasDownloadLink":true,"downloads":0},{"id":"10637","slug":"cinematic-cutscene-system","title":"Cinematic Cutscene System","category":"Gameplay Features","engine":"5.3+","assetVersion":"Engine version: 5.3+","engineVersion":"4.26","tag":"Gameplay Features","accent":"blue","visual":"animation","summary":"Enhance your game's storytelling with the Cinematic Cutscene System. This tool enables developers to build immersive scenes without writing code or relying on complex Behavior Trees.","platform":"Unreal Engine","publishedAt":"2026-03-03T15:51:35.000Z","updatedAt":"2026-04-19T15:49:58.000Z","sourceNotes":[],"fileContents":[],"compatibility":["Unreal Engine","Engine version: 5.3+"],"featuredImage":{"alt":"Cinematic Cutscene System","src":"https://3dcghub.com/wp-content/uploads/2026/03/e35fc466-fe41-41bb-85f1-65815bca7292.webp"},"hasDownloadLink":true,"downloads":0},{"id":"1000820","slug":"euphoria-close-combat","title":"Euphoria - Close Combat","category":"Gameplay Features","engine":"5.3+","assetVersion":"","engineVersion":"Engine Version: 5.3+","tag":"Gameplay Features","accent":"blue","visual":"mech","summary":"A high fidelity data-driven close combat framework for realistic, cinematic Unreal Engine games with advanced environment interaction and Motion Warping Transfo","platform":"Unreal Engine","publishedAt":"2026-07-31T11:39:00.360Z","updatedAt":"2026-07-31T11:39:00.360Z","sourceNotes":[],"fileContents":[],"compatibility":["Unreal Engine","Engine Version: 5.3+"],"featuredImage":{"alt":"Euphoria - Close Combat","src":"/wp-content/uploads/published/2026/07/e2f9b34d706d-executionsystempreview-1920x1080-e8d62f36f0315be38-66dd487364.webp"},"hasDownloadLink":true,"downloads":0}]}
Gameplay Features
Anamorphic Depth of Field for Cinematics
A look at the Anamorphic Depth of Field for Cinematics Blueprint for Unreal Engine — HLSL-based physically accurate DOF, bokeh customization, and pipeline-focus
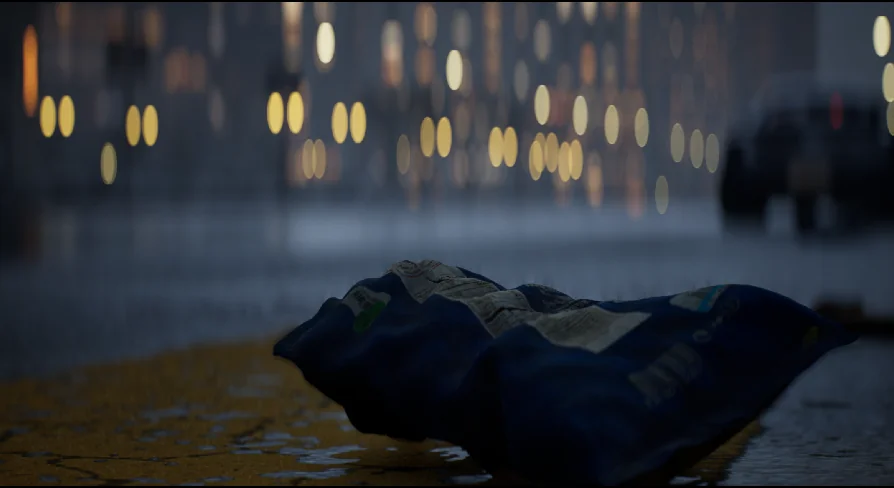
Matching the look of an anamorphic lens inside Unreal Engine usually means stacking Post-Process tricks or fighting the built-in Depth of Field (DOF). The Anamorphic Depth of Field for Cinematics Blueprint takes a more direct approach: it’s an Anamorphic Cine Camera Blueprint that emulates the Depth of Field of an anamorphic lens, complete with Bokeh customization options that let you switch between different combinations of attributes.
The core of the system is a custom DOF blur written in High-Level Shader Language (HLSL). It’s physically based, so the focus values line up with standard Unreal Cine Camera Depth of Field settings. That removes a lot of guesswork when you’re trying to match focal lengths and distances from a real production script.
A Physically Based DOF Written in HLSL
What sets this Blueprint apart is that it doesn’t fake the Depth of Field with a standard Post-Process Material. The DOF component is a custom blur written in HLSL, and it’s calibrated to behave like real optical physics. That means the focus distance, aperture, and other values behave similarly to what you’d get from Unreal’s own Cine Camera Depth of Field settings, but with an anamorphic twist.
The Bokeh customization options add another layer of control. Instead of 1 fixed look, you can cycle through a few combinations of attributes to get the oval Bokeh and horizontal flare characteristics associated with anamorphic lenses. For artists who need a specific lens signature, that extra flexibility is useful when you’re matching shots or trying to sell a particular vintage of optics.
Built for the Movie Render Queue Pipeline
This system is suited to Cinematic renders through the Movie Render Queue (MRQ) at 100% screen percentage. That’s a clear statement about its intended place in a production pipeline—it’s a render-time effect for final frames, not a lightweight gameplay Post-Process. When you’re running it that way, the quality holds up as a proper anamorphic look without temporal artifacts.
That said, it is possible to use it in Real-Time. The trade-off appears in the form of flickering on thin or distant details when they fall out of focus, because the TemporalAA jitter is baked into the scene color within the Post-Process Material chain. If you need to run it live, the included After Tonemapping version of the Material reduces that flicker, but the Bokeh becomes less lively. So, if you’re planning a Real-Time showcase, you’ll likely be making a quality compromise.
Version Updates and Reference Material
The developer has been iterating on this system with regular updates. The Version 8 additions are shown in a dedicated video, and a separate clip demonstrates the Depth Sample Rejection feature that was added on April 27th. Those videos walk through the changes and give a practical sense of how the Blueprint behaves in motion. There’s also an updated example and tutorial linked from the main page, which is a good starting point if you’re setting this up for the first time.
Because the Blueprint is meant to complement Unreal’s existing camera system, it’s not an isolated tool. You drop it into a scene, adjust the focus values to match your shot, and run it through the Movie Render Queue. The HLSL-based DOF does the anamorphic distortion that ordinary Cine Cameras don’t handle natively.
Dealing with Known UE5 Limitations
The developer is transparent about several known issues, especially when working in Unreal Engine 5 (UE5). One involves Lumen: in scenes that rely heavily on screen traces, the Lumen contribution can blow out because it traces against the blurred scene color. This is still under investigation, so heavy Lumen users should test early before committing to a final render.
Another UE5-specific issue appears when Temporal Super Resolution (TSR) is not the active Anti-Aliasing (AA) method. Intermittently, NaN values show up on the right and bottom edge of the Viewport. This doesn’t happen in Unreal Engine 4 (UE4), and the developer is looking into it. If you’re using UE5 with a non-TSRAA setting, it’s worth checking edges in your frames during test renders.
There’s also a note about Auto Exposure. The Anamorphic Cine Camera tends to appear brighter than a normal Cine Camera when Auto Exposure is enabled. The developer recommends manual exposure for Cinematic work, which is a common practice for consistent lighting anyway. If you do need Auto Exposure, it’s a known issue that’s still being worked on.
Where It Sits in Production
For a camera-related tool, the Blueprint lives somewhere between a plugin and a template. It gives you a specific lens behavior that you’d otherwise have to build and calibrate yourself. The inclusion of Bokeh attributes and the physical focus matching makes it a practical fit for Cinematics that need that anamorphic look without renting real anamorphic glass.
When you’re setting up a sequence, the main thing to remember is that this is a render-focused effect. Plan for Movie Render Queue output at full resolution, keep manual exposure in mind, and test your scene’s Lumen settings early if you’re on UE5. With those steps, the Blueprint gives you a clear path to Anamorphic Depth of Field in a virtual camera.
 Gameplay Features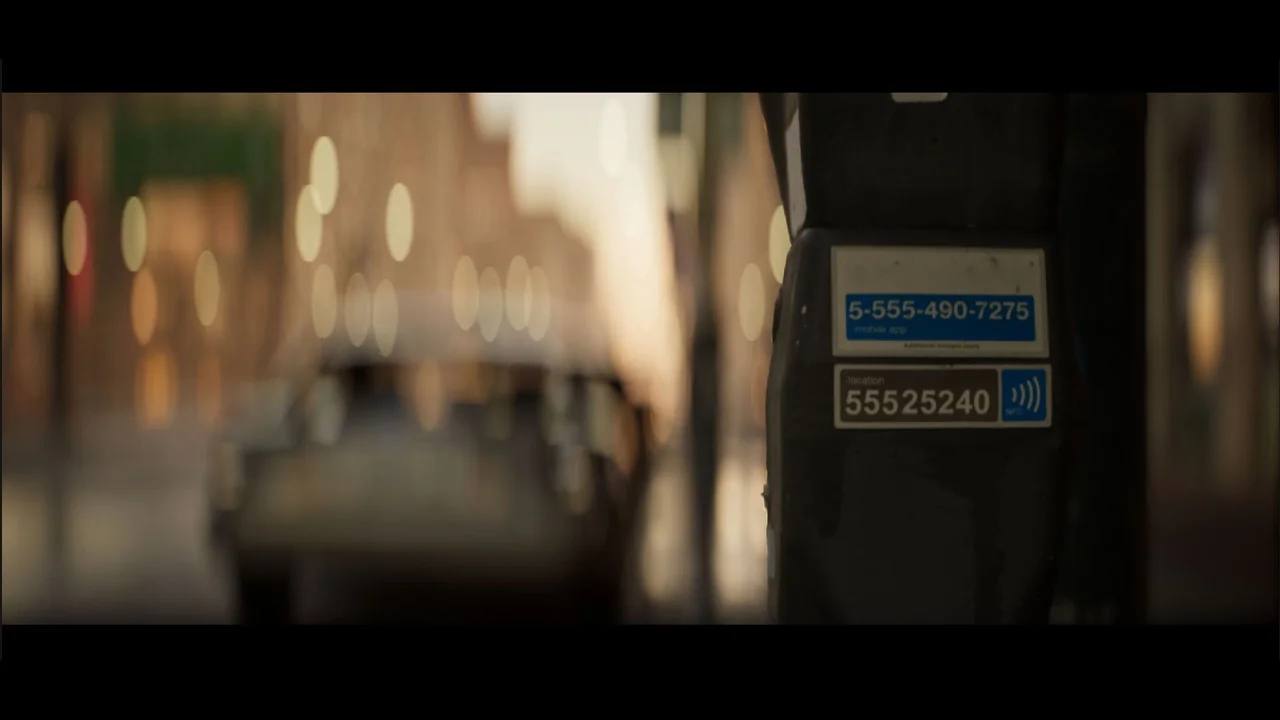
 Gameplay Features
 Gameplay Features
 Gameplay Features